How To Install Gnome on Ubuntu 24.04 LTS

In this tutorial, we will show you how to install Gnome on Ubuntu 24.04 LTS. GNOME, a powerful and intuitive desktop environment, has become the default choice for Ubuntu users with the release of Ubuntu 24.04. This open-source desktop environment offers a sleek and modern user interface, along with a wide range of customization options and productivity features.
This article assumes you have at least basic knowledge of Linux, know how to use the shell, and most importantly, you host your site on your own VPS. The installation is quite simple and assumes you are running in the root account, if not you may need to add ‘sudo‘ to the commands to get root privileges. I will show you the step-by-step installation of Gnome on Ubuntu 24.04 (Noble Numbat). You can follow the same instructions for Ubuntu 22.04 and any other Debian-based distribution like Linux Mint, Elementary OS, Pop!_OS, and more as well.
Prerequisites
- A server running one of the following operating systems: Ubuntu and any other Debian-based distribution like Linux Mint.
- It’s recommended that you use a fresh OS install to prevent any potential issues.
- At least 4 GB of RAM and 20 GB of free disk space.
- SSH access to the server (or just open Terminal if you’re on a desktop).
- An active internet connection. You’ll need an internet connection to download the necessary packages and dependencies.
- An Ubuntu 24.04 system with root access or a user with sudo privileges.
Install Gnome on Ubuntu 24.04 LTS
Step 1. Updating the Package Repository.
To ensure a smooth installation process, it is essential to update your system packages to their latest versions. Open a terminal and execute the following commands:
sudo apt update
sudo apt upgrade
The apt update command refreshes the package list, while apt upgrade installs the available updates. This step helps resolve any dependency issues and provides access to the latest security patches and bug fixes.
Step 2. Installing Gnome on Ubuntu 24.04.
- Method 1: Installing Full GNOME Desktop.
Once the update is complete, enter the following command to install the full GNOME desktop package:
sudo apt install ubuntu-gnome-desktop
The full GNOME desktop installation includes a wide range of applications and utilities, such as LibreOffice for productivity, Firefox for web browsing, and various multimedia tools. Keep in mind that this installation may require around 2GB of disk space.
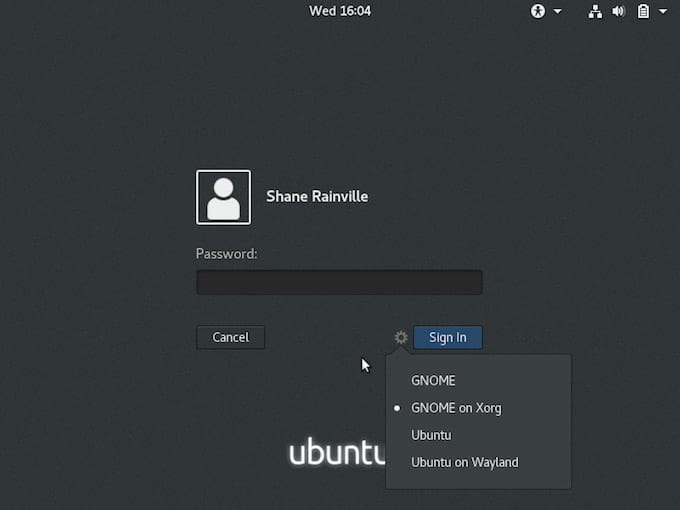
After the installation is complete, restart your system. On the login screen, click on the gear icon and select the “GNOME” session from the list of available desktop environments.
- Method 2: Installing GNOME Desktop Minimal.
For users who prefer a lightweight GNOME experience, installing the minimal GNOME desktop package is a great option. To install the minimal GNOME desktop package, enter the following command:
sudo apt install gnome-session
The minimal installation provides a basic GNOME desktop environment without the extra applications and utilities, making it a good choice for users with limited disk space or those who prefer a more streamlined experience.
After the installation is complete, restart your system and select the “GNOME Minimal” session from the login screen.
- Method 3: Installing Vanilla GNOME.
For users who want to experience GNOME in its purest form, installing the vanilla GNOME package is the way to go. Vanilla GNOME offers a minimalistic and unaltered desktop environment, allowing for greater customization and control. Follow these steps to install vanilla GNOME:
sudo apt install gnome-session gnome-shell
To enhance your vanilla GNOME experience, consider installing the GNOME Tweaks tool, which provides additional customization options:
sudo apt install gnome-tweaks
After the installation is complete, restart your system and select the “GNOME on Xorg” session from the login screen.

Launch the GNOME Tweaks tool to customize various aspects of your desktop environment, such as the theme, icons, fonts, and extensions. Experiment with different settings to create a personalized GNOME experience that suits your preferences.
Step 3. Troubleshooting.
While installing and using GNOME on Ubuntu 24.04 is generally a smooth process, you may encounter some common issues. Here are a few troubleshooting tips to help you resolve them:
-
- Missing extensions: If you find that certain GNOME extensions are missing or not working correctly, try updating your system and reinstalling the extensions from the official GNOME Extensions website.
- UI glitches: If you experience any visual glitches or display issues with GNOME, try updating your graphics drivers to the latest version. You can also try switching between the Xorg and Wayland display servers to see if the issue persists.
- Performance issues: If GNOME feels sluggish or unresponsive, consider reducing the number of extensions and customizations you have enabled. You can also try installing the GNOME Tweaks tool and adjusting the animation and performance settings to optimize your experience.
Congratulations! You have successfully installed Gnome. Thanks for using this tutorial for installing Gnome on the Ubuntu 24.04 LTS system. For additional help or useful information, we recommend you check the Gnome website.