How To Install Jenkins on Fedora 38

In this tutorial, we will show you how to install Jenkins on Fedora 38. For those of you who didn’t know, In the dynamic landscape of software development, efficiency and automation are paramount. Enter Jenkins, the time-tested open-source automation server that empowers developers by automating a range of tasks, from building and testing code to deployment.
This article assumes you have at least basic knowledge of Linux, know how to use the shell, and most importantly, you host your site on your own VPS. The installation is quite simple and assumes you are running in the root account, if not you may need to add ‘sudo‘ to the commands to get root privileges. I will show you the step-by-step installation of Jenkins on a Fedora 38.
Prerequisites
- A server running one of the following operating systems: Fedora 38.
- It’s recommended that you use a fresh OS install to prevent any potential issues.
- SSH access to the server (or just open Terminal if you’re on a desktop).
- An active internet connection. You’ll need an internet connection to download the necessary packages and dependencies for Jenkins.
- A
non-root sudo useror access to theroot user. We recommend acting as anon-root sudo user, however, as you can harm your system if you’re not careful when acting as the root.
Install Jenkins on Fedora 38
Step 1. Before we can install Jenkins on Fedora 38, it’s important to ensure that our system is up-to-date with the latest packages. This will ensure that we have access to the latest features and bug fixes and that we can install Jenkins without any issues:
sudo dnf update
Step 2. Installing Java.
Jenkins, being a Java-based application, requires the Java Development Kit. Install OpenJDK 17, a widely used Java variant, with this command:
sudo dnf install java-17-openjdk
The Java Development Kit lays the foundation for Jenkins to run seamlessly on your system.
Step 3. Installing Jenkins on Fedora 38.
To access the latest version of Jenkins, you’ll need to add the Jenkins repository. Begin by importing the Jenkins repository key:
sudo rpm --import https://pkg.jenkins.io/redhat-stable/jenkins.io-2023.key
Then, add the Jenkins repository with this command:
sudo wget -O /etc/yum.repos.d/jenkins.repo \
    https://pkg.jenkins.io/redhat-stable/jenkins.repo
With the repository added, proceed to install Jenkins:
sudo dnf install jenkins
Once the Jenkins is installed, start and enable the Jenkins service with the following command.
sudo systemctl start jenkins
sudo systemctl enable jenkins
Step 4. Open Firewall Port.
As Jenkins operates through a web interface, it requires a designated port, typically 8080, to communicate. Open this port using Firewalld:
sudo firewall-cmd --zone=public --add-port=8080/tcp --permanent
sudo firewall-cmd --reload
Step 5. Initial Jenkins Setup.
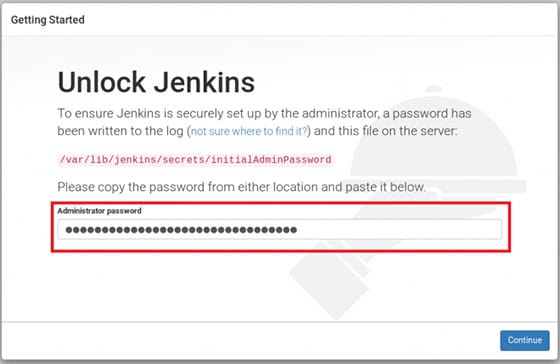
Guide the user through the initial setup in the web browser. Provide the URL to access Jenkins and the initial admin password location:
http://your_server_ip:8080

Explain how to retrieve the initial admin password:
sudo cat /var/lib/jenkins/secrets/initialAdminPassword
Step 6. Troubleshooting Tips.
-
Issue: Jenkins fails to start. Solution: Check if Java is properly installed and the JAVA_HOME environment variable is set correctly. Additionally, examine Jenkins logs for insights into the issue.
-
Issue: Unable to access Jenkins web interface. Solution: Ensure the firewall port (8080/tcp) is open, and the correct IP address is used in the browser. Double-check the initial admin password as well.
-
Issue: Plugins not functioning as expected. Solution: Verify the compatibility of the plugins with the Jenkins version. Updating or reinstalling plugins might resolve the issue.
Congratulations! You have successfully installed Jenkins. Thanks for using this tutorial for installing Jenkins on your Fedora 38 system. For additional help or useful information, we recommend you check the official Jenkins website.