How To Install Jira on AlmaLinux 9

Jira is a powerful project management tool developed by Atlassian, widely used for tracking issues, managing projects, and collaborating with teams. Whether you’re a developer or a project manager, installing Jira on a stable Linux distribution like AlmaLinux 9 can significantly improve your team’s productivity. In this guide, we will walk you through the process of installing Jira on AlmaLinux 9 using a clean and efficient method.
Prerequisites
System Requirements
Before starting the installation process, ensure that your server meets the following minimum hardware requirements:
- CPU: 2 cores (recommended: 4 cores)
- RAM: 4 GB (recommended: 8 GB or more for large teams)
- Disk Space: At least 10 GB of free space for Jira installation and logs.
Software Requirements
The following software requirements must be met:
- An updated version of AlmaLinux 9.
- Java Development Kit (JDK) or Java Runtime Environment (JRE) version 11 or higher.
User Privileges
You will need root or sudo privileges to install and configure Jira on your system.
Step 1: Update AlmaLinux System
It’s essential to update your system packages to ensure you have the latest security patches and features. Run the following command:
sudo dnf update -yThis command will update all installed packages to their latest versions.
Step 2: Install Java on AlmaLinux 9
Jira requires Java to run. We will install OpenJDK 11, which is compatible with Jira.
sudo dnf install java-11-openjdk-devel -yAfter installation, verify that Java is installed correctly by running:
java -versionYou should see output similar to this:
openjdk version "11.0.x" OpenJDK Runtime Environment...Next, set the JAVA_HOME environment variable:
export JAVA_HOME=/usr/lib/jvm/java-11-openjdkStep 3: Download Jira Software
You can download the latest version of Jira directly from Atlassian’s website or use the wget command:
wget https://www.atlassian.com/software/jira/downloads/binary/atlassian-jira-software-x.x.x-x64.binThis command will download the latest version of Jira. Replace “x.x.x” with the actual version number.
Step 4: Make Jira Installer Executable
The downloaded file needs executable permissions before it can be run. Use the following command to make it executable:
chmod +x atlassian-jira-software-x.x.x-x64.binStep 5: Install Jira on AlmaLinux 9
Now that the installer is executable, start the installation process by running:
sudo ./atlassian-jira-software-x.x.x-x64.binSelect Installation Type
The installer will prompt you to choose between an Express Install (default settings) or Custom Install. For most users, Express Install is recommended unless you want to customize directories and ports.
- Installation Directory:
/opt/atlassian/jira(default) - Home Directory:
/var/atlassian/application-data/jira(default) - HTTP Port: 8080 (default)
- RMI Port: 8005 (default)
- Run as service: Yes (recommended)
If you choose Custom Install, follow the prompts to specify these settings manually.
Start Jira Service Manually (If Not Set as a Service)
If you did not configure Jira to run as a service during installation, start it manually using:
sudo /etc/init.d/jira startStep 6: Configure Firewall for Jira Access
If you’re running a firewall on your server, you’ll need to allow traffic through port 8080 so that you can access Jira from a web browser.
Allow HTTP Port Through Firewall
sudo firewall-cmd --permanent --add-port=8080/tcp
sudo firewall-cmd --reload
sudo firewall-cmd --list-all
Step 7: Access Jira Web Interface
You can now access the Jira web interface by opening a browser and navigating to:
http://<your-server-ip>:8080
Initial Setup Wizard
The first time you access Jira, you’ll be greeted by an initial setup wizard. Here you can choose between two options:
- “Set it up for me” – Recommended for beginners as it configures most settings automatically.
- “I’ll set it up myself” – Allows more control over the setup process, including database configuration.
Step 8: Set Up PostgreSQL Database for Jira
If you chose manual setup in step 7, you’ll need to configure an external database for Jira. We recommend using PostgreSQL for production environments.
Install PostgreSQL on AlmaLinux 9
sudo dnf install postgresql-server postgresql-contrib -y
sudo postgresql-setup --initdb --unit postgresql
sudo systemctl start postgresql
sudo systemctl enable postgresql
Create Database and User for Jira
sudo su - postgres
psql
CREATE DATABASE jiradb;
CREATE USER jirauser WITH PASSWORD 'password';
GRANT ALL PRIVILEGES ON DATABASE jiradb TO jirauser;
\q
exit
Edit PostgreSQL Configuration Files for Remote Connections (Optional)
If you’re running PostgreSQL on a different server than your Jira instance, you’ll need to modify the following files in your PostgreSQL configuration directory (/var/lib/pgsql/data/pg_hba.conf):
- Add `
host all all <your-jira-ip>/32 md5` at the end of `pg_hba.conf`. - Edit `
postgresql.conf` to listen on all IP addresses (`listen_addresses = '*'`). Restart PostgreSQL after making changes.
Step 9: Complete Setup in Browser
The final step is completing the setup through the browser interface. Follow these steps:
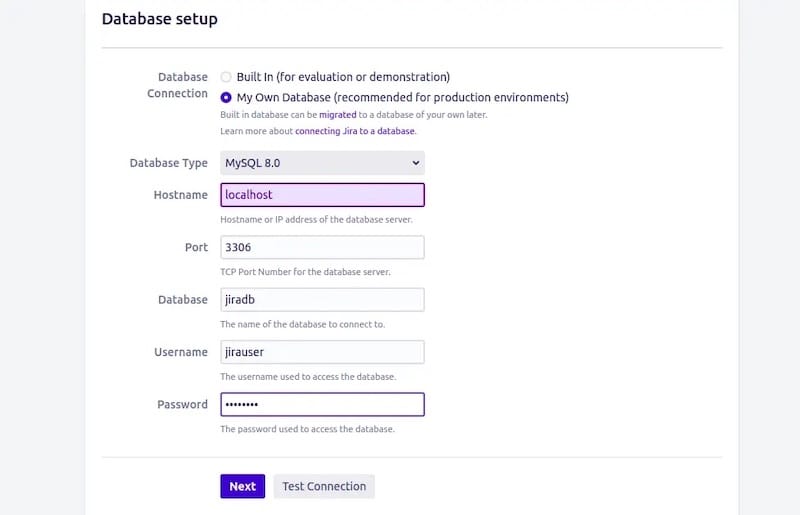
- Select PostgreSQL as your database type and enter connection details such as database name (`
jiradb`), username (`jirauser`), and password. - Add your license key from Atlassian when prompted.
- Create an admin account for managing your new Jira instance.
Step 10: Configure Jira as a Service on AlmaLinux 9
If you didn’t enable it during installation, you can configure Jira to start automatically at boot using systemd commands:
sudo systemctl enable jira.service
sudo systemctl start jira.service
sudo systemctl status jira.service
Troubleshooting Common Issues During Installation
Error: Port Conflicts with Existing Services
- If port `8080` is already in use by another service, modify the default port in the `server.xml` file located in `
/opt/atlassian/jira/conf/server.xml`. Find this line:
<Connector port="8080" ... />Edit the port number and restart the service with `systemctl restart jira.service`.
Error: Memory Allocation Issues
- If you’re encountering memory-related errors during startup or usage of Jira, adjust JVM memory allocation settings in `/
opt/atlassian/jira/bin/setenv.sh`. Increase values for `-Xms` (initial memory allocation) and `-Xmx` (maximum memory allocation).
Congratulations! You have successfully installed Jira. Thanks for using this tutorial for installing the Jira project management tool on your AlmaLinux 9 system. For additional or useful information, we recommend you check the official Jira website.