How To Install Joomla on Debian 12

Joomla is a powerful and versatile content management system (CMS) that allows you to create and manage dynamic websites with ease. Debian 12, also known as “Bookworm,” is a stable and secure Linux distribution that provides an excellent foundation for hosting web applications. In this comprehensive guide, we’ll walk you through the process of installing Joomla on Debian 12, ensuring you have a robust and efficient web platform for your projects.
Prerequisites
Before we begin the installation process, let’s ensure you have everything you need:
- A Debian 12 server with root access or sudo privileges
- At least 2GB of RAM (4GB recommended for optimal performance)
- Minimum 20GB of free disk space
- A domain name pointed to your server’s IP address
You’ll also need to install some essential software packages, which we’ll cover in the next section. It’s crucial to have the necessary permissions to modify system files and install software on your Debian 12 server.
Preparing the Debian 12 Environment
To ensure a smooth installation process, we’ll start by updating your Debian 12 system and installing the required dependencies.
1. Update the System
Open a terminal and run the following commands:
sudo apt update
sudo apt upgrade -y
This will update your package lists and upgrade all installed packages to their latest versions.
2. Install Essential Packages
Install some necessary tools and libraries:
sudo apt install wget unzip -y3. Configure the Firewall
If you’re using UFW (Uncomplicated Firewall), allow HTTP and HTTPS traffic:
sudo ufw allow 80/tcp
sudo ufw allow 443/tcp
sudo ufw reload
Setting Up the LAMP Stack
Joomla requires a LAMP (Linux, Apache, MySQL, PHP) stack to function. Let’s install and configure each component.
1. Install Apache Web Server
sudo apt install apache2 -y
sudo systemctl start apache2
sudo systemctl enable apache2
Verify that Apache is running by visiting your server’s IP address in a web browser. You should see the default Apache page.
2. Install MySQL/MariaDB
sudo apt install mariadb-server mariadb-client -y
sudo systemctl start mariadb
sudo systemctl enable mariadb
Secure your MySQL installation:
sudo mysql_secure_installationFollow the prompts to set a root password and remove insecure default settings.
3. Install PHP and Required Modules
sudo apt install php php-cli php-fpm php-json php-common php-mysql php-zip php-gd php-mbstring php-curl php-xml php-pear php-bcmath -y4. Test the LAMP Stack
Create a PHP info file to verify your PHP installation:
echo "" | sudo tee /var/www/html/phpinfo.phpVisit http://your_server_ip/phpinfo.php in your browser. If you see the PHP information page, your LAMP stack is working correctly. Remember to remove this file after testing for security reasons:
sudo rm /var/www/html/phpinfo.phpCreating a Database for Joomla
Joomla requires a database to store its content and configuration. Let’s create one using MySQL.
1. Access MySQL
sudo mysql -u root -pEnter the root password you set during the MySQL secure installation.
2. Create a New Database
Run the following SQL commands:
CREATE DATABASE joomla_db;
CREATE USER 'joomla_user'@'localhost' IDENTIFIED BY 'your_strong_password';
GRANT ALL PRIVILEGES ON joomla_db.* TO 'joomla_user'@'localhost';
FLUSH PRIVILEGES;
EXIT;
Replace ‘your_strong_password‘ with a secure password of your choice.
Downloading and Extracting Joomla
Now that our environment is ready, let’s download and set up the Joomla files.
1. Download Joomla
cd /tmp
wget https://downloads.joomla.org/cms/joomla5/5-2-0/Joomla_5-2-0-Stable-Full_Package.zip
Note: Check the official Joomla download page for the latest version and update the URL accordingly.
2. Extract the Files
unzip Joomla_5-2-0-Stable-Full_Package.zip -d /var/www/html/joomla3. Set Proper Permissions
sudo chown -R www-data:www-data /var/www/html/joomla
sudo chmod -R 755 /var/www/html/joomla
Configuring Apache for Joomla
To serve your Joomla site, we need to create an Apache virtual host configuration.
1. Create a Virtual Host File
sudo nano /etc/apache2/sites-available/joomla.confAdd the following configuration, replacing your_domain.com with your actual domain:
<VirtualHost *:80>
    ServerName your_domain.com
    ServerAlias www.your_domain.com
    DocumentRoot /var/www/html/joomla

    <Directory /var/www/html/joomla>
        Options FollowSymlinks
        AllowOverride All
        Require all granted
    </Directory>

    ErrorLog ${APACHE_LOG_DIR}/joomla_error.log
    CustomLog ${APACHE_LOG_DIR}/joomla_access.log combined
</VirtualHost>
2. Enable the Virtual Host
sudo a2ensite joomla.conf
sudo a2enmod rewrite
3. Restart Apache
sudo systemctl restart apache2Running the Joomla Installation Wizard
With everything set up, it’s time to run the Joomla installation wizard.
1. Access the Joomla Installation Page
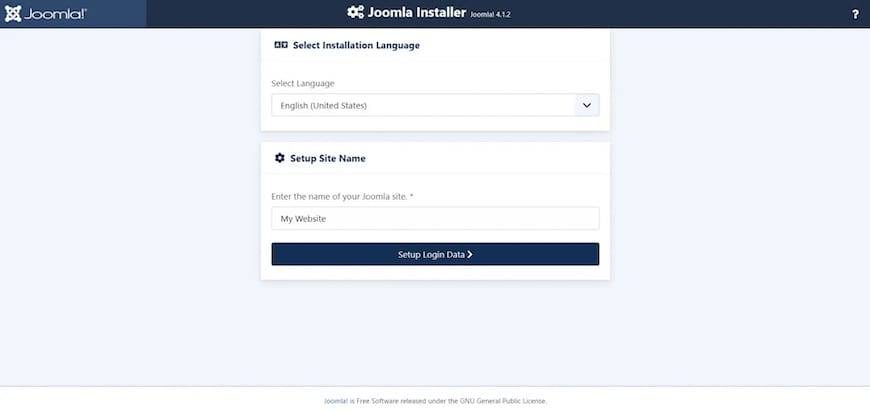
Open your web browser and navigate to http://your_domain.com. You should see the Joomla installation page.

2. Configure Site Settings
- Choose your site name, description, and admin credentials
- Select your default language
3. Database Configuration
Enter the database details you created earlier:
- Database Type: MySQLi
- Host Name: localhost
- Username: joomla_user
- Password: your_strong_password
- Database Name: joomla_db
4. Finalize the Installation
Review your settings and click “Install” to complete the process. Once finished, you’ll see a success message.
Post-Installation Tasks
After successfully installing Joomla, there are a few important tasks to complete:
1. Remove the Installation Directory
sudo rm -rf /var/www/html/joomla/installation2. Configure SEF URLs
To enable Search Engine Friendly (SEF) URLs:
- Log in to your Joomla admin panel
- Go to System > Global Configuration
- Click on the “SEO Settings” tab
- Set “Search Engine Friendly URLs” to “Yes”
- Set “Use URL rewriting” to “Yes”
- Save your changes
Securing Your Joomla Installation
Security should be a top priority for any website. Here are some essential steps to secure your Joomla installation:
1. Keep Joomla and Extensions Updated
Regularly check for and install updates for Joomla core and all installed extensions. This helps protect against known vulnerabilities.
2. Implement Strong Passwords
Use strong, unique passwords for all user accounts, especially administrative ones. Consider using a password manager to generate and store complex passwords securely.
3. Enable Two-Factor Authentication
Joomla supports two-factor authentication (2FA) out of the box. Enable this feature for all administrative accounts to add an extra layer of security.
4. Regular Backups
Set up automated backups of your Joomla database and files. Store backups in a secure, off-site location to ensure you can recover your site in case of any issues.
Troubleshooting Common Issues
Even with careful installation, you might encounter some issues. Here are solutions to common problems:
Database Connection Errors
If you’re seeing database connection errors, double-check your configuration.php file in the Joomla root directory. Ensure the database credentials are correct.
Permission-Related Problems
If you’re having issues uploading files or installing extensions, it might be due to incorrect file permissions. Try adjusting permissions with:
sudo find /var/www/html/joomla -type f -exec chmod 644 {} \;
sudo find /var/www/html/joomla -type d -exec chmod 755 {} \;
sudo chown -R www-data:www-data /var/www/html/joomla
PHP Configuration Issues
Joomla requires specific PHP settings. If you’re experiencing PHP-related errors, check your php.ini file and ensure it meets Joomla’s requirements. You can find these in the Joomla documentation.
Congratulations! You have successfully installed Joomla. Thanks for using this tutorial for installing the Joomla 5 CMS on Debian 12 system. For additional help or useful information, we recommend you check the Joomla website.