How To Install Jupyter Notebook on Fedora 39

In this tutorial, we will show you how to install Jupyter Notebook on Fedora 39. For those of you who didn’t know, Jupyter Notebook is an open-source web application, that has become an essential tool for data scientists, programmers, and researchers. It allows you to create and share documents that contain live code, equations, visualizations, and narrative text. If you’re running Fedora 39 and eager to harness the power of Jupyter Notebook, you’re in the right place.
This article assumes you have at least basic knowledge of Linux, know how to use the shell, and most importantly, you host your site on your own VPS. The installation is quite simple and assumes you are running in the root account, if not you may need to add ‘sudo‘ to the commands to get root privileges. I will show you the step-by-step installation of the Jupyter Notebook on a Fedora 39.
Prerequisites
- A server running one of the following operating systems: Fedora 39.
- It’s recommended that you use a fresh OS install to prevent any potential issues.
- SSH access to the server (or just open Terminal if you’re on a desktop).
- A working internet connection is essential to download the necessary packages.
- A
non-root sudo useror access to theroot user. We recommend acting as anon-root sudo user, however, as you can harm your system if you’re not careful when acting as the root.
Install Jupyter Notebook on Fedora 39
Step 1. Before we can install Jupyter Notebook on Fedora 39, it’s important to ensure that our system is up-to-date with the latest packages. This will ensure that we have access to the latest features and bug fixes and that we can install Jupyter Notebook without any issues:
sudo dnf update
Step 2. Installing Python.
To install Python on Fedora 39, you can use DNF (Dandified YUM), Fedora’s package manager. Open your terminal and run:
sudo dnf install python3
This command installs Python 3, which is the latest version at the time of writing. Once the installation is complete, you’ll have Python at your disposal.
To manage Python packages, you’ll need Pip, the Python package manager. Install Pip by running the following command in your terminal:
sudo dnf install python3-pip
Pip allows you to easily install and manage Python packages, making it an essential tool for our Jupyter Notebook installation.
Step 3. Creating a Virtual Environment.
Virtual environments are crucial for isolating Python dependencies between different projects. This isolation prevents conflicts and ensures a clean setup. To create a virtual environment, we’ll use the venv module. In your terminal, navigate to the directory where you want to create the environment and run the following command:
python -m venv myenv
Replace myenv with a name of your choice. This name will be the directory where your virtual environment is stored.
Once you’ve created the virtual environment, you need to activate it. This step is crucial because it ensures that any Python packages you install are contained within this environment, rather than being installed system-wide. Activate the virtual environment with the following command:
source myenv/bin/activate
You’ll notice that your command prompt changes, indicating that the virtual environment is now active. This change ensures that any Python packages you install are specific to this environment.
Step 4. Installing Jupyter Notebook on Fedora 39.
With the virtual environment activated, you can now proceed to install Jupyter Notebook using Pip:
pip install jupyter
Pip will fetch and install the Jupyter Notebook and its dependencies. This may take a moment, but it’s an automated process.
After the installation is complete, you can verify that the Jupyter Notebook is installed correctly by running:
jupyter --version
Step 5. Configuring Jupyter Notebook.
Jupyter Notebook can be customized to fit your specific needs. Configuring it allows you to set up security, specify default settings, and tailor it to your preferences.
To configure Jupyter Notebook, you’ll need to generate a configuration file. This file stores your settings and options. You can create one using the following command:
jupyter notebook --generate-config
This command creates a configuration file at ~/.jupyter/jupyter_notebook_config.py. You can now edit this file to customize your Jupyter Notebook settings.
Step 6. Launching the Jupyter Notebook Server.
To start the Jupyter Notebook server, open your terminal, ensure your virtual environment is active, and run the following command:
jupyter notebook
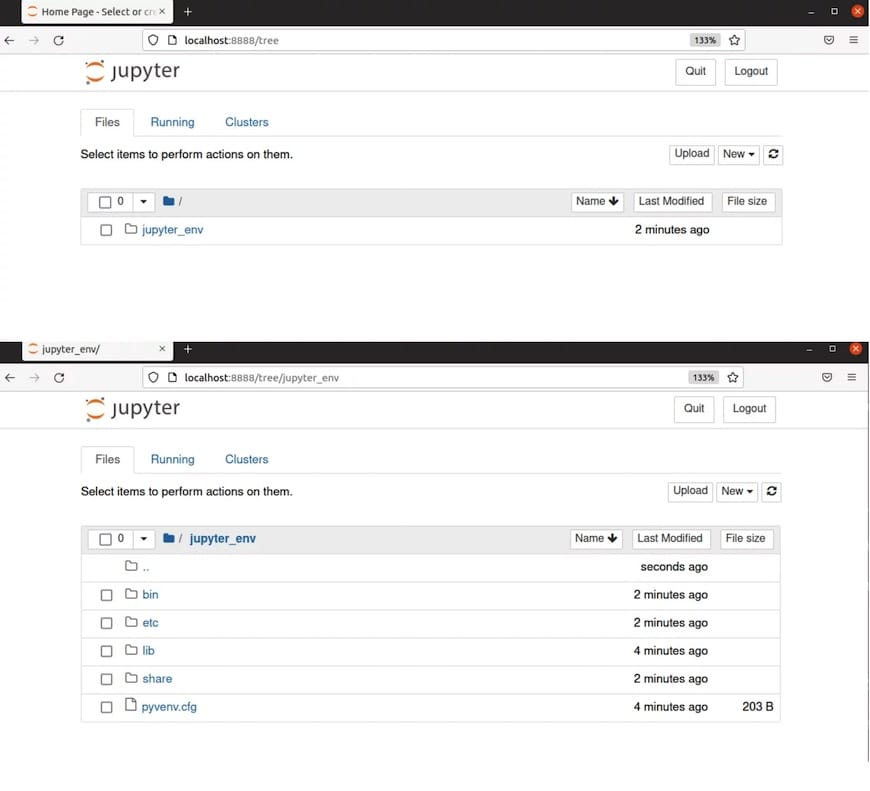
Once the server is running, open your web browser and navigate to the following URL:
http://localhost:8888
This is the default address and port for Jupyter Notebook. If you customized the IP and port in the configuration file, use the one you specified.
You’ll be prompted to enter the password you set earlier, and once authenticated, you’ll be greeted with the Jupyter Notebook interface in your web browser.

Congratulations! You have successfully installed Jupyter. Thanks for using this tutorial for installing the Jupyter Notebook on your Fedora 39 system. For additional help or useful information, we recommend you check the official Jupyter website.