How To Install LocalSend on openSUSE
![]()
LocalSend is a powerful cross-platform file sharing tool that enables seamless transfer of files between devices on a local network without relying on external servers. This guide provides a thorough walkthrough of installing LocalSend on openSUSE Linux distributions, exploring multiple methods and configurations to ensure successful implementation. LocalSend offers an open-source alternative to proprietary solutions like AirDrop, making it particularly valuable for Linux users who need to share files across different operating systems and devices.
Introduction to LocalSend
LocalSend represents a significant advancement in local network file sharing applications, designed to work across multiple platforms including Linux, Windows, macOS, Android, and iOS. As an open-source solution licensed under the Apache License 2.0, it enables users to share files directly between devices without requiring internet connectivity or central servers. This peer-to-peer approach prioritizes privacy and security while maintaining ease of use.
For openSUSE users, LocalSend provides a valuable addition to the system toolkit, enabling seamless file transfers between your Linux machine and other devices regardless of their operating system. Unlike many proprietary alternatives, LocalSend respects user privacy with no ads, tracking, or hidden costs. The application’s cross-platform compatibility makes it particularly valuable in mixed-device environments, solving the common problem of sharing files between Linux and non-Linux systems.
The application utilizes local area network discovery to automatically detect nearby devices running LocalSend, eliminating the need for complex configuration or account creation. With its integrated encryption capabilities, the tool ensures that file transfers remain secure and private. As of its current version, LocalSend has established itself as a reliable solution for local file sharing needs across the open-source community.
Understanding LocalSend Functionality
LocalSend operates through a straightforward mechanism that distinguishes it from traditional file-sharing methods. When launched, the application creates a local server on your device and broadcasts its presence on the local network. Other devices running LocalSend can discover this broadcast, establishing direct connections between them without routing through external servers. This architecture ensures that all data transfers remain within your local network, enhancing both speed and privacy.
The application interface divides into three main tabs: receive, send, and settings. The receive tab allows you to view incoming file requests and access previously received files. The send tab enables you to select files, folders, text, or clipboard content to transfer to other devices on the network. The settings tab provides customization options for the application’s behavior, appearance, and security features.
When sending files, LocalSend displays all discoverable devices on the network, allowing you to select one or multiple recipients. The receiving device then receives a notification requesting permission to accept the incoming files, giving users control over what they download. This consent-based approach enhances security by preventing unwanted file transfers.
LocalSend offers notable functionality beyond basic file sharing. Users can share text and clipboard content directly between devices, facilitating quick information exchange without creating separate files. The application also provides options to share via links when recipients don’t have LocalSend installed, though this method lacks the security benefits of direct device-to-device transfers.
For openSUSE users, LocalSend integrates with the desktop environment, particularly showing excellent theme integration with KDE Plasma. This integration creates a cohesive user experience that feels native to the openSUSE environment.
Installation Prerequisites
Before installing LocalSend on openSUSE, several preparatory steps ensure a smooth implementation. First, verify your openSUSE version, as installation methods may vary slightly between Leap and Tumbleweed distributions. This guide applies to both versions, but command specifics might differ slightly based on your release.
Your system requires functioning network connectivity, preferably with other devices on the same local network to take advantage of LocalSend’s capabilities. While internet access isn’t necessary for basic functionality, it facilitates the initial installation process for certain methods.
LocalSend requires specific firewall configurations to function properly. The application uses ports 53317 for both TCP and UDP protocols to discover devices and transfer files. Ensure these ports are open in your firewall configuration. For openSUSE’s default firewall, this typically involves using firewall-config or terminal commands to adjust the settings.
Depending on your chosen installation method, you may need to install additional package managers. For Flatpak installation, ensure flatpak is installed on your system. Similarly, for Snap installation, the snapd package must be present. These package management systems are not always installed by default on openSUSE.
Sufficient storage space is also necessary for both the application installation and subsequent file transfers. While LocalSend itself has a relatively small footprint, ensure you have adequate space for the files you intend to share. Additionally, administrative privileges (sudo access) are required for most installation methods.
Installing LocalSend via AppImage
The AppImage installation method offers significant advantages for openSUSE users, particularly for those using the KDE Plasma desktop environment. According to user experiences, the AppImage version integrates better with system themes and avoids common interface inconsistencies found in containerized applications. This method requires no complex package management and provides a self-contained executable that runs directly.
To begin the AppImage installation, navigate to the official LocalSend website using your web browser. The download page offers various installation options for different platforms. For openSUSE, locate and download the AppImage file designed for Linux systems. This file typically appears with a name format similar to “LocalSend-[version]-linux-x86-64.AppImage.”
After downloading the AppImage, you’ll need to make it executable before running it. Open a terminal in the directory containing the downloaded file and execute the following command:
chmod +x LocalSend-*-linux-x86-64.AppImageThis command grants execution permissions to the AppImage file. Once executable, you can launch LocalSend by double-clicking the AppImage in your file manager or running it from the terminal:
./LocalSend-*-linux-x86-64.AppImageFor a more integrated experience, consider creating a desktop entry for the application. This allows LocalSend to appear in your application menu alongside other installed software. You can create this integration by using the AppImageLauncher tool or manually creating a .desktop file in the appropriate location.
The AppImage version of LocalSend provides significant benefits for openSUSE Tumbleweed users, particularly with KDE Plasma, as it adopts system themes automatically. This creates a more cohesive visual experience compared to containerized alternatives like Flatpak. Additionally, the AppImage runs in isolation without affecting system libraries, reducing potential conflicts with other applications.
One noteworthy consideration with AppImage installation is that automatic updates may not be available unless you use a dedicated AppImage management tool. To update, you’ll typically need to download the latest AppImage from the official website and replace your existing file.
Installing LocalSend via Flatpak
Flatpak installation offers a secure, distribution-agnostic method for installing LocalSend on openSUSE. This containerized approach provides isolation from the base system, enhancing security while ensuring consistent behavior across different Linux distributions. For openSUSE users, particularly those who already use Flatpak for other applications, this method provides a familiar and convenient installation process.
First, ensure that Flatpak is installed on your openSUSE system. For most recent versions of openSUSE, Flatpak comes pre-installed, but if necessary, you can install it using the following command:
sudo zypper install flatpakAfter installing Flatpak, you need to add the Flathub repository, which hosts numerous applications including LocalSend:
flatpak remote-add --if-not-exists flathub https://flathub.org/repo/flathub.flatpakrepoOnce the Flathub repository is added, you can install LocalSend with a single command:
flatpak install flathub org.localsend.localsend_appDuring installation, Flatpak will download LocalSend along with all its dependencies, creating a self-contained environment for the application. This process ensures that LocalSend will work regardless of which libraries are installed on your base system.
After installation completes, you can launch LocalSend from your application menu or using the command:
flatpak run org.localsend.localsend_appFor openSUSE users considering Flatpak installation, it’s worth noting that while the application functions identically to other installation methods, some users have reported visual inconsistencies with system themes, particularly in KDE Plasma. The Flatpak version typically uses its containerized GTK theme rather than adopting the system theme, which may result in a less integrated appearance.
The primary advantage of Flatpak installation is its automated update mechanism. When updates become available, they can be installed through your system’s software center or using the command:
flatpak updateThis ensures you always have the latest version with minimal manual intervention, an advantage over the AppImage method which requires manual updating.
Installing LocalSend via Snap
The Snap package system provides another viable method for installing LocalSend on openSUSE. While not native to openSUSE, Snap support can be added to provide access to a wide range of applications, including LocalSend. This installation method offers advantages including automatic updates and strict security confinement.
To begin, you’ll need to install snapd, the service that manages snap packages, on your openSUSE system. Open a terminal and run:
sudo zypper install snapdAfter installation completes, enable the snapd service to ensure it starts automatically:
sudo systemctl enable --now snapdFor complete functionality, create the symbolic link that allows snap to work correctly:
sudo ln -s /var/lib/snapd/snap /snapIt’s recommended to log out and back in, or restart your system, to ensure the snap paths are updated correctly. Once snap is properly configured, installing LocalSend is straightforward:
sudo snap install localsendThe installation process will download and install LocalSend along with its dependencies. Once installed, you can launch the application from your application menu or by typing localsend in the terminal.
When using the Snap version of LocalSend, be aware that Snap’s confinement may affect certain functionality, particularly related to file system access. By default, Snap applications have limited access to your system, which provides security benefits but may require additional permissions for full functionality.
For updating the Snap version of LocalSend, the process is automatic by default. Snap regularly checks for updates and applies them in the background. If you prefer to update manually, you can use:
sudo snap refresh localsendThis ensures your installation remains current with the latest features and security patches without requiring manual intervention.
Post-Installation Configuration
After successfully installing LocalSend on your openSUSE system through any of the methods described, several configuration steps enhance functionality and security. The first critical configuration involves firewall settings, as LocalSend requires specific ports to communicate across your local network.
For openSUSE’s firewalld, you need to open ports 53317 for both TCP and UDP protocols. This can be accomplished using the graphical firewall-config tool or through terminal commands:
sudo firewall-cmd --permanent --add-port=53317/tcp
sudo firewall-cmd --permanent --add-port=53317/udp
sudo firewall-cmd --reload
These commands permanently add the necessary port exceptions and reload the firewall to apply the changes immediately. Without this configuration, LocalSend may fail to discover other devices or establish connections.
Using LocalSend on openSUSE
Upon first launching LocalSend, you’ll encounter the settings interface where you can customize your experience. Begin by setting a recognizable device name that will identify your computer to other LocalSend users on the network. This name appears when other devices discover your system, so choose something descriptive and unique.
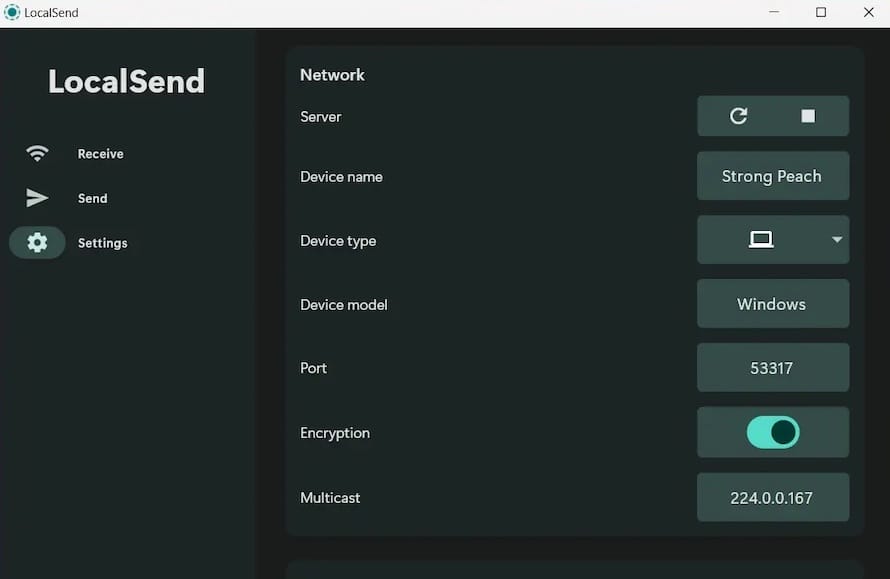
Next, configure your preferred download path where received files will be stored. By default, LocalSend uses your system’s Downloads folder, but you can customize this location based on your organizational preferences. The settings panel also allows you to enable or disable auto-accepting files from trusted devices, although for security reasons, manual confirmation is recommended for most scenarios.
For enhanced security, consider enabling the encryption option in settings. While LocalSend transfers remain local to your network, encryption provides additional protection against potential network sniffing or unauthorized access to transferred data. This is particularly important when operating on shared or public networks.
Additional configuration options include language selection, theme customization, and behavior settings like auto-launch preferences and notification controls. These can be adjusted according to personal preference to create an optimal user experience.
Troubleshooting Common Issues
Despite LocalSend’s straightforward design, users occasionally encounter issues during installation or operation on openSUSE systems. Understanding these common problems and their solutions ensures a smoother experience.
One frequent issue involves the application failing to launch after installation. This problem was reported by a Ubuntu user who installed the deb package, but similar issues can occur on openSUSE. If LocalSend doesn’t start after installation, first verify that the application is properly installed by checking its presence in your system’s application launcher. For Flatpak installations, ensure the Flatpak runtime is correctly installed. For AppImage versions, confirm the file has execution permissions set correctly.
Device discovery problems represent another common challenge. If LocalSend fails to find other devices on the network, first check that both devices are connected to the same local network. Next, verify that firewall settings on both devices allow traffic on port 53317 for both TCP and UDP protocols. Network segmentation or client isolation features on some routers can also prevent device discovery, so check your router settings if problems persist.
File transfer failures occasionally occur, especially with larger files. These issues typically stem from network instability or insufficient permissions at the download location. Ensure your download directory has appropriate write permissions and consider using a wired network connection for large transfers to improve reliability.
For users experiencing visual inconsistencies with the application, particularly with the Flatpak version, this relates to theme integration issues. The AppImage version generally provides better visual integration with KDE Plasma desktop environments. For GNOME users, the Flatpak version may actually offer better theme consistency.
If installation fails with package conflicts or dependency issues, consider trying an alternative installation method. The AppImage version requires minimal dependencies and often works when other methods fail, making it a good fallback option for troubleshooting installation problems.
Keeping LocalSend Updated on openSUSE
Maintaining an updated version of LocalSend ensures access to the latest features, security patches, and compatibility improvements. The update process varies depending on your chosen installation method.
For Flatpak installations, updates are typically handled automatically through your system’s software center. Alternatively, you can manually check for updates using the terminal command flatpak update, which will update all Flatpak applications including LocalSend. This method provides the most streamlined update experience with minimal user intervention.
Snap installations also receive automatic updates by default. The snap system periodically checks for new versions and applies them in the background. If you prefer manual control, use sudo snap refresh localsend to update specifically the LocalSend application.
AppImage installations require the most manual intervention for updates. Since AppImages are self-contained executables, updating involves downloading the latest version from the official website and replacing your existing file. No automated update mechanism exists for this method unless you implement a third-party AppImage management tool.
Congratulations! You have successfully installed LocalSend. Thanks for using this tutorial for installing LocalSend on openSUSE system. For additional help or useful information, we recommend you check the official LocalSend website.