In this tutorial, we will show you how to install Mantis Bug Tracker on Ubuntu 20.04 LTS. For those of you who didn’t know, Mantis is a free and popular open-source bug tracking system. It is written in PHP and supports all types of database servers. It provides a professional dashboard to manage bugs assigned to the user. It supports powerful access control which provides per project base user access. It is very flexible, you can customize the issue fields, notifications, and workflow.
This article assumes you have at least basic knowledge of Linux, know how to use the shell, and most importantly, you host your site on your own VPS. The installation is quite simple and assumes you are running in the root account, if not you may need to add ‘sudo‘ to the commands to get root privileges. I will show you through the step-by-step installation of Mantis Bug Tracker on Ubuntu 20.04 (Focal Fossa). You can follow the same instructions for Ubuntu 18.04, 16.04, and any other Debian-based distribution like Linux Mint.
Prerequisites
- A server running one of the following operating systems: Ubuntu 20.04, 18.04, 16.04, and any other Debian-based distribution like Linux Mint.
- It’s recommended that you use a fresh OS install to prevent any potential issues.
- A
non-root sudo useror access to theroot user. We recommend acting as anon-root sudo user, however, as you can harm your system if you’re not careful when acting as the root.
Install Mantis Bug Tracker on Ubuntu 20.04 LTS Focal Fossa
Step 1. First, make sure that all your system packages are up-to-date by running the following apt commands in the terminal.
sudo apt update
sudo apt upgrade
Step 2. Installing the LAMP stack.
A Ubuntu 20.04 LAMP server is required. If you do not have LAMP installed, you can follow our guide here.
Step 3. Download and Install Mantis Bug Tracker on Ubuntu 20.04.
Now we download the latest stable MantisBT release from the official page:
wget https://tenet.dl.sourceforge.net/project/mantisbt/mantis-stable/2.24.3/mantisbt-2.24.3.zip
Once downloaded, unzip the Mantis archive:
unzip mantisbt-2.24.3.zip
mv mantisbt-2.24.3 /var/www/html/mantisbt
We will need to change some folders permissions:
chown apache:apache -R /var/www/html/mantisbt
Step 4. Configuring MariaDB for Mantis Bug Tracker.
By default, MariaDB is not hardened. You can secure MariaDB using the mysql_secure_installation script. You should read and below each step carefully which will set a root password, remove anonymous users, disallow remote root login, and remove the test database and access to secure MariaDB.
mysql_secure_installation
Configure it like this:
- Set root password? [Y/n] y
- Remove anonymous users? [Y/n] y
- Disallow root login remotely? [Y/n] y
- Remove test database and access to it? [Y/n] y
- Reload privilege tables now? [Y/n] y
Next, we will need to log in to the MariaDB console and create a database for the Mantis Bug Tracker. Run the following command:
mysql -u root -p
This will prompt you for a password, so enter your MariaDB root password and hit Enter. Once you are logged in to your database server you need to create a database for Mantis Bug Tracker installation:
MariaDB [(none)]> CREATE DATABASE mantisdb;
MariaDB [(none)]> GRANT ALL PRIVILEGES ON mantisdb.* TO 'mantis'@'localhost' IDENTIFIED BY 'your-strong-passwd';
MariaDB [(none)]> FLUSH PRIVILEGES;
MariaDB [(none)]> \q
Step 5. Configure Apache for Mantis.
Now we create a new Virtual Host for Apache to manage the Mantis:
sudo nano /etc/apache2/sites-enabled/mantis.conf
Add the following line:
VirtualHost *:80>
   ServerAdmin admin@your-server.com
   DocumentRoot "/var/www/html/mantisbt"
   ServerName idroot.us
   ServerAlias www.idroot.us
   ErrorLog "/var/log/apache2/mantisbt-error_log"
   TransferLog "/var/log/apache2/mantisbt-access_log"

      <Directory "/var/www/html/mantisbt">
          DirectoryIndex index.php index.html
          Options FollowSymLinks
          AllowOverride None
          Require all granted
          Options MultiViews FollowSymlinks
      </Directory>
</VirtualHost>
Save and exit the configuration file. Restart the apache service for the changes to take effect:
sudo a2ensite mantis.conf
sudo a2enmod rewrite
sudo systemctl restart apache2
Step 6. Configure the Firewall.
You need to allow port 80 through the UFW firewall for Mantis BT. You can enable the UFW firewall and check it’s status by the following command:
sudo ufw enable
sudo ufw allow 80
Step 7. Accessing Mantis Bug Tracker.
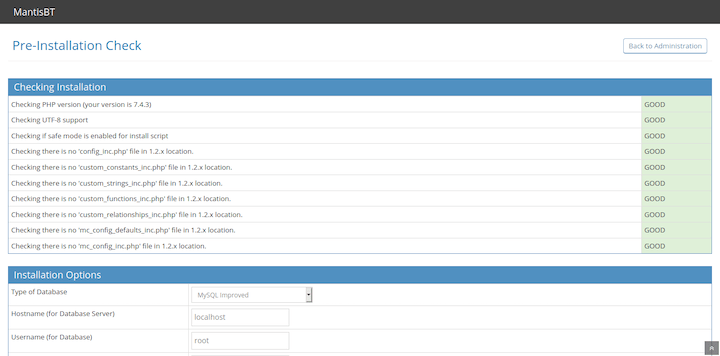
Mantis Bug Tracker will be available on HTTP port 80 by default. Open your favorite browser and navigate to http://your-domain.com or http://server-ip-address and complete the required steps to finish the installation.

Congratulations! You have successfully installed Mantis. Thanks for using this tutorial for installing Mantis Bug Tracker on your Ubuntu 20.04 LTS Focal Fossa system. For additional help or useful information, we recommend you check the official Mantis website.