How To Install Mattermost on Ubuntu 22.04 LTS

In this tutorial, we will show you how to install Mattermost on Ubuntu 22.04 LTS. For those of you who didn’t know, Mattermost is an open-source, self-hosted chat and collaboration platform that is designed for modern teams. It is similar to other chat platforms like Slack, but it is designed to be more flexible and customizable, with a focus on security and privacy. One of the main advantages of Mattermost is its flexibility and customization options. It can be easily integrated with other tools and services, such as GitLab and JIRA, and it can be customized to meet the specific needs of a team. It is also highly scalable, with support for large organizations and distributed teams.
This article assumes you have at least basic knowledge of Linux, know how to use the shell, and most importantly, you host your site on your own VPS. The installation is quite simple and assumes you are running in the root account, if not you may need to add ‘sudo‘ to the commands to get root privileges. I will show you the step-by-step installation of Mattermost on Ubuntu 22.04 (Jammy Jellyfish). You can follow the same instructions for Ubuntu 22.04 and any other Debian-based distribution like Linux Mint, Elementary OS, Pop!_OS, and more as well.
Prerequisites
- A server running one of the following operating systems: Ubuntu 22.04, 20.04, and any other Debian-based distribution like Linux Mint.
- It’s recommended that you use a fresh OS install to prevent any potential issues.
- SSH access to the server (or just open Terminal if you’re on a desktop).
- An active internet connection. You’ll need an internet connection to download the necessary packages and dependencies for Mattermost.
- A
non-root sudo useror access to theroot user. We recommend acting as anon-root sudo user, however, as you can harm your system if you’re not careful when acting as the root.
Install Mattermost on Ubuntu 22.04 LTS Jammy Jellyfish
Step 1. First, make sure that all your system packages are up-to-date by running the following apt commands in the terminal.
sudo apt update
sudo apt upgrade
sudo apt install dirmngr gnupg apt-transport-https ca-certificates software-properties-common
Step 2. Installing PostgreSQL Database Server.
By default, PostgreSQL is available on Ubuntu 22.04 base repository. Now run the following command below to install the latest version of PostgreSQL to your system:
sudo apt install postgresql postgresql-contrib
Once successfully installed, enable PostgreSQL (to start automatically upon system boot), start, and verify the status using the commands below:
sudo systemctl enable postgresql
sudo systemctl start postgresql
sudo systemctl status postgresql
Next, run the command below to log in to the PostgreSQL you just installed above:
sudo --login --user postgres
psql
Then, we create the Mattermost database:
postgres=# CREATE DATABASE mattermostdb;
postgres=# CREATE USER mmuser WITH PASSWORD 'mmuser-password';
postgres=# GRANT ALL PRIVILEGES ON DATABASE mattermost to mmuser;
postgres=# \q
For additional resources on installing PostgreSQL, read the post below:
Step 3. Installing Mattermost on Ubuntu 22.04.
By default, Mattermost is not available on Ubuntu 22.04 base repository. Now run the following command below to download the latest version of Mattermost to your Ubuntu system:
wget https://releases.mattermost.com/7.5.2/mattermost-7.5.2-linux-amd64.tar.gz
Next, extract the archive:
tar -xvzf mattermost*.gz
Move the extracted files to the /opt directory.
sudo mv mattermost /opt
Create the data storage directory for the Mattermost server.
sudo mkdir /opt/mattermost/data
Step 4. Create a user for Mattermost.
You’ll need to create a Mattermost system user and group to launch the service:
sudo useradd --system --user-group mattermost
Verify it is a system user using the command below:
id mattermost
Next, you’ll need to change the ownership of the Mattermost directory to the Mattermost user that you just created. To do this, enter the following command:
sudo chown -R mattermost:mattermost /opt/mattermost
Step 5. Configure Mattermost Server.
Now open the configuration file /opt/mattermost/config/config.json:
nano /opt/mattermost/config/config.json
Find the variable DriverName under the SqlSettings and change its value to mysql.
"DriverName": "mysql",
Set the variable DataSource to the following value. Replace mmuser with the SQL username, YourPassword23! with the SQL password, and mattermostdb with the database name, you configured in step 2.
"DataSource": "mmuser:Your-strong-Passwd@tcp(localhost:3306)/mattermostdb?charset=utf8mb4,utf8&writeTimeout=30s",
Step 6. Create a Systemd Service for Mattermost.
Now we create a systemd service file to manage the Mattermost service:
nano /lib/systemd/system/mattermost.service
Add the following file:
[Unit]
Description=Mattermost
After=network.target
After=postgresql.service
BindsTo=postgresql.service

[Service]
Type=notify
ExecStart=/opt/mattermost/bin/mattermost
TimeoutStartSec=3600
KillMode=mixed
Restart=always
RestartSec=10
WorkingDirectory=/opt/mattermost
User=mattermost
Group=mattermost
LimitNOFILE=49152

[Install]
WantedBy=multi-user.target
Save and close the file, then reload the systemd daemon with the following command:
sudo systemctl daemon-reload
sudo systemctl start mattermost
sudo systemctl enable mattermos
Step 7. Configure Firewall.
Now we set up an Uncomplicated Firewall (UFW) with Apache to allow public access on default web ports for 8065:
sudo ufw allow OpenSSH
sudo ufw allow 8065
sudo ufw enable
Step 8. Accessing Mattermost Web Interface.
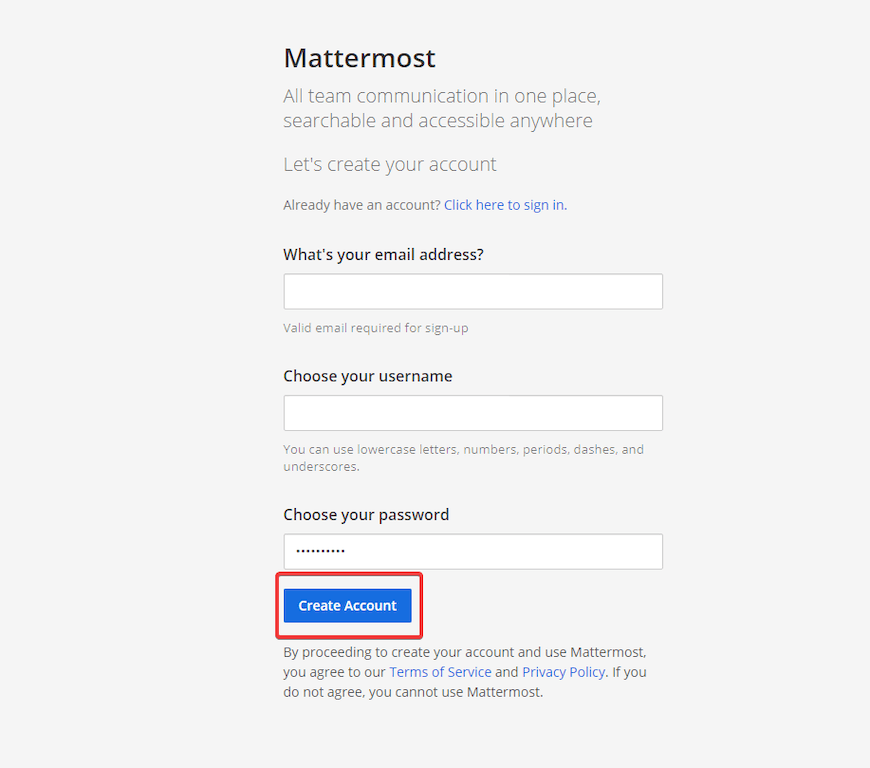
Once successfully installed, open your web browser and access the Mattermost installation wizard using the URL http://your-IP-address:8065. You will be redirected to the following page:

Congratulations! You have successfully installed Mattermost. Thanks for using this tutorial for installing Mattermost on Ubuntu 22.04 LTS Jammy Jellyfish system. For additional help or useful information, we recommend you check the official Mattermost website.