In this tutorial, we will show you how to install MySQL on Debian 11. For those of you who didn’t know, MySQL is a widely-used relational database management system (RDBMS) that powers countless websites, applications, and software solutions worldwide. Its robustness, scalability, and cross-platform compatibility make it a popular choice among developers and system administrators. Debian 11, codenamed “Bullseye,” is a stable and reliable Linux distribution that provides an excellent foundation for deploying mission-critical applications like MySQL.
This article assumes you have at least basic knowledge of Linux, know how to use the shell, and most importantly, you host your site on your own VPS. The installation is quite simple and assumes you are running in the root account, if not you may need to add ‘sudo‘ to the commands to get root privileges. I will show you the step-by-step installation of the MySQL 8 database on a Debian 11 (Bullseye).
Prerequisites
- A server running one of the following operating systems: Debian 11 or Debian 10.
- It’s recommended that you use a fresh OS install to prevent any potential issues.
- SSH access to the server (or just open Terminal if you’re on a desktop).
- A
non-root sudo useror access to theroot user. We recommend acting as anon-root sudo user, however, as you can harm your system if you’re not careful when acting as the root.
Install MySQL on Debian 11 Bullseye
Step 1. Before we install any software, it’s important to make sure your system is up to date by running the following apt commands in the terminal:
sudo apt update
sudo apt upgrade
Step 2. Installing MySQL on Debian 11.
MySQL is not available in the default Debian repositories. You need to install MySQL APT repository on Debian 11:
wget https://dev.mysql.com/get/mysql-apt-config_0.8.22-1_all.deb
sudo dpkg -i mysql-apt-config_0.8.22-1_all.deb
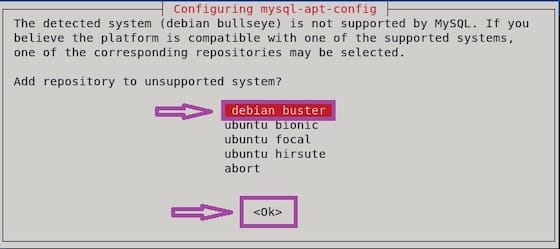
During the MySQL repository installation, If prompted, select the repository for Debian Buster and press the TAB key to select OK. Press ENTER to proceed.

Next, update the package list and install the MySQL server package by running:
sudo apt update
sudo apt install mysql-server
During the installation, a new popup will appear, prompting you to enter the database root password.

Once the installation is completed, the MySQL service will start automatically, you can verify it by typing:
sudo systemctl status mysql
Step 3. Securing MySQL.
After the installation of MySQL is complete, you may need to secure your new MySQL. By default, MySQL is not hardened. You can secure MySQL using the mysql_secure_installation script. you should read each step carefully which will set a root password, remove anonymous users, disallow remote root login, and remove the test database and access to secure MySQL:
mysql_secure_installation
Configure it like this:
By default, a MySQL installation has an anonymous user,
allowing anyone to log into MySQL without having to have
a user account created for them. This is intended only for
testing, and to make the installation go a bit smoother.
You should remove them before moving into a production
environment.

Remove anonymous users? (Press y|Y for Yes, any other key for No) : y
Success.

Normally, root should only be allowed to connect from
'localhost'. This ensures that someone cannot guess at
the root password from the network.

Disallow root login remotely? (Press y|Y for Yes, any other key for No) : y
Success.

By default, MySQL comes with a database named 'test' that
anyone can access. This is also intended only for testing,
and should be removed before moving into a production
environment.

Remove test database and access to it? (Press y|Y for Yes, any other key for No) : y
 - Dropping test database...
Success.

 - Removing privileges on test database...
Success.

Reloading the privilege tables will ensure that all changes
made so far will take effect immediately.

Reload privilege tables now? (Press y|Y for Yes, any other key for No) : y
Success.

All done!
To log in to MySQL, use the following command (note that it’s the same command you would use to log into a MySQL database):
mysql -u root -p
Congratulations! You have successfully installed MySQL. Thanks for using this tutorial for installing the latest version of MySQL 8 on Debian 11 Bullseye. For additional help or useful information, we recommend you check the official MySQL website.