How To Install Nessus Security Scanner on Ubuntu 24.04 LTS

In this tutorial, we will show you how to install Nessus Security Scanner on Ubuntu 24.04 LTS. Nessus Security Scanner stands as one of the most powerful vulnerability assessment tools available to security professionals today. Developed by Tenable, Nessus has established itself as a cornerstone in the cybersecurity arsenal, providing comprehensive scanning capabilities to identify security weaknesses across networks, systems, and applications. In this guide, we’ll walk through the complete process of installing and configuring Nessus Security Scanner on Ubuntu 24.04 LTS (Noble Numbat), enabling you to strengthen your security posture through regular vulnerability assessments.
Understanding Nessus Security Scanner
Nessus is a widely-used network vulnerability scanner developed by Tenable that specializes in identifying security weaknesses in systems and networks. It works by scanning systems for known vulnerabilities, misconfigurations, and security policy violations, providing detailed reports that help prioritize remediation efforts.
Available Versions and Licensing Options
Nessus comes in several versions to meet different organizational needs:
- Nessus Essentials: The free version, formerly known as Nessus Home, provides limited scanning capabilities for up to 16 IP addresses. This is perfect for small environments, personal use, or educational purposes.
- Nessus Professional: A paid version providing unlimited scanning capabilities, more advanced features, and commercial support.
- Nessus Expert: The most comprehensive version, including everything in Professional plus external attack surface scanning, web application scanning, and cloud infrastructure scanning.
Nessus builds its functionality on top of the Common Vulnerabilities and Exposures (CVE) architecture, allowing it to detect and report on thousands of potential security issues. The platform is continuously updated with new plugins, with over 100 new plugins released weekly within 24 hours of vulnerability disclosure.
Prerequisites for Installation
Before proceeding with the Nessus installation on Ubuntu 24.04, ensure you have the following prerequisites in place:
- An Ubuntu 24.04 LTS (Noble Numbat) server with administrative access
- A non-root user with sudo privileges
- At least 4GB of RAM (8GB recommended for production environments)
- Minimum 20GB free disk space
- Active internet connection for downloading the installation package and vulnerability updates
- Basic knowledge of Linux command-line operations
For optimal performance, particularly in larger environments, consider these hardware recommendations:
- Multi-core CPU (4+ cores recommended)
- SSD storage for improved scanning performance
- Stable network connection with sufficient bandwidth
Preparing Your Ubuntu System
Before installing Nessus, it’s essential to ensure your Ubuntu 24.04 system is up-to-date with the latest packages and security patches. This helps minimize potential compatibility issues and security vulnerabilities.
Start by updating your package lists and upgrading installed packages:
sudo apt update
sudo apt upgrade -y
Next, install some essential packages that may be required during the installation process:
sudo apt install wget curl apt-transport-https gnupg2 software-properties-common -yVerify your system’s hostname configuration, as this is important for Nessus operation:
hostname
hostname -f
If your hostname is not properly configured, set it with:
sudo hostnamectl set-hostname your-hostnameThen edit the /etc/hosts file to include your hostname:
sudo nano /etc/hostsAdd or modify the line for your IP address:
127.0.0.1 localhost
127.0.1.1 your-hostname
Downloading Nessus Security Scanner
The next step is to download the appropriate Nessus package for Ubuntu 24.04. Since Nessus frequently updates its software, it’s best to verify the latest available version from the official Tenable website.
You can download the latest Nessus package using the curl command. At the time of writing, we’ll use version 10.8.3, but you should check for the most recent version available:
curl --request GET \
  --url 'https://www.tenable.com/downloads/api/v2/pages/nessus/files/Nessus-10.8.3-ubuntu1604_amd64.deb' \
  --output 'Nessus-10.8.3-ubuntu1604_amd64.deb'
This command downloads the Nessus package and saves it with the specified filename. If the version has changed, replace the version number in the URL.
To verify the integrity of the downloaded package, you can check the file size:
ls -lh Nessus-10.8.3-ubuntu1604_amd64.debInstalling Nessus on Ubuntu 24.04
Now that you have downloaded the Nessus package, proceed with the installation using the dpkg command. This command is used to install, remove, and manage Debian packages on Ubuntu:
sudo dpkg -i Nessus-10.8.3-ubuntu1604_amd64.debDuring the installation process, you’ll see output indicating the progress. When the installation completes successfully, you’ll see a message confirming that Nessus has been installed.
If you encounter a “dpkg frontend lock” error during installation, it means another process is using the package management system. To resolve this:
- Identify the process locking the dpkg frontend:
sudo lsof /var/lib/dpkg/lock-frontend - Terminate the process using its PID:
sudo kill -9 <PID> - Reconfigure dpkg:
sudo dpkg --configure -a
Then try the installation again.
After installation, the Nessus files will be located in the /opt/nessus directory, which includes:
- Configuration files
- Binary executables
- Plugin database
- Web interface components
Starting and Managing the Nessus Service
Once Nessus is installed, you need to start the Nessus daemon service (nessusd). This service handles the scanning functionality and provides the web interface for management.
To start the Nessus service:
sudo systemctl start nessusdTo ensure that Nessus starts automatically at system boot:
sudo systemctl enable nessusdTo verify that the service is running correctly:
sudo systemctl status nessusdThe output should show that the service is active (running). If you see “active (running)” in the output, Nessus has started successfully.
Common service management commands include:
- Stop the service:
sudo systemctl stop nessusd - Restart the service:
sudo systemctl restart nessusd - Check if enabled:
sudo systemctl is-enabled nessusd
If you need to check the Nessus logs for troubleshooting:
sudo journalctl -u nessusdConfiguring Firewall Settings
For security reasons, it’s important to properly configure your firewall to allow access to Nessus while maintaining overall system security. Ubuntu 24.04 uses UFW (Uncomplicated Firewall) by default, which makes firewall configuration straightforward.
First, ensure that UFW is installed:
sudo apt install ufw -yAllow SSH access (important to maintain remote access to your server):
sudo ufw allow OpenSSHAllow access to the Nessus web interface on port 8834:
sudo ufw allow 8834/tcpEnable the firewall if it’s not already active:
sudo ufw enableVerify the firewall configuration:
sudo ufw statusThe output should show that both SSH and port 8834 are allowed. This configuration ensures that you can access the Nessus web interface while maintaining security.
Accessing the Nessus Web Interface
After starting the Nessus service and configuring the firewall, you can access the web interface to complete the setup process. Nessus provides a web-based interface that runs on port 8834 and uses HTTPS for secure communication.
Open a web browser and navigate to:
https://your-server-ip:8834Replace your-server-ip with the actual IP address of your Ubuntu server. If you’re accessing Nessus locally on the same machine, you can use:
https://localhost:8834Since Nessus uses a self-signed SSL certificate by default, your browser will display a security warning. This is normal for a fresh installation. You can safely proceed by:
- In Chrome: Click “Advanced” and then “Proceed to [IP] (unsafe)”
- In Firefox: Click “Advanced” and then “Accept the Risk and Continue”
Once you bypass the certificate warning, you’ll see the Nessus setup wizard. This wizard will guide you through the initial configuration process.
Initial Nessus Setup Wizard
The first time you access the Nessus web interface, you’ll be presented with a setup wizard that guides you through the initial configuration. This process includes registration, account creation, and plugin installation.
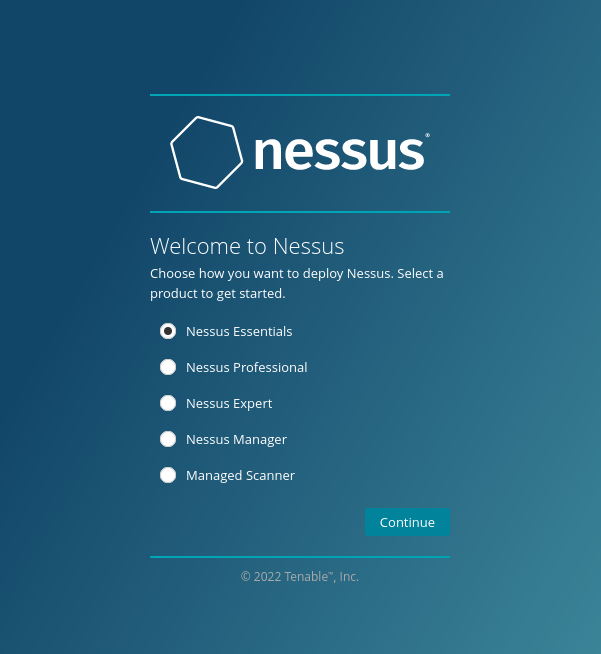
Step 1: Select Deployment Type
First, you’ll need to select the Nessus deployment type. Choose “Nessus Essentials” for the free version or select the appropriate option if you’ve purchased a commercial license.

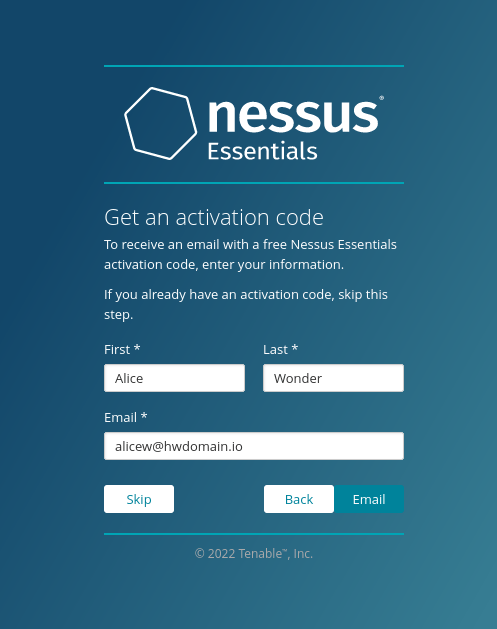
Step 2: Register and Activate
To activate Nessus Essentials:
- Enter your information (name, email)
- Click “Register”
- Check your email for the activation code
- Enter the activation code in the setup wizard
For Nessus Professional or other commercial versions, enter the license key provided by Tenable after purchase.

Step 3: Create Administrator Account
Next, create an administrator account for Nessus:
- Enter a username
- Create a strong password
- Confirm the password
- Click “Continue”
This account will have full administrative privileges in Nessus.
Step 4: Plugin Download and Initialization
After account creation, Nessus will download and compile the vulnerability plugins. This process may take some time (typically 15-30 minutes) depending on your internet connection speed and server performance.
During this process:
- Plugins are downloaded from Tenable’s servers
- Plugins are compiled and organized
- The vulnerability database is initialized
If the plugin download fails, you can manually update the plugins using the nessuscli utility:
cd /opt/nessus/sbin
./nessuscli update
When the initialization process completes, you’ll be redirected to the login page. Enter the administrator credentials you created earlier to access the Nessus dashboard.
Adding Nessus to System PATH
To make Nessus command-line utilities easily accessible, it’s helpful to add the Nessus binary directories to your system PATH. This allows you to run Nessus commands without specifying the full path.
First, identify the Nessus binary directories:
ls /opt/nessusYou’ll notice that Nessus has two important binary directories:
/opt/nessus/bin– Contains user-oriented utilities/opt/nessus/sbin– Contains administrative utilities
To add these directories to your PATH, edit your .bashrc file:
nano ~/.bashrcAdd the following line at the end of the file:
export PATH="$PATH:/opt/nessus/bin:/opt/nessus/sbin"Save and close the file (Ctrl+O, Enter, Ctrl+X). Then, reload the configuration:
source ~/.bashrcVerify that the directories have been added to your PATH:
echo $PATHYou should see the Nessus directories listed in the output. Now you can run commands like nessuscli without specifying the full path.
Creating Your First Scan
Now that Nessus is set up and configured, you’re ready to create your first vulnerability scan. Nessus offers various scan templates for different purposes, but we’ll focus on creating a basic network scan.
From the Nessus dashboard:
- Click on the “New Scan” button
- Select “Basic Network Scan” from the templates
- Configure the scan settings:
- Name: Enter a descriptive name for the scan
- Description: (Optional) Add details about the scan’s purpose
- Folder: Choose where to save the scan (default is “My Scans”)
- Targets: Enter the IP address, range, or hostname of the target system(s)
For advanced configuration, you can adjust settings in the following sections:
- Discovery: Configure port scanning options (default: standard ports)
- Assessment: Select vulnerability checks to perform
- Report: Customize the report format and contents
- Advanced: Adjust performance settings and timeouts
For your first scan, the default settings are usually sufficient. After configuring the targets, click “Save” to create the scan.
Consider these best practices for initial scans:
- Start with a small scope (1-2 hosts) to ensure proper configuration
- Use standard ports scanning for faster results
- Run initial scans during off-hours to minimize impact
- Communicate with stakeholders before scanning production systems
Running and Monitoring Scans
After creating a scan, you’re ready to execute it and monitor its progress. Running a scan is straightforward, but it’s important to understand how to monitor and manage the scanning process.
To start a scan:
- From the Nessus dashboard, locate your saved scan
- Click the play button (▶) next to the scan name
- Confirm the scan execution when prompted
The scan will begin, and Nessus will display a progress indicator showing:
- Percentage completion
- Current scanning phase
- Number of hosts being scanned
- Vulnerabilities discovered so far
During a scan, you can:
- Pause the scan by clicking the pause button (⏸)
- Stop the scan by clicking the stop button (⏹)
- View real-time results by clicking on the running scan name
Depending on the network size and scan configuration, scans may take anywhere from minutes to hours to complete. Factors affecting scan duration include:
- Number of target hosts
- Number of ports being scanned
- Network connectivity and latency
- Host response times
- Thoroughness of vulnerability checks
For optimal scanning performance:
- Schedule scans during off-peak hours
- Divide large networks into smaller scan jobs
- Ensure stable network connectivity between scanner and targets
- Consider using multiple scanners for very large environments

Understanding Scan Results
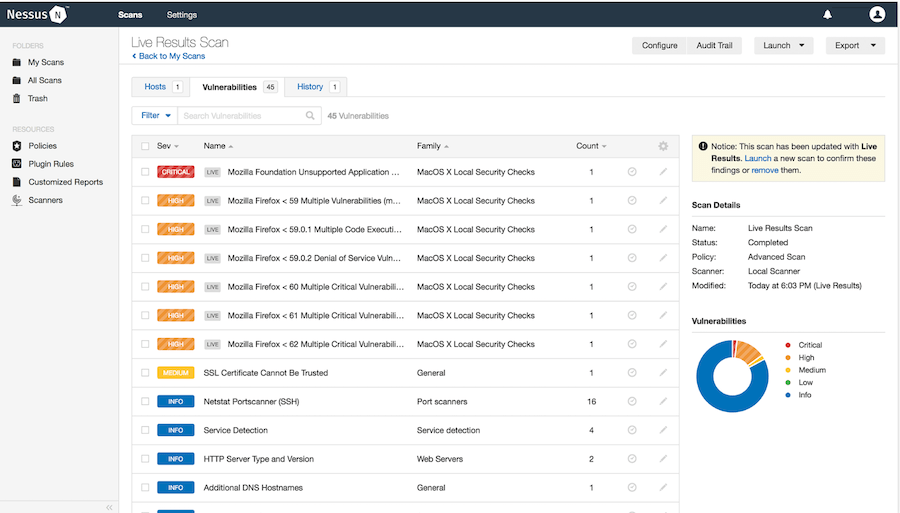
Once a scan completes, Nessus provides comprehensive results to help you understand and address vulnerabilities in your systems. The results are organized to prioritize the most critical issues.
In the Nessus dashboard, click on a completed scan to view its results. The overview page shows:
- Total number of vulnerabilities discovered
- Breakdown by severity (Critical, High, Medium, Low, Info)
- Most affected hosts
- Most common vulnerabilities
Nessus uses several scoring systems to help prioritize vulnerabilities:
- CVSS (Common Vulnerability Scoring System): Industry-standard metric measuring severity
- VPR (Vulnerability Priority Rating): Tenable’s proprietary scoring system that considers exploitability
- Risk Factor: Simple categorization (Critical, High, Medium, Low, None)
When reviewing scan results:
- Focus first on Critical and High severity vulnerabilities
- Look for patterns or common issues across multiple hosts
- Pay attention to vulnerabilities with known exploits or active threats
- Consider the context of each system when prioritizing remediation
For each vulnerability, Nessus provides detailed information:
- Description of the vulnerability
- Affected software or component
- Potential impact if exploited
- Remediation steps or suggested fixes
- References to CVE entries and other resources
Understanding false positives is also important. Sometimes Nessus may flag issues that aren’t applicable to your environment. Review findings carefully and consider:
- Is the vulnerable component actually in use?
- Are compensating controls already in place?
- Does the configuration actually create a security risk?
Generating Reports
Nessus provides robust reporting capabilities to document scan findings and share results with stakeholders. Reports can be generated in various formats for different purposes.
To generate a report:
- From the Nessus dashboard, select the completed scan
- Click on the “Report” button in the top right
- Choose the report format (HTML, PDF, CSV, Nessus XML)
- Configure report options:
- Included vulnerability severities
- Chapter organization
- Custom notes or executive summary
- Click “Generate Report”
Each report format serves different purposes:
- HTML: Interactive report viewable in any browser
- PDF: Formal documentation for stakeholders
- CSV: Data analysis and integration with other tools
- Nessus XML: Integration with other security platforms
When generating reports, consider customizing them for different audiences:
- Executive summary for management
- Detailed technical reports for IT staff
- Compliance-focused reports for auditors
- Remediation-oriented reports for operations teams
Nessus reports typically include:
- Scan metadata (time, scope, scanner version)
- Executive summary with key metrics
- Host-by-host vulnerability listings
- Detailed vulnerability information
- Remediation recommendations
- References to vulnerability databases and resources
For regular scanning, consider establishing a consistent reporting schedule and format to track vulnerability trends over time.
Troubleshooting Common Issues
Even with careful setup, you may encounter issues with Nessus. Here are solutions to common problems:
Service Won’t Start
If the Nessus service fails to start:
sudo systemctl status nessusdLook for error messages in the output. Common causes include:
- Port 8834 already in use by another application
- Insufficient system resources (memory, disk space)
- Corrupted installation files
To resolve:
# Restart the service
sudo systemctl restart nessusd

# Check the logs for detailed errors
sudo journalctl -u nessusd
Plugin Download Failures
If plugins fail to download:
- Verify internet connectivity from your server
- Check if a proxy is required for outbound connections
- Manually update plugins:
cd /opt/nessus/sbin
sudo ./nessuscli update
Web Interface Not Accessible
If you can’t access the web interface:
- Verify the Nessus service is running
- Check firewall settings:
sudo ufw status - Test connectivity to the port:
curl -k https://localhost:8834
Scan Performance Issues
For slow or failing scans:
- Reduce the number of simultaneous scans
- Adjust scan settings to limit the scope
- Check network connectivity between scanner and targets
- Increase scanner resources (CPU, RAM)
Authentication Failures
If you’re having trouble logging in:
- Reset the admin password:
cd /opt/nessus/sbin sudo ./nessuscli chpasswd admin - Enter a new password when prompted
Database Lock Errors
For “database locked” errors:
sudo systemctl stop nessusd
sudo rm -f /opt/nessus/var/nessus/logs/*.db-journal
sudo systemctl start nessusd
Advanced Configuration Options
For users who need more control over Nessus behavior, several advanced configuration options are available:
Custom Scan Policies
Create customized scan policies for specific use cases:
- Navigate to “Policies” in the Nessus web interface
- Click “New Policy”
- Select a base template
- Modify settings to match your requirements:
- Specific plugin families to include/exclude
- Authentication credentials for deeper scanning
- Custom plugin settings
Performance Tuning
Adjust scanning performance:
- Edit the
nessusd.conffile:sudo nano /opt/nessus/etc/nessusd.conf - Modify parameters like:
max_hosts: Maximum hosts to scan simultaneouslymax_checks: Maximum simultaneous checks per hostplugin_timeout: Time before a plugin is considered hung
Scheduled Scanning
Set up automated, recurring scans:
- Create a scan template as usual
- In the schedule section, enable “Schedule”
- Configure frequency (daily, weekly, monthly)
- Set start time and recurrence pattern
User Management
For teams, create multiple user accounts with different permissions:
- Navigate to “Settings” > “Users”
- Click “New User”
- Assign appropriate role:
- Administrator: Full control
- Standard User: Run scans, view results
- Limited User: View only assigned scans
Proxy Configuration
If your environment requires a proxy for internet access:
cd /opt/nessus/sbin
sudo ./nessuscli fix --secure --set proxy=proxy_host:port
sudo ./nessuscli fix --secure --set proxy_username=username
sudo ./nessuscli fix --secure --set proxy_password=password
sudo systemctl restart nessusd
Congratulations! You have successfully installed Nessus. Thanks for using this tutorial for installing Nessus Security Scanner on Ubuntu 24.04 LTS system. For additional help or useful information, we recommend you check the official Nessus website.