How To Install ownCloud on Debian 12
 In today’s digital age, cloud storage has become an essential part of our lives. While there are many commercial cloud storage solutions available, self-hosted options like ownCloud offer greater control over your data and enhanced privacy. This comprehensive guide will walk you through the process of installing ownCloud on Debian 12, a stable and reliable Linux distribution perfect for hosting your personal cloud storage solution.
ownCloud is an open-source file sync and share software that allows you to store, access, and share your files, calendars, contacts, and other data from any device. By hosting ownCloud on your own server, you maintain complete control over your data, ensuring privacy and security.
Debian 12, also known as “Bookworm,” is an excellent choice for hosting ownCloud due to its stability, security features, and long-term support. This combination provides a robust foundation for your self-hosted cloud storage solution.
Prerequisites
Before we begin the installation process, ensure that you have the following prerequisites in place:
System Requirements
- A server or VPS running Debian 12
- At least 512MB of RAM (1GB or more recommended)
- Minimum 5GB of free disk space (more depending on your storage needs)
- A stable internet connection
Required Software Packages
- Apache web server
- PHP 7.4 or higher
- MariaDB or MySQL database server
- Various PHP extensions (we’ll install these during the process)
Domain Name and SSL Certificate
While not strictly necessary for a local installation, having a domain name and SSL certificate is crucial for secure remote access. You can obtain a free SSL certificate from Let’s Encrypt.
Preparing the System
Let’s start by updating your Debian 12 system and installing the necessary dependencies.
Updating Debian 12
Open a terminal and run the following commands:
sudo apt update
sudo apt upgrade -y
This ensures your system is up-to-date with the latest security patches and software versions.
Installing Necessary Dependencies
Install the required packages by running:
sudo apt install apache2 mariadb-server libapache2-mod-php php php-mysql php-common php-gd php-json php-curl php-zip php-xml php-mbstring php-bz2 php-intl php-bcmath php-gmp -yThis command installs Apache web server, MariaDB database server, PHP, and various PHP extensions required by ownCloud.
Configuring the Firewall
If you’re using UFW (Uncomplicated Firewall), allow HTTP and HTTPS traffic:
sudo ufw allow 80/tcp
sudo ufw allow 443/tcp
sudo ufw enable
This configuration allows incoming connections on ports 80 (HTTP) and 443 (HTTPS).
Installing and Configuring the Web Server
Apache should already be installed from the previous step. Let’s configure it for ownCloud.
Apache Setup
Create a new Apache configuration file for ownCloud:
sudo nano /etc/apache2/sites-available/owncloud.confAdd the following content to the file:
<VirtualHost *:80>
    ServerAdmin webmaster@localhost
    DocumentRoot /var/www/owncloud
    ServerName your_domain.com

    <Directory /var/www/owncloud/>
        Options +FollowSymlinks
        AllowOverride All
        Require all granted
    </Directory>

    ErrorLog ${APACHE_LOG_DIR}/error.log
    CustomLog ${APACHE_LOG_DIR}/access.log combined
</VirtualHost>
Replace “your_domain.com” with your actual domain name or server IP address.
PHP Configuration
Adjust PHP settings for better performance:
sudo nano /etc/php/7.4/apache2/php.iniFind and modify the following lines:
memory_limit = 512M
upload_max_filesize = 200M
post_max_size = 200M
max_execution_time = 360
date.timezone = Your/Timezone
Replace “Your/Timezone” with your actual timezone (e.g., “America/New_York”).
Enabling Apache Modules
Enable necessary Apache modules:
sudo a2enmod rewrite
sudo a2enmod headers
sudo a2enmod env
sudo a2enmod dir
sudo a2enmod mime
Setting Up the Database
Now, let’s set up the MariaDB database for ownCloud.
Securing MariaDB Installation
Run the MySQL secure installation script:
sudo mysql_secure_installationFollow the prompts to set a root password and remove insecure default settings.
Creating a Database for ownCloud
Log into MariaDB:
sudo mysql -u root -pCreate a database and user for ownCloud:
CREATE DATABASE owncloud;
CREATE USER 'ownclouduser'@'localhost' IDENTIFIED BY 'your_password';
GRANT ALL PRIVILEGES ON owncloud.* TO 'ownclouduser'@'localhost';
FLUSH PRIVILEGES;
EXIT;
Replace ‘your_password’ with a strong, unique password.
Downloading and Installing ownCloud
Now we’ll download and set up the ownCloud files.
Obtaining ownCloud Files
Download the latest version of ownCloud:
cd /tmp
wget https://download.owncloud.com/server/stable/owncloud-complete-latest.tar.bz2
tar -xjf owncloud-complete-latest.tar.bz2
Moving Files to Web Directory
Move the extracted files to the Apache web directory:
sudo mv owncloud /var/www/
sudo chown -R www-data:www-data /var/www/owncloud
Setting Proper Permissions
Set the correct permissions:
sudo find /var/www/owncloud/ -type d -exec chmod 750 {} \;
sudo find /var/www/owncloud/ -type f -exec chmod 640 {} \;
Configuring ownCloud
With the files in place, let’s configure ownCloud through the web interface.
Accessing the Web-based Installer
Enable the ownCloud Apache configuration and restart Apache:
sudo a2ensite owncloud.conf
sudo systemctl restart apache2
Now, open a web browser and navigate to http://your_domain.com or http://your_server_ip. You should see the ownCloud setup page.

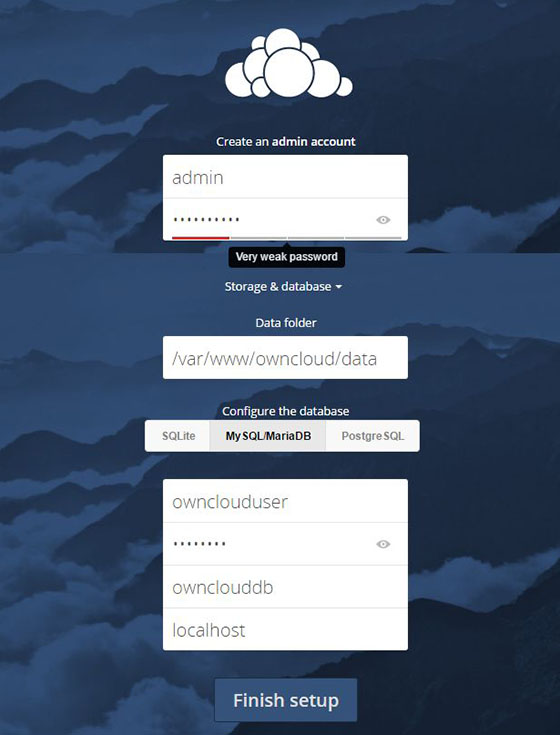
Creating Admin Account
On the setup page, create an admin account by entering a username and password.
Configuring Database Connection
Select “MySQL/MariaDB” as the database, and enter the following details:
- Database user: ownclouduser
- Database password: your_password (the one you set earlier)
- Database name: owncloud
- Host: localhost
Click “Finish setup” to complete the installation.
Post-Installation Tasks
After the initial setup, there are a few more tasks to optimize your ownCloud installation.
Enabling HTTPS
For security, it’s crucial to enable HTTPS. If you have a domain name, you can use Let’s Encrypt to obtain a free SSL certificate:
sudo apt install certbot python3-certbot-apache
sudo certbot --apache -d your_domain.com
Follow the prompts to configure HTTPS.
Configuring Cron Jobs
Set up a cron job for ownCloud background tasks:
sudo crontab -u www-data -eAdd the following line:
*/5 * * * * php -f /var/www/owncloud/cron.phpThis runs ownCloud’s cron job every 5 minutes.
Optimizing ownCloud Performance
Enable caching to improve performance. Edit the ownCloud config file:
sudo nano /var/www/owncloud/config/config.phpAdd the following lines within the $CONFIG array:
'memcache.local' => '\OC\Memcache\APCu',
'memcache.distributed' => '\OC\Memcache\Redis',
'redis' => [
     'host' => 'localhost',
     'port' => 6379,
],
Then install the required packages:
sudo apt install php-apcu redis-server php-redisTroubleshooting Common Issues
Even with careful installation, you might encounter some issues. Here are solutions to common problems:
Permission Problems
If you encounter permission errors, double-check the ownership and permissions of the ownCloud directory:
sudo chown -R www-data:www-data /var/www/owncloud
sudo find /var/www/owncloud/ -type d -exec chmod 750 {} \;
sudo find /var/www/owncloud/ -type f -exec chmod 640 {} \;
Database Connection Errors
If you’re having trouble connecting to the database, verify your database settings in the config.php file:
sudo nano /var/www/owncloud/config/config.phpEnsure the database details are correct.
PHP Configuration Issues
If ownCloud complains about missing PHP modules, install them using:
sudo apt install php-modulenameReplace ‘modulename’ with the required module (e.g., php-gd, php-curl).
Maintaining and Updating ownCloud
To keep your ownCloud installation secure and up-to-date, follow these maintenance practices:
Regular Backups
Regularly backup your ownCloud data and database. You can use the occ command for this:
sudo -u www-data php /var/www/owncloud/occ maintenance:mode --on
sudo rsync -avx /var/www/owncloud/ /path/to/owncloud-dirbkp/
sudo mysqldump --single-transaction -h localhost -u root -p owncloud > owncloud-sqlbkp.bak
sudo -u www-data php /var/www/owncloud/occ maintenance:mode --off
Updating ownCloud
To update ownCloud, first enable maintenance mode:
sudo -u www-data php /var/www/owncloud/occ maintenance:mode --onThen, download and extract the new version, replace the old files, and run the upgrade command:
sudo -u www-data php /var/www/owncloud/occ upgradeFinally, disable maintenance mode:
sudo -u www-data php /var/www/owncloud/occ maintenance:mode --offMonitoring System Resources
Regularly monitor your server’s resources using tools like htop or glances. This helps you identify any performance issues early:
sudo apt install htop
htop
Congratulations! You have successfully installed ownCloud. Thanks for using this tutorial for installing the latest version of ownCloud on the Debian 12 system. For additional help or useful information, we recommend you to check the official ownCloud website.