How To Install Piwigo on Debian 12

In this tutorial, we will show you how to install Piwigo on Debian 12. In the digital age, managing and sharing photos has become an integral part of our lives. Whether you‘re a professional photographer or a hobbyist, robust photo gallery software is a must-have tool. One such tool is Piwigo, a free and open-source web-based photo gallery software. With Piwigo, you can create, manage, and share your photo gallery with ease.
This article assumes you have at least basic knowledge of Linux, know how to use the shell, and most importantly, you host your site on your own VPS. The installation is quite simple and assumes you are running in the root account, if not you may need to add ‘sudo‘ to the commands to get root privileges. I will show you the step-by-step installation of the Piwigo open-source photo management on a Debian 12 (Bookworm).
Prerequisites
- A server running one of the following operating systems: Debian 12 (Bookworm).
- It’s recommended that you use a fresh OS install to prevent any potential issues.
- SSH access to the server (or just open Terminal if you’re on a desktop).
- You will need an active internet connection to download the Piwigo package.
- A
non-root sudo useror access to theroot user. We recommend acting as anon-root sudo user, however, as you can harm your system if you’re not careful when acting as the root.
Install Piwigo on Debian 12 Bookworm
Step 1. Keeping your system packages updated is a fundamental aspect of maintaining a secure and stable system. To update your system packages, open your terminal and execute the following commands:
sudo apt update
sudo apt upgrade
Step 2. Installing Required Software.
Piwigo operates on a web server, uses a PHP interpreter to process its scripts, and stores its data in a MySQL database. Therefore, the next step is to install Apache, MySQL, and PHP on your system. Execute the following command to install these packages:
sudo apt install apache2 mysql-server php php-mysql libapache2-mod-php
This command installs Apache (a web server), MySQL (a database server), PHP (a scripting language), and some additional PHP extensions.
Step 3. Installing Piwigo on Debian 12.
With the necessary software installed, you’re now ready to download Piwigo. Navigate to the official Piwigo website and download the latest version of the software. Alternatively, you can use the wget command to download Piwigo directly from the terminal:
wget https://piwigo.org/download/dlcounter.php?code=latest -O piwigo.zip
Once the download is complete, extract the Piwigo archive to the web root directory using the unzip command:
unzip piwigo.zip -d /var/www/html/
Step 4. Create a MySQL Database and User for Piwigo.
Piwigo uses a MySQL database to store its data. Therefore, you need to create a new MySQL database and user for Piwigo. To do this, log in to the MySQL shell as the root user:
mysql -u root -p
In the MySQL shell, execute the following commands to create a new database and user, and grant all privileges to the new user:
CREATE DATABASE piwigo_db;
CREATE USER 'piwigo_user'@'localhost' IDENTIFIED BY 'your-strong-password';
GRANT ALL ON piwigo_db.* TO 'piwigo_user'@'localhost';
FLUSH PRIVILEGES;
EXIT;
Step 5. Configure Piwigo.
After creating the MySQL database and user, the next step is to configure Piwigo. This involves setting the correct permissions for the Piwigo directory. Execute the following commands to set the necessary permissions:
sudo chown -R www-data:www-data /var/www/html/piwigo
sudo chmod -R 755 /var/www/html/piwigo
These commands change the ownership of the Piwigo directory to the www-data user and group and set the correct permissions for the directory.
Step 6. Complete the Installation Through the Web Interface.
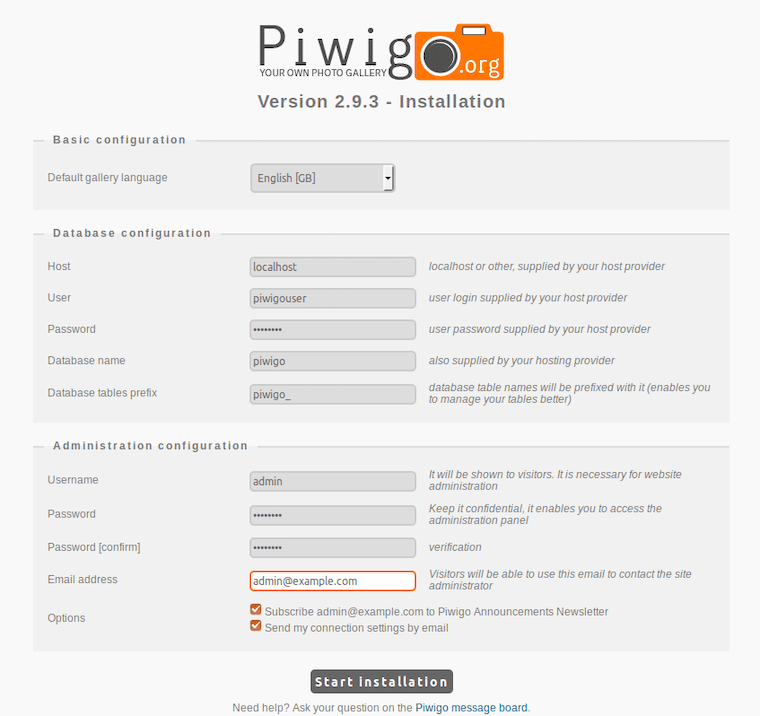
With Piwigo configured, you’re now ready to complete the installation process. Open your web browser and navigate to http://your_server_ip/piwigo. Follow the on-screen instructions to complete the installation. During this process, you’ll be asked to enter the details of the MySQL database and user you created earlier.

Piwigo uses a MySQL database to store its data. Therefore, you need to create a new MySQL database and user for Piwigo. To do this, log in to the MySQL shell as the root user:
Congratulations! You have successfully installed Piwigo. Thanks for using this tutorial to install the latest version of the Piwigo open-source photo management on Debian 12 Bookworm. For additional help or useful information, we recommend you check the official Piwigo website.