How To Install Piwigo on Manjaro

In this tutorial, we will show you how to install Piwigo on Manjaro. Piwigo is a powerful and user-friendly open-source photo gallery software that allows you to easily manage and share your digital photos. With its extensive features and customization options, Piwigo has become a popular choice among photography enthusiasts and professionals alike. If you‘re running Manjaro Linux and looking to set up your own photo gallery, installing Piwigo is a great option.
This article assumes you have at least basic knowledge of Linux, know how to use the shell, and most importantly, you host your site on your own VPS. The installation is quite simple and assumes you are running in the root account, if not you may need to add ‘sudo‘ to the commands to get root privileges. I will show you the step-by-step installation of the Piwigo open-source photo gallery on a Manjaro Linux.
Prerequisites
- A server or desktop running one of the following operating systems: Manjaro, and other Arch-based distributions.
- It’s recommended that you use a fresh OS install to prevent any potential issues.
- SSH access to the server (or just open Terminal if you’re on a desktop).
- A stable internet connection is crucial for downloading and installing packages. Verify your connection before proceeding.
- Access to a Manjaro Linux system with a non-root sudo user or root user.
Install Piwigo on Manjaro
Step 1. Keeping your system up-to-date is crucial for maintaining security and stability. Before installing Piwigo, run the following command to update your Manjaro Linux installation:
sudo pacman -Syu
Step 2. Installing LAMP Stack.
Piwigo requires a LAMP (Linux, Apache, MySQL, and PHP) stack to function properly. If you do not have LAMP installed, you can follow our guide here.
Step 3. Installing Piwigo on Manjaro.
Visit the official Piwigo website and click the “Download” button to get the latest stable release. Alternatively, you can download Piwigo directly from the command line using wget or curl.
Open a terminal and run the following command to download Piwigo:
wget http://piwigo.org/download/dlcounter.php?code=latest -O piwigo.zip
Unzip the downloaded archive:
unzip piwigo-14.3.0.zip
Next, create a directory for Piwigo on the web server:
sudo mkdir /var/www/html/piwigo
Transfer the extracted Piwigo files to the newly created directory:
sudo cp -r piwigo/* /var/www/html/piwigo/
Change the ownership of the Piwigo directory to the Apache user:
sudo chown -R http:http /var/www/html/piwigo/
Step 4. Configuring MySQL.
First, secure your MySQL installation by running the following command:
sudo mysql_secure_installation
Follow the on-screen instructions to set a root password, remove anonymous users, disallow remote root login, and remove the test database.
Log in to the MySQL console:
mysql -u root -p
A dedicated database is essential for Piwigo to store its data. Log into MariaDB using the root account and execute the following SQL commands to create a new database, a user, and grant the necessary privileges:
CREATE DATABASE piwigo_db;
CREATE USER 'piwigo_user'@'localhost' IDENTIFIED BY 'your_strong_password';
GRANT ALL PRIVILEGES ON piwigo_db.* TO 'piwigo_user'@'localhost';
FLUSH PRIVILEGES;
Exit;
Step 5. Configure Apache Web Server.
Create a new virtual host configuration file at /etc/httpd/conf/extra/piwigo.conf and add the following content:
<VirtualHost *:80>
    ServerName your-domain.com
    ServerAdmin webmaster@example.com
    DocumentRoot /var/www/html/piwigo
    <Directory /var/www/html/piwigo>
        AllowOverride All
        Require all granted
    </Directory>
    ErrorLog /var/log/httpd/piwigo_error.log
    CustomLog /var/log/httpd/piwigo_access.log combined
</VirtualHost>
Enable the virtual host and restart Apache:
sudo a2ensite piwigo.conf
sudo systemctl restart httpd
Step 6. Configure SSL.
sudo apt install certbot python3-certbot-apache
sudo certbot --apache
During the installation process, Certbot will prompt you for some basic information including your email address and domain name. Enter the email address of the web server administrator and select the domain(s) you want to secure with SSL/TLS.
Step 7. Running the Installation Wizard.
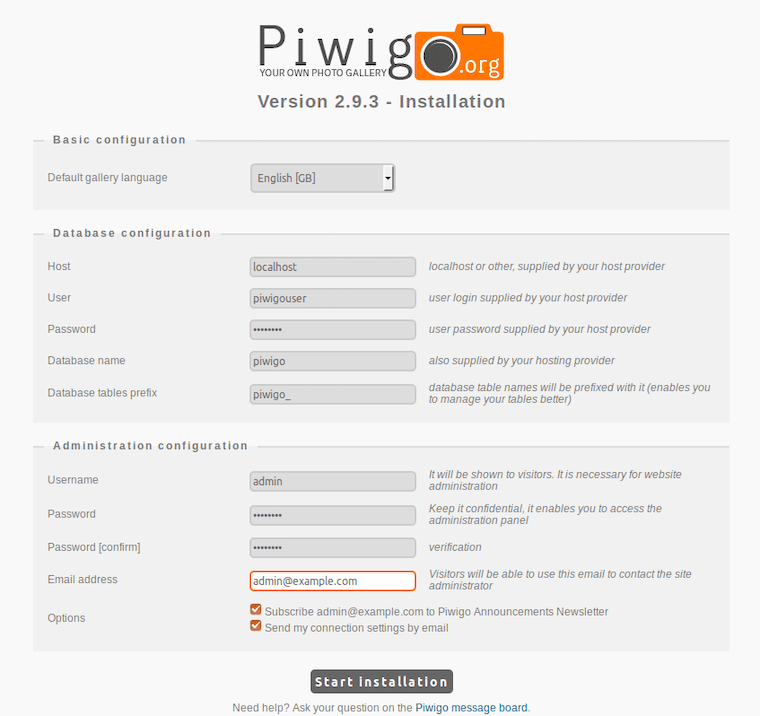
Access the Piwigo installation page in a web browser by navigating to https://your-domain.com/You will be redirected to the Piwigo installation page. On the first installation screen, select Piwigo language and insert MySQL database settings: host, user, password, and table prefix. Also, add a Piwigo admin account with a strong password and the email address of the admin account.

Congratulations! You have successfully installed Piwigo. Thanks for using this tutorial to install the latest version of the Piwigo open-source photo gallery management on the Manjaro system. For additional help or useful information, we recommend you check the official Piwigo website.