How To Install PrestaShop on Fedora 39

In this tutorial, we will show you how to install PrestaShop on Fedora 39. PrestaShop is a free and open-source e-commerce platform that allows you to create an online store. It is a powerful and flexible platform that can be used to sell a wide variety of products and services.
This article assumes you have at least basic knowledge of Linux, know how to use the shell, and most importantly, you host your site on your own VPS. The installation is quite simple and assumes you are running in the root account, if not you may need to add ‘sudo‘ to the commands to get root privileges. I will show you the step-by-step installation of the PrestaShop e-commerce on a Fedora 39.
Prerequisites
Before diving into the installation process, let’s ensure that you have everything you need:
- A server running one of the following operating systems: Fedora 39.
- It’s recommended that you use a fresh OS install to prevent any potential issues.
- You will need access to the terminal to execute commands. Fedora 39 provides the Terminal application for this purpose. It can be found in your Applications menu.
- You’ll need an active internet connection to download PrestaShop and its dependencies.
- A
non-root sudo useror access to theroot user. We recommend acting as anon-root sudo user, however, as you can harm your system if you’re not careful when acting as the root.
Install PrestaShop on Fedora 39
Step 1. First, ensure that your Fedora system is up-to-date by running the following commands:
sudo dnf update
Step 2. Installing LAMP Stack.
Before we dive into this tutorial, it’s crucial to ensure that your server is equipped with the powerful LAMP stack. If you haven’t already set up LAMP, don’t worry – we’ve got you covered. Just follow our comprehensive guide available right here.
Step 3. Installing PrestaShop on Fedora 39.
Now download the latest version of PrestaShop:
wget https://github.com/PrestaShop/PrestaShop/releases/download/8.1.2/prestashop_8.1.2.zip
Unzip the archive into prestashop directory:
unzip prestashop_8.1.2.zip -d /var/www/html/
Set the necessary permissions:
sudo chown -R apache:apache /var/www/html/prestashop
sudo chmod -R 755 /var/www/html/prestashop
Step 4. Creating a Database for PrestaShop.
Log into MariaDB:
mysql -u root -p
Create a database and user for PrestaShop:
CREATE DATABASE prestashop;
GRANT ALL PRIVILEGES ON prestashop.* TO 'prestashop'@'localhost' IDENTIFIED BY 'your-strong-password';
FLUSH PRIVILEGES;
EXIT;
Step 5. Configuring Apache for PrestaShop.
Create a new Apache configuration file for PrestaShop:
sudo nano /etc/httpd/conf.d/prestashop.conf
Add the following content:
<VirtualHost *:80>
    ServerAdmin webmaster@your_domain.com
    DocumentRoot /var/www/html/prestashop
    ServerName your-domain.com
    ServerAlias www.your-domain.com

    <Directory /var/www/html/prestashop/>
        Options Indexes FollowSymLinks MultiViews
        AllowOverride All
        Order allow,deny
        allow from all
    </Directory>

    ErrorLog /var/log/httpd/prestashop_error.log
    CustomLog /var/log/httpd/prestashop_access.log combined
</VirtualHost>
Save and close the file. Then, restart Apache to apply the changes:
sudo systemctl restart httpd
Step 6. Securing the PrestaShop with SSL Certificates.
While optional, using SSL to encrypt traffic is highly recommended for e-commerce sites like PrestaShop. It protects sensitive customer data transmitted during transactions.
We will use free SSL certificates from Let’s Encrypt. First, enable the mod_ssl module in Apache:
sudo dnf install mod_ssl
Next, install Certbot, a tool that automates fetching SSL certificates from Let’s Encrypt:
sudo dnf install certbot python3-certbot-apache
Run Certbot to fetch SSL certificates. Specify your site’s domain as the parameter:
sudo certbot --apache -d prestashop.example.com
Follow the prompts to specify contact emails and agree to terms of service. Certbot will communicate with Let’s Encrypt servers and automatically configure Apache with the issued certificates.
Step 7. Configure Firewall.
To set up a firewall for PrestaShop on Fedora 39, you can use the built-in firewall management tool, firewalld. If not already installed, you can install firewalld using the following command:
sudo dnf install firewalld
Once installed, start the firewall service and enable it to start at boot using the following commands:
sudo systemctl start firewalld
sudo systemctl enable firewalld
PrestaShop typically runs on a web server, which by default uses port 80 for HTTP and port 443 for HTTPS. You can open these ports in the firewall using the following commands:
sudo firewall-cmd --add-service=http --permanent
sudo firewall-cmd --add-service=https --permanent
After making changes, reload the firewall to apply them using the following command:
sudo firewall-cmd --reload
You can verify that the changes have been applied correctly using the following command:
sudo firewall-cmd --list-all
Step 8. Completing PrestaShop Installation via Web Browser.
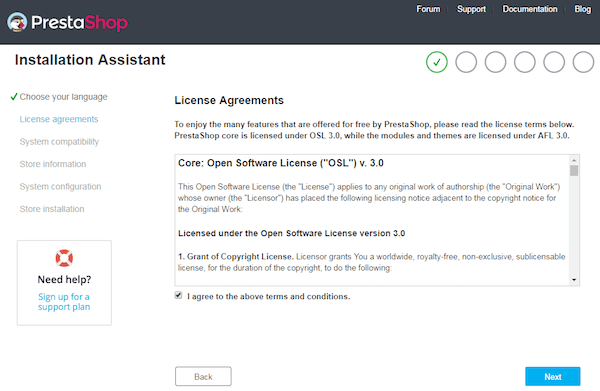
Now, access the PrestaShop installation wizard by navigating to https://your-domain.com in your web browser. Follow the steps to configure your shop, database, and admin account.

Congratulations! You have successfully installed PrestaShop. Thanks for using this tutorial for installing the PrestaShop e-commerce on your Fedora 39 system. For additional or useful information, we recommend you check the official PrestaShop website.