![]()
Ruby on Rails, often simply referred to as Rails, is a powerful and flexible web development framework written in Ruby. It follows the convention-over-configuration (CoC) and Don’t Repeat Yourself (DRY) principles, making it incredibly efficient for building modern web applications. This comprehensive guide provides a detailed walkthrough on how to install Ruby on Rails on CentOS Stream 10, a robust and reliable Linux distribution well-suited for server environments.
For beginners and experienced developers alike, setting up a development environment can sometimes be challenging. This article aims to simplify the process, offering step-by-step instructions to ensure a smooth and successful installation. We’ll cover everything from initial server setup to verifying your Rails installation, providing valuable insights and troubleshooting tips along the way. Get ready to dive into the world of Ruby on Rails development!
Why Ruby on Rails?
Ruby on Rails is celebrated for its rapid development capabilities. Its emphasis on convention allows developers to build applications faster with less code. The framework includes tools and libraries that handle common web development tasks, such as database interactions, routing, and templating. This streamlines the development process, making it easier to create sophisticated web applications efficiently.
- Convention over Configuration (CoC): Reduces the need for extensive configuration, allowing developers to focus on building features.
- Don’t Repeat Yourself (DRY): Promotes code reusability and reduces redundancy, making applications easier to maintain.
- Large and Active Community: Offers extensive documentation, tutorials, and community support, making it easier to find solutions and learn best practices.
- Rich Ecosystem of Gems: Provides access to a vast collection of libraries (gems) that extend the framework’s functionality and simplify common tasks.
Why CentOS Stream 10?
CentOS Stream 10 is a continuously delivered Linux distribution that serves as an upstream (development) platform for Red Hat Enterprise Linux (RHEL). It offers a stable and reliable environment, making it an excellent choice for deploying web applications. Its robust nature ensures consistent performance, while its regular updates provide access to the latest features and security patches.
- Stability: Provides a stable and reliable environment for running web applications.
- Security: Offers regular security updates and patches, ensuring your server remains protected against potential threats.
- Performance: Delivers excellent performance, making it suitable for hosting high-traffic web applications.
- Community Support: Benefits from a strong community, providing access to a wealth of resources and support.
By combining Ruby on Rails with CentOS Stream 10, you get a powerful, efficient, and reliable platform for building and deploying web applications.
Prerequisites
Before diving into the installation process, there are a few prerequisites you need to take care of. These initial steps ensure that your CentOS Stream 10 server is properly set up and ready for Ruby on Rails.
Setting Up Your CentOS Stream 10 Server
First, you will need a CentOS Stream 10 server. You can set this up on a cloud provider like AWS, Google Cloud, or DigitalOcean, or on a local virtual machine using software like VirtualBox or VMware. Ensure your server has internet access so you can download the necessary packages.
Creating a User Account with Sudo Privileges
For security reasons, it’s best to avoid working directly with the root account. Instead, create a new user account with sudo privileges. This allows you to perform administrative tasks without compromising the system’s security.
To create a new user, use the following command, replacing newuser with your desired username:
sudo adduser newuserNext, set a password for the new user:
sudo passwd newuserAdd the user to the wheel group to grant sudo privileges:
sudo usermod -aG wheel newuserNow, you can switch to the new user account:
su - newuserUpdating the System
Before installing any new software, it’s crucial to update your system’s package repositories and installed packages. This ensures you have the latest versions and security patches.
Run the following command to update your system:
sudo dnf update -yThis command updates all installed packages to their latest versions. The -y flag automatically answers “yes” to any prompts, streamlining the process.
Basic Terminal Knowledge
Familiarity with basic terminal commands is essential for installing and managing Ruby on Rails. Here are some commands you should know:
cd: Change directoryls: List files and directoriesmkdir: Create a new directoryrm: Remove files or directoriescp: Copy files or directoriesmv: Move files or directoriessudo: Execute commands with administrative privileges
Basic Security Practices
Before proceeding with the installation, it’s important to consider basic security practices. These practices help protect your server from potential threats.
- Use Strong Passwords: Ensure all user accounts have strong, unique passwords.
- Enable a Firewall: Use
firewalldto configure a firewall and restrict access to unnecessary ports. - Keep Software Updated: Regularly update your system and installed software to patch security vulnerabilities.
- Disable Root Login: Prevent direct login to the root account to reduce the risk of unauthorized access.
By following these prerequisites, you’ll have a solid foundation for installing Ruby on Rails on CentOS Stream 10.
Installing Dependencies
Ruby on Rails relies on several dependencies to function correctly. These dependencies include Git, GCC, Make, and other development tools. Installing these dependencies ensures that Ruby and Rails can be compiled and run without issues.
Package Management with DNF
CentOS Stream 10 uses DNF (Dandified Yum) as its package manager. DNF is a powerful tool for installing, updating, and removing software packages. It automatically handles dependencies, making the installation process easier and more reliable.
Essential Dependencies
Here’s a list of essential dependencies you need to install:
- Git: A distributed version control system used for tracking changes in source code.
- GCC: The GNU Compiler Collection, which includes compilers for C, C++, and other languages.
- Make: A build automation tool used to compile and install software packages.
- Zlib and Zlib-devel: A compression library used by Ruby and other software.
- Libyaml-devel: A library for parsing YAML files, which are commonly used in Rails applications.
- Readline-devel: A library for providing command-line editing and history features.
- Openssl-devel: A library for implementing secure communication protocols.
- Libffi-devel: A library that provides a portable interface for calling external functions.
- Bzip2: A data compression program.
- Autoconf and Automake: Tools for automatically configuring software build processes.
- Libtool: A generic library support script.
- Bison: A parser generator.
- CURL: A command-line tool for transferring data with URLs.
- Sqlite-devel: A software library that provides a relational database management system.
Installing Dependencies with DNF
To install these dependencies, run the following command:
sudo dnf install -y git gcc make zlib-devel libyaml-devel readline-devel openssl-devel libffi-devel bzip2 autoconf automake libtool bison curl sqlite-develThis command installs all the necessary dependencies. The -y flag automatically answers “yes” to any prompts.
Role of Each Dependency
- Git: Used for version control, allowing you to track changes to your Rails application’s code.
- GCC and Make: Used to compile Ruby extensions and other software components.
- Zlib, Libyaml, Readline, Openssl, and Libffi: Provide essential libraries for Ruby and Rails to function correctly.
- Autoconf, Automake, and Libtool: Used to configure and build software packages.
- Bison: Helps in generating parsers for various file formats.
- CURL: Facilitates the transfer of data via URLs, which is often necessary for interacting with APIs and other web services.
- Sqlite-devel: Provides the necessary tools and libraries for working with SQLite databases, a common choice for development environments.
By installing these dependencies, you ensure that your CentOS Stream 10 system is fully prepared for Ruby on Rails development.
Installing Ruby Version Manager (RVM)
RVM (Ruby Version Manager) is a command-line tool that allows you to easily install, manage, and work with multiple Ruby environments on the same system. This is particularly useful for developers who need to work on projects with different Ruby versions.
Benefits of Using RVM
- Manage Multiple Ruby Versions: Install and switch between different Ruby versions effortlessly.
- Isolated Environments: Create isolated Ruby environments for each project, preventing dependency conflicts.
- Simplified Installation: Simplifies the installation process, making it easier to set up Ruby on your system.
Steps to Install RVM
Follow these steps to install RVM on your CentOS Stream 10 system:
Import the GPG Key
Before installing RVM, import the GPG key to verify the authenticity of the installation script:
gpg --keyserver hkps://keyserver.ubuntu.com --recv-keys 409B6B1796C275462A1703113804BB82D39DC0E3 7D2BAF1CF37B13E2069D6956105BD0E739499BDBInstall RVM Using the Installation Script
Download and run the RVM installation script:
curl -sSL https://get.rvm.io | bash -s stableThis command downloads the RVM installation script and executes it. The stable option ensures you install the latest stable version of RVM.
Load RVM into the Current Shell Session
After installation, load RVM into your current shell session:
source ~/.rvm/scripts/rvmThis command loads the RVM environment variables and functions, allowing you to use RVM commands.
RVM Requirements
RVM has some dependencies that need to be installed separately. You can check the requirements by running:
rvm requirementsThis command lists any missing dependencies. Install them using DNF:
sudo dnf install -y patch autoconf automake bison gcc-c++ libffi-devel libtool make nodejs openssl-devel readline-devel sqlite-devel zlib-develUsing a Non-Root User for RVM Installation
It’s crucial to install RVM as a non-root user. Installing RVM as root can lead to permission issues and security vulnerabilities. Always use a regular user account with sudo privileges.
By following these steps, you’ll have RVM installed and configured on your CentOS Stream 10 system, ready to manage your Ruby environments.
Installing Ruby
With RVM installed, you can now install Ruby. RVM simplifies the process of installing and managing multiple Ruby versions, making it easy to switch between different environments.
Listing Available Ruby Versions
To see a list of available Ruby versions, use the following command:
rvm list knownThis command displays a list of Ruby versions that can be installed using RVM.
Installing a Specific Ruby Version
To install a specific Ruby version, use the following command, replacing 3.2.2 with your desired version:
rvm install 3.2.2RVM downloads and installs the specified Ruby version. This process may take some time, depending on your internet connection and system resources.
Setting the Default Ruby Version
After installing Ruby, set it as the default version:
rvm use 3.2.2 --defaultThis command sets the specified Ruby version as the default for all new terminal sessions.
Verifying the Ruby Installation
Verify that Ruby is installed correctly by checking its version:
ruby -vThis command displays the installed Ruby version. Make sure it matches the version you installed with RVM.
Troubleshooting Common Installation Issues
- Missing Dependencies: If you encounter errors during installation, make sure you have installed all the necessary dependencies. Run
rvm requirementsto check for missing dependencies. - Permission Issues: Ensure you are installing Ruby as a non-root user. Avoid using
sudowith RVM commands. - Network Problems: Check your internet connection if the installation process is slow or fails to download the necessary files.
Benefits of the Installed Ruby Version
Installing a specific Ruby version ensures compatibility with your Rails applications. Different Rails versions may require different Ruby versions, so it’s essential to use the correct version for your project.
By following these steps, you’ll have Ruby installed and configured on your CentOS Stream 10 system, ready for Rails development.
Installing Rails
With Ruby installed, you can now install Rails. Rails is distributed as a Ruby gem, making it easy to install using the gem command.
RubyGems and Bundler
RubyGems is a package manager for Ruby libraries and applications. Bundler is a dependency manager that ensures your Rails application uses the correct versions of its dependencies.
Updating RubyGems
Before installing Rails, update RubyGems to the latest version:
gem update --systemThis command updates RubyGems to the latest version, ensuring you have access to the latest features and security patches.
Installing Bundler
Install Bundler to manage your application’s dependencies:
gem install bundlerBundler helps you define and manage the dependencies for your Rails application, ensuring that all the necessary gems are installed and compatible.
Installing Rails
Install Rails using the gem install command:
gem install railsThis command installs the latest version of Rails. If you need to install a specific version, use the -v flag:
gem install rails -v 7.0.4Potential Issues During Installation
- Missing Dependencies: If you encounter errors during installation, make sure you have installed all the necessary dependencies. Check the error message for specific missing libraries.
- Permission Issues: Ensure you have the necessary permissions to install gems. Avoid using
sudounless necessary. - Network Problems: Check your internet connection if the installation process is slow or fails to download the necessary gems.
Verifying the Rails Installation
Verify that Rails is installed correctly by checking its version:
rails -vThis command displays the installed Rails version. Make sure it matches the version you installed with gem install.
Keeping Rails Updated
Regularly update Rails to benefit from the latest features, bug fixes, and security patches:
gem update railsThis command updates Rails to the latest version.
By following these steps, you’ll have Rails installed and configured on your CentOS Stream 10 system, ready to build web applications.
Configuring a JavaScript Runtime Environment
Rails relies on a JavaScript runtime environment to execute JavaScript code in the asset pipeline. Node.js is a popular choice for this purpose.
Need for a JavaScript Runtime Environment
A JavaScript runtime environment allows Rails to compile and execute JavaScript code, enabling features like asset bundling, minification, and transpilation.
Introducing Node.js
Node.js is a JavaScript runtime built on Chrome’s V8 JavaScript engine. It allows you to run JavaScript code outside of a web browser, making it suitable for server-side scripting and command-line tools.
Installing Node.js Using DNF
Install Node.js using DNF:
sudo dnf install -y nodejsThis command installs Node.js on your CentOS Stream 10 system.
Verifying the Node.js Installation
Verify that Node.js is installed correctly by checking its version:
node -vThis command displays the installed Node.js version.
Integrating Node.js with the Rails Asset Pipeline
Rails automatically detects Node.js and uses it to compile JavaScript assets. You don’t need to configure anything manually. Simply ensure that Node.js is installed and available in your system’s PATH.
By installing Node.js, you enable Rails to process JavaScript assets, enhancing the functionality and performance of your web applications.
Creating a New Rails Application
With Ruby and Rails installed, you can now create a new Rails application. This involves using the rails new command to generate a basic application structure.
Command to Create a New Rails Application
To create a new Rails application, use the following command, replacing myapp with your desired application name:
rails new myappThis command generates a new Rails application in a directory named myapp.
Options for Database Configuration
Rails supports various database systems, including SQLite, PostgreSQL, and MySQL. You can specify the database system when creating the application using the -d flag:
- SQLite:
rails new myapp -d sqlite3 - PostgreSQL:
rails new myapp -d postgresql - MySQL:
rails new myapp -d mysql
Navigating to the Application Directory
After creating the application, navigate to the application directory:
cd myappBasic Structure of a Rails Application
A Rails application has a well-defined directory structure:
- app: Contains the application’s models, views, and controllers.
- config: Contains configuration files, such as database settings and routes.
- db: Contains database migrations and schema files.
- lib: Contains custom libraries and modules.
- log: Contains log files.
- public: Contains static assets, such as images and JavaScript files.
- test: Contains test files.
- vendor: Contains third-party libraries and plugins.
Common Directories and Files
- app/models: Contains the application’s data models.
- app/views: Contains the application’s view templates.
- app/controllers: Contains the application’s controllers, which handle user requests.
- config/routes.rb: Defines the application’s routes.
- db/migrate: Contains database migrations.
- Gemfile: Lists the application’s dependencies.
By creating a new Rails application, you set up the basic structure for building your web application.
Starting the Rails Server
With a new Rails application created, you can now start the Rails server to preview your application in a web browser.
Command to Start the Rails Server
To start the Rails server, use the following command:
rails serverThis command starts the Rails server on the default port (3000) and address (localhost).
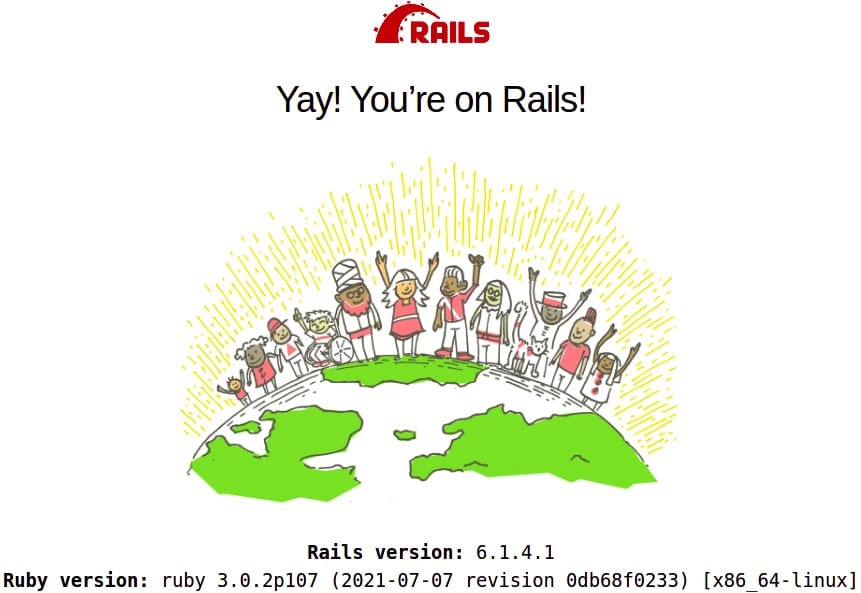
Accessing the Rails Application in a Web Browser
Open your web browser and navigate to http://localhost:3000 to access your Rails application. You should see the default Rails welcome page.
Troubleshooting Common Server Startup Issues
- Port Already in Use: If the port is already in use, you can specify a different port using the
-pflag:rails server -p 4000. - Missing Dependencies: If you encounter errors during startup, make sure you have installed all the necessary dependencies. Run
bundle installto install any missing gems. - Database Configuration Issues: Check your database configuration in
config/database.ymlto ensure it’s correctly set up.
Default Rails Welcome Page
The default Rails welcome page displays information about your Rails environment and provides links to documentation and resources.
Configuring the Server Port and Address
You can configure the server port and address using the -p and -b flags:
- Port:
rails server -p 4000 - Address:
rails server -b 0.0.0.0(to listen on all interfaces)
By starting the Rails server, you can preview your application in a web browser and begin developing its features.
Congratulations! You have successfully installed Ruby on Rails. Thanks for using this tutorial for installing Ruby on Rails on your CentOS Stream 10 system. For additional or useful information, we recommend you check the official Ruby on Rails website.
[su_box title=”VPS Manage Service Offer” style=”bubbles” box_color=”#000000″ radius=”10″]If you don’t have time to do all of this stuff, or if this is not your area of expertise, we offer a service to do “VPS Manage Service Offer”, starting from $10 (Paypal payment). Please contact us to get the best deal![/su_box]