In this tutorial, we will show you how to install Sysdig on Ubuntu 20.04 LTS. For those of you who didn’t know, Sysdig is a free and open-source activity monitoring tool that can be used to capture and analyze application logs. It provides a complete overview of the usage of CPU, Memory, IO, users, and more directly on the command terminal in a well-structured interface. Sysdig can be installed on almost all operating systems, even on Windows and OS X.
This article assumes you have at least basic knowledge of Linux, know how to use the shell, and most importantly, you host your site on your own VPS. The installation is quite simple and assumes you are running in the root account, if not you may need to add ‘sudo‘ to the commands to get root privileges. I will show you the step-by-step installation of the Sysdig monitoring tool on Ubuntu 20.04 (Focal Fossa). You can follow the same instructions for Ubuntu 18.04, 16.04, and any other Debian-based distribution like Linux Mint.
Prerequisites
- A server running one of the following operating systems: Ubuntu 20.04, 18.04, 16.04, and any other Debian-based distribution like Linux Mint.
- It’s recommended that you use a fresh OS install to prevent any potential issues.
- SSH access to the server (or just open Terminal if you’re on a desktop).
- A
non-root sudo useror access to theroot user. We recommend acting as anon-root sudo user, however, as you can harm your system if you’re not careful when acting as the root.
Install Sysdig on Ubuntu 20.04 LTS Focal Fossa
Step 1. First, make sure that all your system packages are up-to-date by running the following apt commands in the terminal.
sudo apt update
sudo apt upgrade
sudo apt install gnupg software-properties-common curl -y
sudo apt install linux-headers-$(uname -r)
Step 2. Installing Sysdig on Ubuntu 20.04.
Now we run the following command to install the Sysdig to your system:
curl -s https://s3.amazonaws.com/download.draios.com/stable/install-sysdig | bash
After this command, you need to update your server and install it:
sudo apt update
sudo apt install sysdig
Once the installation has been completed, you can see more information about the Sysdig with the following command:
sysdig --help
Step 3. How to use Sysdig.
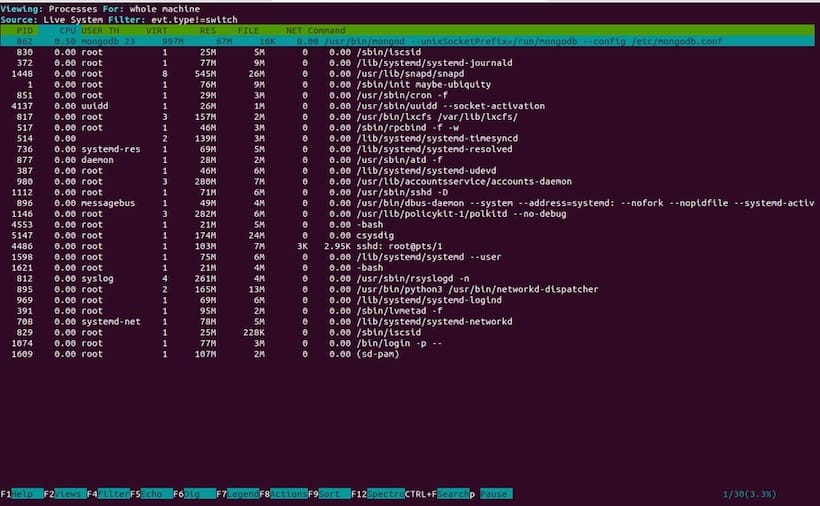
You can run the csysdig command to display the running processes, CPU usage, and memory usage:
sudo csydig
Something like the below output you will see:
- PID: Process PID.
- CPU: Amount of CPU used by the process.
- TH: Number of threads that the process contains.
- VIRT: Total virtual memory for the process.
- RES: Resident’s non-swapped memory for the process.
- FILE: Total (input+output) file I/O bandwidth generated by the process, in bytes per second.
- NET: Total (input+output) network I/O bandwidth generated by the process, in bytes per second.
- Command: The full command line of the process

Congratulations! You have successfully installed Sysdig. Thanks for using this tutorial for installing the Sysdig monitoring system on Ubuntu 20.04 LTS Focal Fossa system. For additional help or useful information, we recommend you check the official Sysdig website.