How To Install UNetbootin on Ubuntu 24.04 LTS

Creating bootable USB drives is an essential skill for Linux enthusiasts and system administrators. UNetbootin, short for Universal Netboot Installer, is a powerful tool that simplifies this process, allowing users to create bootable USB drives for various Linux distributions without the need for burning CDs. In this comprehensive guide, we’ll walk you through the process of installing UNetbootin on Ubuntu 24.04, exploring multiple methods and providing detailed instructions for each.
What is UNetbootin?
UNetbootin is a versatile, cross-platform utility designed to create bootable USB drives for Linux distributions. It offers a user-friendly interface that allows both novice and experienced users to easily create live USB systems for installing or testing various Linux flavors. Some key features of UNetbootin include:
- Support for a wide range of Linux distributions
- Ability to use custom ISO files
- Built-in distribution downloader
- Cross-platform compatibility (Windows, macOS, and Linux)
For Ubuntu 24.04 users, UNetbootin provides a straightforward method to create bootable USB drives, which can be particularly useful for systems without CD/DVD drives or for those who prefer the portability and reusability of USB drives.
Prerequisites
Before we dive into the installation process, let’s ensure you have everything needed to successfully install and use UNetbootin on your Ubuntu 24.04 system:
- A computer running Ubuntu 24.04
- An active internet connection for downloading software and dependencies
- Administrative privileges on your system
- A USB drive with at least 4GB capacity, formatted as FAT32
- Basic familiarity with the terminal
To prepare your system, open a terminal and run the following command to update your system packages:
sudo apt update && sudo apt upgrade -yThis ensures that your system is up-to-date and ready for the installation process.
Methods to Install UNetbootin on Ubuntu 24.04
There are several ways to install UNetbootin on Ubuntu 24.04. We’ll cover three primary methods, each with its own advantages and use cases.
1. Installing UNetbootin Using the Official PPA
The Personal Package Archive (PPA) method is often the simplest and most straightforward way to install UNetbootin on Ubuntu systems. Here’s a step-by-step guide:
- Open a terminal window.
- Add the official UNetbootin PPA repository by running:
sudo add-apt-repository ppa:gezakovacs/ppa - Update your package lists:
sudo apt update - Install UNetbootin:
sudo apt install unetbootin
Once the installation is complete, you can launch UNetbootin either from the terminal by typing unetbootin or by searching for it in the Applications menu.
Troubleshooting PPA Installation:
- If you encounter dependency errors, try running
sudo apt --fix-broken installto resolve them. - In case the PPA is outdated, you may need to consider alternative installation methods.
2. Installing UNetbootin Using Binary Files from the Official Website
When the PPA method isn’t suitable or you need the latest version, installing UNetbootin using binary files is an excellent alternative. Follow these steps:
- Download the latest binary file from the official UNetbootin GitHub repository:
wget https://github.com/unetbootin/unetbootin/releases/download/702/unetbootin-linux64-702.binNote: Replace “702” with the latest version number available at the time of installation.
- Make the downloaded file executable:
chmod +x ./unetbootin-linux64-702.bin - Run the binary file to launch UNetbootin:
sudo ./unetbootin-linux64-702.bin
Tips for Managing Binary Installations:
- Always download binary files from trusted sources to ensure security.
- Keep track of the location where you save the binary file for easy updates and removal.
- Consider creating a desktop shortcut or adding the binary to your PATH for convenient access.
3. Alternative Installation Methods
For users who prefer different package management systems or those who enjoy a more hands-on approach, here are two alternative methods to install UNetbootin:
Using Snap Packages
Snap packages offer a universal Linux package format that can simplify software installation and management. To install UNetbootin using Snap:
sudo snap install unetbootin --classicAdvantages of Snap Installation:
- Easy installation and removal
- Automatic updates
- Sandboxed environment for improved security
Potential Drawbacks:
- Larger installation size compared to traditional packages
- Possible compatibility issues with external drives due to sandboxing
Compiling from Source Code (Advanced Users)
For advanced users who want complete control over the installation process, compiling UNetbootin from source is an option. Here’s a general outline of the process:
- Clone the UNetbootin repository from GitHub:
git clone https://github.com/unetbootin/unetbootin.git - Install build dependencies:
sudo apt install build-essential qt5-default qttools5-dev-tools - Navigate to the cloned directory and compile:
cd unetbootin qmake make - Install the compiled program:
sudo make install
Compiling from source allows for customization and ensures you have the absolute latest version, but it requires more technical knowledge and time.
How to Use UNetbootin to Create a Bootable USB Drive
Now that you have UNetbootin installed, let’s walk through the process of creating a bootable USB drive:
- Launch UNetbootin from the terminal or application menu.
- Choose a distribution or ISO file:
- For pre-configured distributions, select from the dropdown menu.
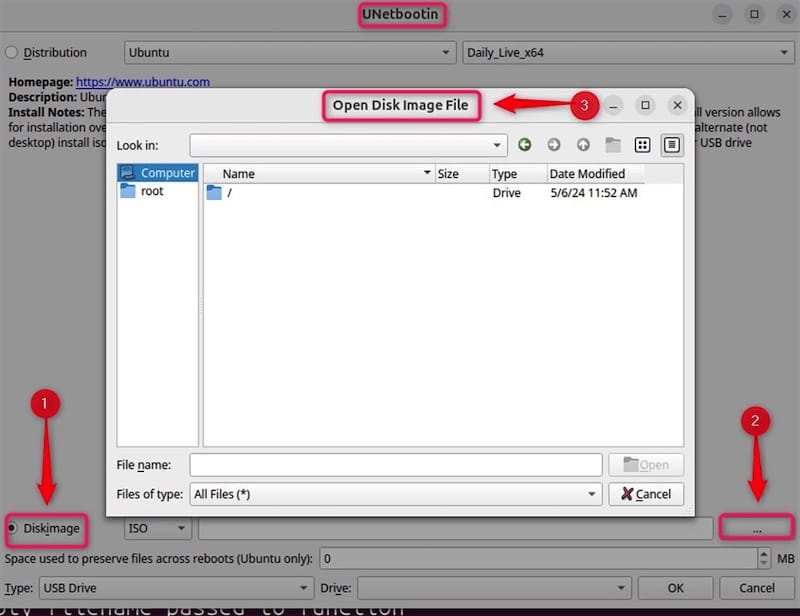
- For custom ISO files, select the “Diskimage” option and browse to your ISO file.
- Select your target USB drive from the “Drive” dropdown menu. Be extremely careful to choose the correct drive to avoid data loss.
- Click “OK” to start the process of creating the bootable USB drive.
- Wait for the process to complete. This may take several minutes depending on the size of the distribution or ISO file.

After the process is complete, it’s crucial to verify that the bootable USB drive works correctly. You can do this by restarting your computer and booting from the USB drive.
Common Issues and Troubleshooting Tips
While UNetbootin is generally reliable, you may encounter some issues. Here are some common problems and their solutions:
USB Drive Not Detected by UNetbootin
Solution: Ensure your USB drive is formatted as FAT32. You can use the ‘Disks’ utility or ‘GParted’ to reformat the drive if necessary.
Permission Errors When Running Binary Files
Solution: Double-check that you’ve made the file executable using the chmod +x command. If issues persist, try running the command with sudo.
Bootable USB Not Working After Creation
Solution: Verify the integrity of your ISO file using checksums. Corrupt ISO files can lead to non-bootable USB drives. Also, ensure your computer’s BIOS is set to boot from USB devices.
UNetbootin Freezes During Operation
Solution: This can sometimes occur due to system resource constraints. Try closing other applications and restarting UNetbootin. If the problem persists, consider using an alternative tool like Etcher or dd command.
Congratulations! You have successfully installed UNetbootin. Thanks for using this tutorial for installing UNetbootin on the Ubuntu 24.04 LTS system. For additional help or useful information, we recommend you check the official UNetbootin website.