How To Install WebERP on Fedora 41

WebERP is a powerful, open-source web-based accounting and business management system that can greatly enhance your organization’s financial operations. In this comprehensive guide, we’ll walk you through the process of installing WebERP on Fedora 41, ensuring you have a robust and efficient accounting solution up and running in no time.
Prerequisites
Before we dive into the installation process, let’s ensure you have all the necessary components in place:
System Requirements
- A Fedora 41 server with root access
- Minimum of 2GB RAM (4GB recommended for optimal performance)
- At least 20GB of free disk space
- A stable internet connection for downloading packages
Required Packages
WebERP relies on the LAMP stack (Linux, Apache, MySQL/MariaDB, PHP) and some additional dependencies. We’ll install the following packages:
- Apache web server
- MariaDB (MySQL fork)
- PHP and necessary modules
- Additional utilities like wget and unzip
Preparing the Environment
Let’s start by updating your Fedora 41 system and installing the required packages.
System Updates
First, ensure your system is up to date:
sudo dnf update -y
LAMP Stack Installation
Now, let’s install the LAMP stack components:
sudo dnf install httpd mariadb-server php php-mysqlnd php-gd php-xml php-mbstring php-json php-intl php-opcache -y
After the installation is complete, start and enable the Apache and MariaDB services:
sudo systemctl start httpd mariadb
sudo systemctl enable httpd mariadb
Securing MariaDB
Run the MariaDB secure installation script to set a root password and remove insecure defaults:
sudo mysql_secure_installation
Follow the prompts to set a strong root password and answer ‘Y’ to all security questions.
WebERP Installation Process
With our environment prepared, we can now proceed with the WebERP installation.
Downloading WebERP
First, let’s download the latest stable version of WebERP:
cd /tmp
wget https://sourceforge.net/projects/web-erp/files/latest/download -O weberp.zip
unzip weberp.zip
sudo mv webERP /var/www/html/weberp
File Configuration
Set the correct permissions for the WebERP directory:
sudo chown -R apache:apache /var/www/html/weberp
sudo chmod -R 755 /var/www/html/weberp
Apache Virtual Host Configuration
Create a new Apache configuration file for WebERP:
sudo nano /etc/httpd/conf.d/weberp.conf
Add the following content to the file:
<VirtualHost *:80>
    ServerAdmin webmaster@yourdomain.com
    DocumentRoot /var/www/html/weberp
    ServerName weberp.yourdomain.com
    ErrorLog /var/log/httpd/weberp_error.log
    CustomLog /var/log/httpd/weberp_access.log combined
    <Directory /var/www/html/weberp>
        Options FollowSymLinks
        AllowOverride All
        Require all granted
    </Directory>
</VirtualHost>
Save the file and exit the editor. Then, restart Apache to apply the changes:
sudo systemctl restart httpd
Database Setup
Now, let’s set up the database for WebERP.
MariaDB Configuration
Log into MariaDB as the root user:
sudo mysql -u root -p
Create a new database and user for WebERP:
CREATE DATABASE weberp;
CREATE USER 'weberpuser'@'localhost' IDENTIFIED BY 'your_strong_password';
GRANT ALL PRIVILEGES ON weberp.* TO 'weberpuser'@'localhost';
FLUSH PRIVILEGES;
EXIT;
Replace ‘your_strong_password’ with a secure password of your choice.
WebERP Configuration
With the database set up, we can now configure WebERP through its web-based setup.
Web-based Setup
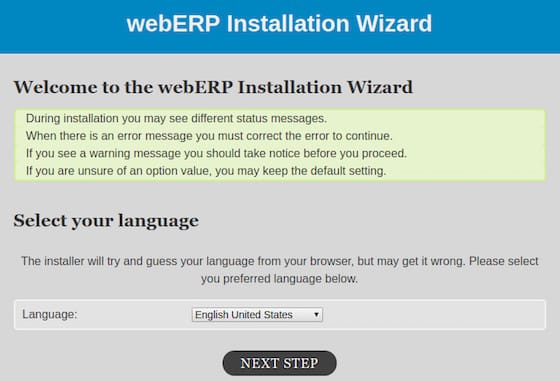
Open your web browser and navigate to http://weberp.yourdomain.com or http://your_server_ip/weberp. You should see the WebERP setup page.
Follow these steps to complete the setup:
- Choose your language and click “Next”.
- Enter the database details (database name, username, and password) you created earlier.
- Set up your company information and admin user account.
- Choose whether to install demo data (recommended for testing).
- Complete the installation process by following the on-screen instructions.

Security Considerations
After installation, it’s crucial to implement security measures to protect your WebERP instance.
SSL/TLS Implementation
To secure your WebERP traffic, install an SSL certificate. You can use Let’s Encrypt for a free certificate:
sudo dnf install certbot python3-certbot-apache -y
sudo certbot --apache -d weberp.yourdomain.com
File Permissions Hardening
Ensure that sensitive files are not accessible from the web:
sudo chmod 400 /var/www/html/weberp/config.php
sudo chmod 750 /var/www/html/weberp/companies
Database Security Best Practices
Regularly update your database passwords and limit remote access to the database server.
Post-Installation Tasks
After successfully installing WebERP, perform these important tasks:
Testing the Installation
Log in to your WebERP instance and navigate through different modules to ensure everything is working correctly. Create test transactions to verify the system’s functionality.
Backup Configuration
Set up regular backups of your WebERP database and configuration files:
sudo mkdir /var/backups/weberp
sudo mysqldump -u root -p weberp > /var/backups/weberp/weberp_db_backup_$(date +%Y%m%d).sql
sudo cp -R /var/www/html/weberp /var/backups/weberp/weberp_files_backup_$(date +%Y%m%d)
Update Procedures
Regularly check for WebERP updates and apply them to keep your system secure and up-to-date. Always backup your data before performing updates.
Troubleshooting Guide
If you encounter issues during or after installation, try these troubleshooting steps:
Common Installation Issues
- Database Connection Errors: Double-check your database credentials in the WebERP configuration file.
- PHP Module Missing: Ensure all required PHP modules are installed and enabled.
- Apache Not Starting: Check Apache error logs for detailed information.
Configuration Problems
If you’re experiencing configuration issues:
- Verify that the
config.phpfile has the correct database settings. - Ensure Apache has read permissions for the WebERP directory.
- Check PHP error logs for any PHP-related issues.
Permission Errors
For permission-related problems:
sudo chown -R apache:apache /var/www/html/weberp
sudo find /var/www/html/weberp -type d -exec chmod 755 {} \;
sudo find /var/www/html/weberp -type f -exec chmod 644 {} \;
Maintenance and Updates
To keep your WebERP installation running smoothly:
Regular Backup Procedures
Implement a cron job for automated backups:
sudo crontab -e
Add the following line to run daily backups:
0 2 * * * /usr/bin/mysqldump -u root -p'your_root_password' weberp > /var/backups/weberp/weberp_db_backup_$(date +\%Y\%m\%d).sql
Update Management
Regularly check the WebERP website for updates. When updating:
- Backup your current installation and database.
- Download the new version and replace the old files.
- Run the update script provided with the new version.
- Test thoroughly after updating.
Performance Optimization
To optimize WebERP performance:
- Enable PHP OpCache for faster PHP execution.
- Use MariaDB query caching for frequently accessed data.
- Implement server-side caching with tools like Redis or Memcached.
Congratulations! You have successfully installed WebERP. Thanks for using this tutorial for installing WebERP on the Fedora 41 system. For additional help or useful information, we recommend you check the official WebERP website.