How To Install WildFly on Debian 12

In this tutorial, we will show you how to install WildFly on Debian 12. For those of you who didn’t know, WildFly formerly known as JBoss, is a leading open-source Java application server that provides a robust platform for developing and deploying Java-based applications. If you’re a developer working with Java applications, WildFly can significantly enhance your productivity and performance.
This article assumes you have at least basic knowledge of Linux, know how to use the shell, and most importantly, you host your site on your own VPS. The installation is quite simple and assumes you are running in the root account, if not you may need to add ‘sudo‘ to the commands to get root privileges. I will show you step-by-step install WildFly on a Debian 12 (Bookworm).
Prerequisites
- A server running one of the following operating systems: Debian 12 (Bookworm).
- It’s recommended that you use a fresh OS install to prevent any potential issues.
- SSH access to the server (or just open Terminal if you’re on a desktop).
- An active internet connection. You’ll need an internet connection to download the necessary packages and dependencies for WildFly.
- A
non-root sudo useror access to theroot user. We recommend acting as anon-root sudo user, however, as you can harm your system if you’re not careful when acting as the root.
Install WildFly on Debian 12 Bookworm
Step 1. Before we install any software, it’s important to make sure your system is up to date by running the following apt commands in the terminal:
sudo apt update
sudo apt install curl gpg gnupg2 software-properties-common apt-transport-https lsb-release ca-certificates
This command will refresh the repository, allowing you to install the latest versions of software packages.
Step 2. Installing Java.
WildFly requires a compatible Java Development Kit (JDK) to run your Java applications. Now run the following command to install OpenJDK:
sudo apt install openjdk-17-jdk
To confirm that the JDK is successfully installed, run the following command:
java -version
Step 3. Installing WildFly on Debian 12.
Now that you have Debian 12 Bookworm and the JDK installed, let’s proceed with the WildFly installation process. First, download the latest stable version of WildFly to your Debian system:
wget https://download.jboss.org/wildfly/{VERSION}/wildfly-{VERSION}.zip
Replace {VERSION} with the appropriate version number (e.g., 27.0.1) you want to download.
Next, extract the downloaded archive:
unzip wildfly-{VERSION}.zip
The extracted files will be located in a new directory named wildfly-{VERSION}.
Before installing WildFly, it’s essential to set up the necessary environment variables. We’ll configure JAVA_HOME and add Java’s bin directory to the system’s PATH:
nano ~/.bashrc
Add the following lines at the end of the file:
export JAVA_HOME=/usr/lib/jvm/java-{VERSION}-openjdk-amd64
export PATH=$PATH:$JAVA_HOME/bin
Replace {VERSION} with the installed JDK version, such as 17.
Save the changes and exit the text editor then, apply the changes to the current terminal session:
source ~/.bashrc
With the environment set up, it’s time to install WildFly on Debian 12 Bookworm.
Open a terminal and navigate to the wildfly-{VERSION} directory and run the following command to start the installation process:
./bin/standalone.sh
Wait for WildFly to start. Once it’s up and running, you’ll see log messages indicating a successful deployment.
Step 4. Configuring WildFly.
While WildFly can work with its default configuration, it’s often necessary to customize it to suit your specific requirements. Let’s explore the two configuration modes available in WildFly: standalone and domain.
- A. Standalone Mode Configuration:
Standalone mode is suitable for most use cases, where you run a single WildFly instance. To configure WildFly in standalone mode:
- Navigate to the
wildfly-{VERSION}/standalone/configurationdirectory. - Open the
standalone.xmlfile using a text editor. - Customize the configuration settings based on your application’s needs.
- Save the changes and restart WildFly.
- B. Domain Mode Configuration (optional):
Domain mode allows you to manage multiple WildFly instances as a group, offering additional flexibility and scalability. To configure WildFly in domain mode:
- Navigate to the
wildfly-{VERSION}/domain/configurationdirectory. - Open the
domain.xmlfile using a text editor. - Customize the domain configuration based on your requirements.
- Save the changes and restart WildFly.
Step 5. Starting and Testing WildFly.
Now that you have WildFly installed and configured, let’s start the server and test its functionality. Now open a terminal and navigate to the wildfly-{VERSION}/bin directory and run the following command to start the WildFly server:
./standalone.sh -b=0.0.0.0
The -b=0.0.0.0 option ensures that the server binds to all available network interfaces.
Step 6. Configure the Firewall.
If your server is protected by a firewall and you want to access the WildFly interface from the outside of your local network you need to open port 9990:
sudo ufw allow 9990/tcp
Step 7. Accessing WildFly Web Interface.
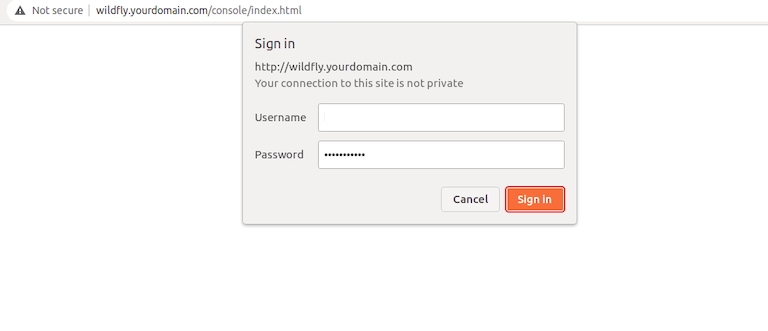
Once successfully installed, open your web browser and access the WildFly using the URL http://your-IP-address:9990/console. You will be redirected to the WildFly page:

You’ll be prompted to enter your management credentials. By default, the username is admin, and the password is admin.
Congratulations! You have successfully installed WildFly. Thanks for using this tutorial to install WildFly on Debian 12 Bookworm. For additional help or useful information, we recommend you check the official WildFly website.