How To Install XFCE Desktop Environment on Linux Mint 22

In this tutorial, we will show you how to install XFCE Desktop Environment on Linux Mint 22. Linux Mint is a popular distribution known for its user-friendly interface and versatility. Among its various desktop environments, XFCE stands out as a lightweight and highly customizable option. This article will guide you through the process of installing the XFCE desktop environment on Linux Mint 22, ensuring a smooth transition and optimal performance.
Understanding XFCE
What is XFCE?
XFCE is a free and open-source desktop environment designed for Unix-like operating systems. It is known for its speed and low resource consumption, making it an excellent choice for older hardware or users seeking a minimalistic experience. Unlike heavier environments like Cinnamon or GNOME, XFCE provides a balance between functionality and performance.
Why Choose XFCE?
The advantages of using XFCE include:
- Lightweight: XFCE requires fewer system resources, allowing it to run smoothly on older machines.
- Customizable: Users can tailor the desktop to their preferences with themes, plugins, and panel configurations.
- User-friendly: Its intuitive interface makes it easy for both new and experienced users to navigate.
XFCE is particularly ideal for users who prioritize speed and efficiency, whether on older hardware or simply looking for a more responsive desktop environment.
Prerequisites for Installation
System Requirements
Before installing XFCE, ensure your system meets the following minimum requirements:
- Processor: 1 GHz or faster
- RAM: 512 MB (1 GB recommended)
- Disk Space: At least 5 GB of free space
Backup Your Data
Before making significant changes to your system, it’s crucial to back up your data. This ensures that you can recover your files in case something goes wrong during the installation process. You can use tools like Timeshift or simply copy important files to an external drive.
Preparing Your System
Updating Your System
An updated system ensures compatibility with new packages. Open the terminal and run the following commands:
sudo apt update
sudo apt upgrade
This process will refresh your package list and install any available updates, keeping your system secure and efficient.
Checking Disk Space
To check your available disk space, use the command:
df -hThis command provides a human-readable format of disk usage, helping you confirm that you have enough space for the installation.
Installing Required Packages
You may need to install additional packages that facilitate the XFCE installation. Use the following command to install any necessary dependencies:
sudo apt install xfce4 xfce4-goodiesInstalling XFCE Desktop Environment
Installation Steps
The installation process for XFCE is straightforward. Execute the command mentioned above in your terminal. This command installs both the core XFCE desktop environment and additional goodies that enhance functionality.
Choosing a Display Manager
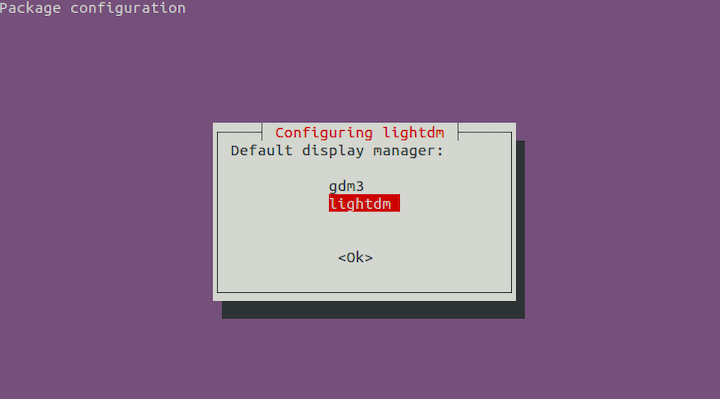
A display manager is responsible for managing user sessions and graphical logins. During installation, you may be prompted to choose a display manager. LightDM is recommended due to its lightweight nature and compatibility with XFCE.
Selecting LightDM
- If prompted, select LightDM from the list of available display managers.
- You can confirm your choice by pressing Enter.

Post-installation Configuration
After installation, you might want to configure some settings to optimize your experience with XFCE. This includes setting up your preferred applications, configuring keyboard shortcuts, and adjusting panel settings.
Switching to XFCE Desktop Environment
Logging Out and Selecting XFCE
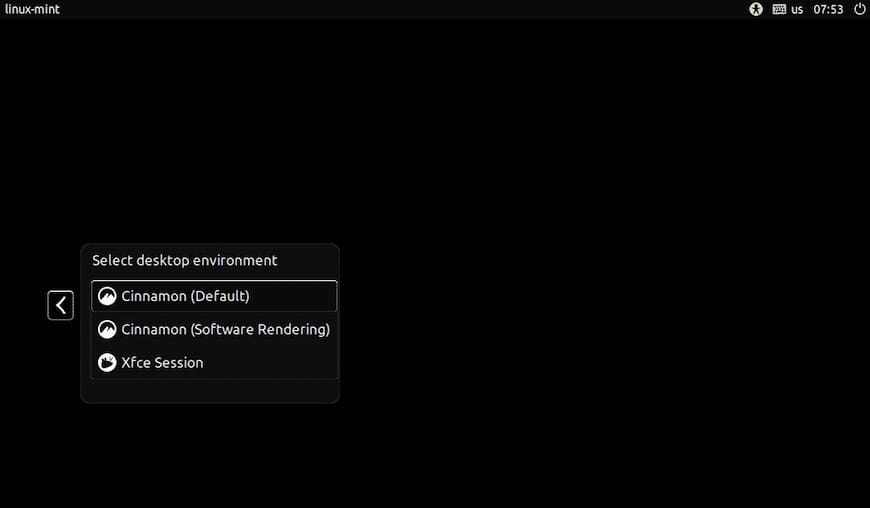
To switch to your newly installed XFCE environment, log out of your current session. On the login screen, look for a session menu (often represented by a gear icon) where you can select “XFCE Session” before logging in again.

First Time Login Experience
The first time you log into XFCE, you will be greeted with a welcome screen that introduces you to some basic features of the environment. Take this opportunity to explore various settings and customize your desktop according to your preferences.
Customizing Your XFCE Environment
Basic Customization Options
Xfce offers numerous customization options that allow you to personalize your desktop experience:
- Themes: Change themes by navigating to Xfce Settings Manager > Appearance > Style.
- Icons: Modify icon sets in the same Appearance settings menu under the Icons tab.
- Panel Settings: Right-click on the panel to add or remove items, change its position, or adjust its size.
Installing Additional Tools and Plugins
Add-ons can enhance functionality significantly. Consider installing tools like Whisker Menu for improved application access or panel plugins that provide system monitoring capabilities. Use the following command to install Whisker Menu:
sudo apt install xfce4-whiskermenu-pluginTroubleshooting Common Issues
Xfce Not Appearing in Session Menu
If you do not see XFCE listed as an option when logging in, check if it was installed correctly by running:
dpkg -l | grep xfce4If it’s not listed, repeat the installation steps ensuring there are no errors during installation.
Performance Issues
If you experience slow performance after switching to XFCE, consider these tips:
- Avoid Resource-Heavy Applications: Use lightweight alternatives whenever possible.
- Tweak Visual Effects: Go to Xfce Settings Manager > Window Manager Tweaks > Compositor, then disable compositing effects if they are causing lag.
- Killing Background Processes: Use the task manager (accessible via right-clicking on the panel) to terminate unnecessary applications running in the background.
Congratulations! You have successfully installed XFCE. Thanks for using this tutorial to install the latest version of XFCE Desktop Environment on the Linux Mint 22 system. For additional help or useful information, we recommend you check the official XFCE website.