How To Install DokuWiki on Ubuntu 22.04 LTS

In this tutorial, we will show you how to install DokuWiki on Ubuntu 22.04 LTS. For those of you who didn’t know, DokuWiki is a free and open-source wiki software written in PHP. It is simple and lightweight that uses a simple file format to store its data, so it does not require any database.
This article assumes you have at least basic knowledge of Linux, know how to use the shell, and most importantly, you host your site on your own VPS. The installation is quite simple and assumes you are running in the root account, if not you may need to add ‘sudo‘ to the commands to get root privileges. I will show you the step-by-step installation of the DokuWiki on Ubuntu 22.04 (Jammy Jellyfish). You can follow the same instructions for Ubuntu 22.04 and any other Debian-based distribution like Linux Mint, Elementary OS, Pop!_OS, and more as well.
Prerequisites
- A server running one of the following operating systems: Ubuntu 22.04, 20.04, and any other Debian-based distribution like Linux Mint.
- It’s recommended that you use a fresh OS install to prevent any potential issues.
- SSH access to the server (or just open Terminal if you’re on a desktop).
- A
non-root sudo useror access to theroot user. We recommend acting as anon-root sudo user, however, as you can harm your system if you’re not careful when acting as the root.
Install DokuWiki on Ubuntu 22.04 LTS Jammy Jellyfish
Step 1. First, make sure that all your system packages are up-to-date by running the following apt commands in the terminal.
sudo apt update
sudo apt upgrade
Step 2. Installing LAMP Stack on Ubuntu 22.04.
Before starting this tutorial, the LAMP server must be installed on your server. If you do not have LAMP Stack installed, you can follow our guide here.
Step 3. Installing DokuWiki on Ubuntu 22.04.
By default, DokuWiki is not available on Ubuntu 22.04 base repository. Now run the following command below to download the latest stable version of DokuWiki to your Ubuntu system:
wget https://download.dokuwiki.org/src/dokuwiki/dokuwiki-stable.tgz
After the download is complete. We need to extract this to the /var/www/html/ directory:
mkdir /var/www/html/dokuwiki
tar xzf dokuwiki-stable.tgz -C /var/www/html/dokuwiki/ --strip-components=1
We will need to change some folders permissions:
chown -R www-data:www-data /var/www/html/dokuwiki
Step 4. Configure Apache Web Server for DokuWiki.
Now we create an Apache virtual host for DokuWiki:
nano /etc/apache2/sites-available/dokuwiki.conf
Add the following file:
<VirtualHost *:80>
 ServerAdmin admin@your-domain.com
 DocumentRoot /var/www/html/dokuwiki/
 ServerName your-domain.com
 ServerAlias www.your-domain.com

 ErrorLog ${APACHE_LOG_DIR}/error.log
 CustomLog ${APACHE_LOG_DIR}/access.log combined

 <Directory /var/www/html/dokuwiki/(bin/|conf/|data/|inc/)/>
        Options FollowSymlinks
        AllowOverride All
        Require all granted
 </Directory>
</VirtualHost>
Save and close the file, then restart the Apache webserver so that the changes take place:
sudo a2ensite dokuwiki.conf
sudo a2enmod rewrite
sudo a2enmod ssl rewrite
sudo systemctl restart apache2
- For additional resources on installing Apache on Ubuntu, read the post below.
How to install Apache on Ubuntu Linux √
Step 5. Secure Joomla with Let’s Encrypt.
First of all, you need to install Certbot to get an SSL certificate with Let’s Encrypt:
sudo apt install certbot python3-certbot-apache
Next, get your SSL certificate with Let’s Encrypt by following these steps:
sudo certbot --apache
You will need to follow the interactive prompt and install the certificate. Since I have two domains, I will install SSL certificates for both domains:
Saving debug log to /var/log/letsencrypt/letsencrypt.log
Enter email address (used for urgent renewal and security notices)
 (Enter 'c' to cancel): admin@your-domain.com

- - - - - - - - - - - - - - - - - - - - - - - - - - - - - - - - - - - - - - - -
Please read the Terms of Service at
https://letsencrypt.org/documents/LE-SA-v1.2-November-15-2017.pdf. You must
agree in order to register with the ACME server. Do you agree?
- - - - - - - - - - - - - - - - - - - - - - - - - - - - - - - - - - - - - - - -
(Y)es/(N)o: Y

- - - - - - - - - - - - - - - - - - - - - - - - - - - - - - - - - - - - - - - -
Would you be willing, once your first certificate is successfully issued, to
share your email address with the Electronic Frontier Foundation, a founding
partner of the Let's Encrypt project and the non-profit organization that
develops Certbot? We'd like to send you email about our work encrypting the web,
EFF news, campaigns, and ways to support digital freedom.
- - - - - - - - - - - - - - - - - - - - - - - - - - - - - - - - - - - - - - - -
(Y)es/(N)o: N
Account registered.

Which names would you like to activate HTTPS for?
- - - - - - - - - - - - - - - - - - - - - - - - - - - - - - - - - - - - - - - -
1: your-domain.com
2: www.your-domain.com
- - - - - - - - - - - - - - - - - - - - - - - - - - - - - - - - - - - - - - - -
Select the appropriate numbers separated by commas and/or spaces, or leave input
blank to select all options shown (Enter 'c' to cancel): 1,2
Requesting a certificate for your-domain.com and www.your-domain.com

Successfully received certificate.
Certificate is saved at: /etc/letsencrypt/live/your-domain.com/fullchain.pem
Key is saved at:         /etc/letsencrypt/live/your-domain.com/privkey.pem
This certificate expires on 2022-09-16.
These files will be updated when the certificate renews.
Certbot has set up a scheduled task to automatically renew this certificate in the background.

Deploying certificate
Successfully deployed certificate for domain.com to /etc/apache2/sites-available/www.your-domain.com-le-ssl.conf
Successfully deployed certificate for www.domain.com to /etc/apache2/sites-available/www.your-domain.com-le-ssl.conf
Congratulations! You have successfully enabled HTTPS on https://domain.com and https://www.your-domain.com

- - - - - - - - - - - - - - - - - - - - - - - - - - - - - - - - - - - - - - - -
If you like Certbot, please consider supporting our work by:
 * Donating to ISRG / Let's Encrypt:   https://letsencrypt.org/donate
 * Donating to EFF:                    https://eff.org/donate-le
- - - - - - - - - - - - - - - - - - - - - - - - - - - - - - - - - - - - - - - -
Step 6. Set up Auto-Renewal SSL.
Let’s Encrypt certificates have 90 days of validity, and it is highly advisable to renew the certificates before they expire. You can test automatic renewal for your certificates by running this command:
sudo certbot renew --dry-run
Step 7. Configure Firewall.
Now we set up an Uncomplicated Firewall (UFW) with Apache to allow public access on default web ports for HTTP and HTTPS:
sudo ufw allow OpenSSH
sudo ufw allow 'Apache Full'
sudo ufw enable
Step 9. Accessing DokuWiki Web Interface.
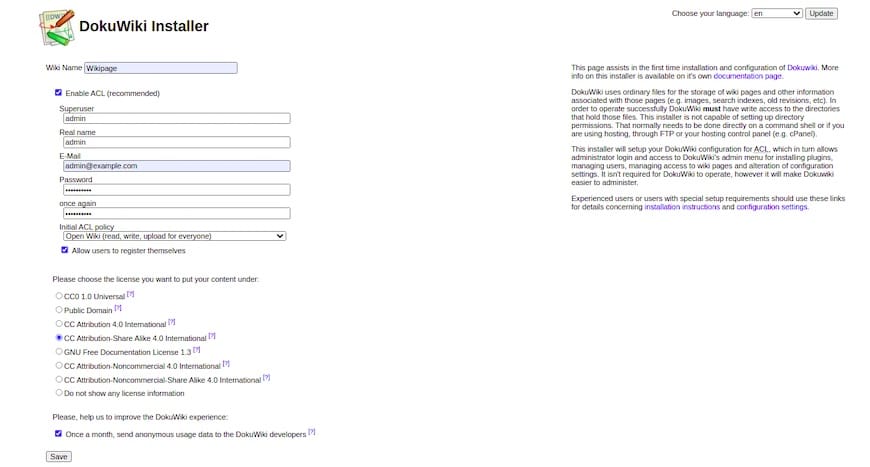
Once successfully installed, open your web browser and access the DokuWiki installation wizard using the URL https://your-domain.com. You will be redirected to the following page:

Congratulations! You have successfully installed DokuWiki. Thanks for using this tutorial for installing the DokuWiki with LAMP on Ubuntu 22.04 LTS Jammy Jellyfish system. For additional help or useful information, we recommend you check the DokuWiki website.