How To Install OTRS on Ubuntu 24.04 LTS

OTRS (Open-source Ticket Request System) is a powerful, flexible ticketing system that helps organizations manage customer service inquiries, IT helpdesk requests, and internal workflows efficiently. With the release of Ubuntu 24.04 LTS, setting up OTRS on this stable, long-term support platform provides an excellent foundation for your service management needs. This comprehensive guide walks you through every step of installing and configuring OTRS on Ubuntu 24.04 LTS, ensuring a smooth setup process.
Introduction
OTRS stands as one of the most robust open-source ticketing systems available today, offering comprehensive solutions for help desks, call centers, and customer support teams. This powerful platform provides ticket management, automation, and reporting capabilities essential for modern service operations. Originally developed in 2001, OTRS has evolved significantly while maintaining its core open-source values through the Community Edition.
Ubuntu 24.04 LTS provides an ideal foundation for OTRS deployment due to its long-term support, stability, and robust package management system. The combination delivers an enterprise-grade service management solution without proprietary software costs. Throughout this guide, you’ll learn how to properly install, configure, and optimize OTRS on Ubuntu 24.04 LTS, creating a fully functional ticketing system ready to support your organization’s needs.
Prerequisites
Before beginning the OTRS installation process, ensure your system meets these essential requirements:
- A server running Ubuntu 24.04 LTS with at least 2GB RAM and 20GB disk space
- Root or sudo privileges on your Ubuntu server
- A static IP address or properly configured domain name
- Basic working knowledge of Linux command line operations
- Unrestricted outbound internet connectivity for package downloads
- Firewall configuration that allows HTTP (port 80) and HTTPS (port 443) traffic
For optimal performance in production environments, consider allocating 4GB or more RAM, especially if handling high ticket volumes. Having these prerequisites in place before starting will ensure a smooth installation process and prevent common setup issues.
Preparing Your Ubuntu 24.04 Environment
Proper preparation of your Ubuntu environment creates a solid foundation for your OTRS installation. Begin by updating your system packages to their latest versions:
sudo apt update
sudo apt upgrade -y
Next, set a proper hostname for your server, which OTRS will use in various communications:
sudo hostnamectl set-hostname otrs.yourdomain.comConfigure your server’s timezone to match your organization’s primary location:
sudo timedatectl set-timezone Region/CityInstall essential system utilities that will support the installation process:
sudo apt install wget curl net-tools git unzip -yThese preliminary steps ensure your Ubuntu 24.04 system has current software, proper identification, and the necessary utilities to support a successful OTRS installation.
Installing Required Dependencies
OTRS requires several components to function correctly, including a web server, database server, and various Perl modules. Start by installing Apache web server and MariaDB:
sudo apt install apache2 mariadb-server mariadb-client -yEnable and start these services to ensure they run at boot:
sudo systemctl enable apache2 mariadb
sudo systemctl start apache2 mariadb
Next, install the extensive list of required Perl modules that power OTRS functionality:
sudo apt install perl libapache2-mod-perl2 libdbd-mysql-perl libtimedate-perl libnet-dns-perl libnet-ldap-perl libio-socket-ssl-perl libpdf-api2-perl libsoap-lite-perl libtext-csv-xs-perl libjson-xs-perl libapache-dbi-perl libxml-libxml-perl libxml-libxslt-perl libyaml-perl libarchive-zip-perl libcrypt-eksblowfish-perl libencode-hanextra-perl libmail-imapclient-perl libtemplate-perl libmoo-perl libauthen-ntlm-perl libjavascript-minifier-xs-perl libdbd-odbc-perl libcss-minifier-xs-perl libdbd-pg-perl libdatetime-perl -yAdditionally, install these frequently needed Perl modules to support advanced OTRS features:
sudo apt install liblwp-useragent-determined-perl libapache2-reload-perl libnet-smtp-ssl-perl libnet-smtp-tls-butmaintained-perl -yVerify your Apache installation is working correctly by visiting your server’s IP address in a web browser. You should see the default Apache page. These dependencies provide the essential infrastructure for OTRS operations.
Setting Up the OTRS User and Directory Structure
OTRS runs most securely and efficiently under a dedicated system user. Create the OTRS user account with the following command:
sudo useradd -r -m -d /opt/otrs -c "OTRS User" -s /usr/sbin/nologin otrsThis creates a system user named “otrs” with its home directory at /opt/otrs and no login shell for enhanced security. Next, add this user to the Apache group to enable proper file access and web server integration:
sudo usermod -aG www-data otrsThe correct ownership and group settings are crucial for OTRS operations, balancing the need for web server access with proper security isolation. This setup creates a clean separation between the OTRS application and other system components while enabling necessary interactions with the web server.
Downloading and Extracting OTRS
Obtain the latest compatible OTRS Community Edition version for your Ubuntu 24.04 system. Download it directly from the official source:
cd /tmp
wget https://otrscommunityedition.com/download/otrs-community-edition-6.0.41.tar.gz
Once downloaded, extract the package to the OTRS installation directory:
sudo tar xvfz otrs-community-edition-6.0.41.tar.gz -C /opt/otrs --strip-components=1The –strip-components=1 parameter ensures files extract directly to /opt/otrs without an additional subdirectory. After extraction, set proper ownership for all OTRS files:
sudo chown -R otrs:otrs /opt/otrsProper file permissions are essential for OTRS security and functionality. Execute the OTRS permission script to set appropriate permissions throughout the directory structure:
sudo perl /opt/otrs/bin/otrs.SetPermissions.plThis script applies the correct permissions to all OTRS files and directories, ensuring both security and proper operation.
Database Configuration
OTRS requires a properly configured database to store tickets, customer information, and system configuration. Begin by securing your MariaDB installation:
sudo mysql_secure_installationFollow the prompts to set a root password, remove anonymous users, disallow remote root login, and remove the test database. Next, create a dedicated database and user for OTRS:
sudo mysql -u root -pAt the MariaDB prompt, execute these commands:
CREATE DATABASE otrs CHARACTER SET utf8mb4 COLLATE utf8mb4_unicode_ci;
CREATE USER 'otrs'@'localhost' IDENTIFIED BY 'your_secure_password';
GRANT ALL PRIVILEGES ON otrs.* TO 'otrs'@'localhost';
FLUSH PRIVILEGES;
EXIT;
Replace ‘your_secure_password’ with a strong, unique password. The utf8mb4 character set supports full Unicode, including emojis and special characters that might appear in customer communications. This database configuration provides a secure, dedicated environment for your OTRS data with appropriate character encoding for international support.
Web Server Configuration
Configure Apache to serve OTRS content by creating a dedicated virtual host. Create a new configuration file:
sudo nano /etc/apache2/sites-available/otrs.confAdd the following configuration, adjusting the ServerName to match your domain:
<VirtualHost *:80>
    ServerName otrs.yourdomain.com
    DocumentRoot /opt/otrs/bin/cgi-bin

    <Directory /opt/otrs/bin/cgi-bin/>
        AllowOverride None
        Options +ExecCGI -Includes
        Require all granted
    </Directory>

    Alias /otrs-web/ "/opt/otrs/var/httpd/htdocs/"

    <Directory /opt/otrs/var/httpd/htdocs/>
        AllowOverride None
        Require all granted
    </Directory>

    ErrorLog ${APACHE_LOG_DIR}/otrs-error.log
    CustomLog ${APACHE_LOG_DIR}/otrs-access.log combined
</VirtualHost>
Enable necessary Apache modules for OTRS:
sudo a2enmod perl
sudo a2enmod deflate
sudo a2enmod headers
sudo a2enmod rewrite
Activate the OTRS virtual host and restart Apache:
sudo a2ensite otrs.conf
sudo systemctl restart apache2
This configuration creates a dedicated virtual host for OTRS, properly maps OTRS web directories, enables required Apache modules, and sets up appropriate logging for troubleshooting.
Initial OTRS Configuration
Before proceeding with the web-based installation, prepare the OTRS configuration files. Start by copying the default configuration file:
sudo cp /opt/otrs/Kernel/Config.pm{.dist,}Check for any missing Perl modules that OTRS requires:
sudo perl /opt/otrs/bin/otrs.CheckModules.plInstall any missing modules reported by the check. Verify the syntax of key OTRS scripts:
sudo perl -cw /opt/otrs/bin/cgi-bin/index.pl
sudo perl -cw /opt/otrs/bin/cgi-bin/customer.pl
sudo perl -cw /opt/otrs/bin/otrs.Console.pl
Each command should report “syntax OK” if everything is correctly installed. These preparatory steps ensure OTRS has a valid initial configuration and all required Perl dependencies before proceeding to the web-based setup.
Web-Based Installation Process
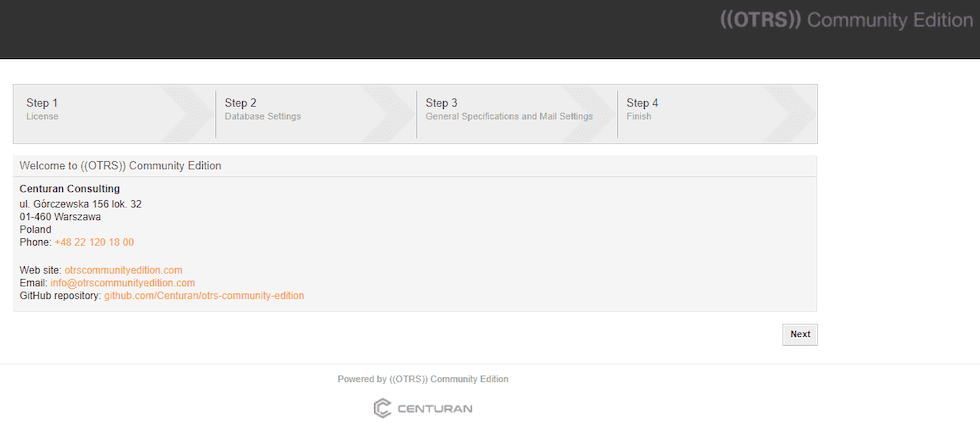
With the groundwork laid, proceed to the web-based OTRS installer. Open your web browser and navigate to:
http://your_server_ip/otrs/installer.plThe installation wizard will guide you through several steps:
- Welcome Screen: Review the information and click “Next” to begin.

- License Agreement: Read and accept the OTRS license to continue.
- Database Selection: Choose “MySQL” as the database type and select “Use an existing database for OTRS.”
- Database Configuration: Enter the database details you created earlier:
- Username: otrs
- Password: your_secure_password
- Database: otrs
- Host: localhost
- System Configuration: Configure basic system settings:
- System FQDN: otrs.yourdomain.com
- Admin Email: admin@yourdomain.com
- Organization: Your Company Name
- Email Settings: Configure your email server or skip this step to configure later.
- Administrator Account: The installer will create an admin user with password “root” by default. Note this information for your first login.
After completing these steps, the installer performs database initialization and configuration. Once complete, you’ll see a confirmation screen with login information. Make note of the URL and credentials for system access.
Post-Installation Tasks
After completing the web installer, several essential post-installation tasks remain. Start the OTRS daemon, which handles background processes:
sudo su -c "/opt/otrs/bin/otrs.Daemon.pl start" -s /bin/bash otrsSet up the OTRS cron jobs for regular maintenance:
sudo su -c "cp /opt/otrs/var/cron/otrs_daemon.dist /opt/otrs/var/cron/otrs_daemon" -s /bin/bash otrs
sudo su -c "/opt/otrs/bin/Cron.sh start" -s /bin/bash otrs
Verify the daemon is running correctly:
sudo su -c "/opt/otrs/bin/otrs.Daemon.pl status" -s /bin/bash otrsConfigure basic email integration by navigating to Admin > System Administration > Email Settings in the OTRS web interface. Test the system by creating a test ticket and verifying it appears in the dashboard. These post-installation steps activate critical background processes and ensure the system is operational.
Securing Your OTRS Installation
Enhance your OTRS installation security with these essential measures. First, implement HTTPS by installing a certificate:
sudo apt install certbot python3-certbot-apache -y
sudo certbot --apache -d otrs.yourdomain.com
Configure a firewall to limit access to essential services:
sudo ufw allow 80/tcp
sudo ufw allow 443/tcp
sudo ufw enable
Set secure file permissions if not already done:
sudo perl /opt/otrs/bin/otrs.SetPermissions.plNavigate to Admin > Users Management > Preferences in the OTRS interface and enforce strong password policies. Regularly update your Ubuntu system to receive security patches:
sudo apt update && sudo apt upgrade -yThese security measures protect your OTRS installation from unauthorized access and potential vulnerabilities, safeguarding sensitive customer information and system integrity.
Basic OTRS Administration
After installation, perform basic administrative setup to prepare OTRS for production use. Access the admin interface at the URL provided during installation using the admin credentials. Create additional agent accounts for your support staff by navigating to Admin > Agents > Add. Configure service queues that match your organization’s structure at Admin > Queues > Add.
Set up auto-responses for common customer interactions like new ticket creation or ticket closure. Configure additional email accounts to handle multiple support addresses or departments. Create basic workflows to automate ticket routing and assignment based on categories or keywords. These administrative steps prepare your OTRS system for practical use in managing customer service operations.
Performance Optimization
Optimize your OTRS installation for better performance, especially in high-volume environments. Fine-tune Apache by editing its configuration:
sudo nano /etc/apache2/mods-available/mpm_prefork.confIncrease values for StartServers, MinSpareServers, and MaxSpareServers based on your server resources. Optimize MariaDB performance by editing its configuration:
sudo nano /etc/mysql/mariadb.conf.d/50-server.cnfAdjust key settings like innodb_buffer_pool_size to approximately 50-70% of available RAM. Implement caching in OTRS by configuring it in the System Administration area. Consider implementing a content delivery network (CDN) for serving static assets in large-scale deployments. These optimizations ensure your OTRS system maintains responsive performance even under heavy loads.
Troubleshooting Common Issues
Address common OTRS installation problems efficiently with these troubleshooting approaches. For permission errors, verify file ownership and permissions:
sudo chown -R otrs:otrs /opt/otrs
sudo perl /opt/otrs/bin/otrs.SetPermissions.pl
If experiencing database connection issues, check your database credentials and connectivity:
mysql -u otrs -p -h localhost otrsFor web server problems, examine Apache error logs:
sudo tail -f /var/log/apache2/error.logWhen OTRS daemon fails to start, check its logs:
sudo tail -f /opt/otrs/var/log/Daemon.logIf encountering Perl module errors, verify all required modules are installed:
sudo perl /opt/otrs/bin/otrs.CheckModules.plFor additional support, consult the official OTRS documentation or community forums where experienced users share solutions to common challenges.
Congratulations! You have successfully installed OTRS. Thanks for using this tutorial for installing OTRS (OpenSource Trouble Ticket System) on Ubuntu 24.04 LTS system. For additional help or useful information, we recommend you check the official OTRS website.