Managing a fleet of Docker containers from the command line works fine until it doesn’t. You SSH into a box at 2 AM because a container crashed, you’re squinting at docker ps -a output trying to remember which stack owns which network, and you realize you’ve spent fifteen minutes doing something a GUI would show you in three seconds. That’s usually the moment sysadmins start looking seriously at Portainer.
Ubuntu 26.04 LTS, codenamed “Resolute Raccoon,” landed as Canonical’s latest long-term support release, and it’s already becoming the default target for new container hosts across a lot of the infrastructure I touch. It ships with a modern kernel, tightened default security policies, and better cgroup v2 handling out of the box, which actually matters if you’re running Docker at any real scale. Pairing it with Portainer gives you a lightweight, self-hosted control plane for Docker (and Kubernetes, if you go that route) without dragging in the overhead of something like Rancher.
This guide walks through a real installation, not a toy demo. That means proper Docker Engine setup from the official repository (not the snap package, and there’s a good reason for that), a hardened Portainer deployment behind HTTPS, firewall rules that don’t leave your management port hanging open to the internet, and the troubleshooting steps you’ll actually need when something doesn’t come up clean on the first try. Whether you’re standing up a single Docker host for a small SaaS product or adding a management node to a cluster of edge servers, the steps below reflect how this actually gets done in production, not just what technically works in a sandbox.
By the end, you’ll have Portainer Community Edition running on Ubuntu 26.04, reachable over a properly configured HTTPS port, with an admin account, a persistent data volume, and a firewall configuration that won’t get flagged in your next security audit.
Why Portainer Still Matters in 2026
Kubernetes dashboards get a lot of attention, but plenty of production workloads still run on plain Docker, especially for small to mid-sized teams, agencies managing multiple client sites, or infrastructure where the operational overhead of a full orchestrator isn’t justified. Portainer fills that gap. It gives you container lifecycle management, stack deployment via Compose files, image and volume inspection, log streaming, and role-based access control, all through a browser.
There’s also a practical angle here that gets overlooked: onboarding. If you manage servers for a small team and someone junior needs to restart a container or check logs without full SSH access, Portainer’s RBAC lets you scope that access tightly. That alone has saved me from writing “how to restart the nginx container” documentation more times than I’d like to admit.
Prerequisites Before You Start
A few things need to be in place before touching the installation commands. Skipping these is the number one reason people end up debugging phantom errors an hour into the process.
- A server running Ubuntu 26.04 LTS with at least 1 vCPU and 1GB RAM (2GB is more comfortable if you’re running several stacks).
- Root or sudo access via SSH.
- A static IP or reliable hostname for the server, since Portainer’s session and TLS behavior gets messy on machines with shifting IPs.
- Ports 9443 (HTTPS UI) and optionally 8000 (edge agent tunnel) open on your firewall, scoped to trusted IPs where possible.
- No conflicting services already bound to those ports.
Check your Ubuntu version first, because assuming is how you end up applying the wrong Docker repo signature later.
lsb_release -aYou should see Release: 26.04 and Codename: resolute in the output. If you’re on an older LTS like 24.04 or 22.04, the Docker installation steps below still apply with the correct codename substitution, but this guide is scoped to 26.04.
Step 1: Update the System
Don’t skip this. Portainer itself is lightweight, but Docker Engine has kernel-level dependencies, and running it on a stale package cache is asking for dependency resolution headaches later.
sudo apt update && sudo apt upgrade -yIf the kernel gets updated during this step, reboot before continuing.
sudo rebootGive the server a minute to come back up, then reconnect over SSH.
Step 2: Install Docker Engine (Not the Snap Version)
This is where a lot of guides go wrong, and it’s worth explaining why. Ubuntu ships a docker.io snap package that technically installs Docker, but it runs inside a confined snap sandbox with restricted filesystem access, altered socket paths, and inconsistent behavior with bind mounts. If you’ve ever had a container that couldn’t see a mounted volume for no apparent reason, snap Docker was probably the culprit. Canonical themselves have quietly moved away from pushing the snap variant as the default for server workloads, and Docker’s own documentation explicitly recommends against it.
Install the official Docker CE package from Docker’s repository instead.
First, remove any older or conflicting Docker-related packages:
sudo apt remove docker docker-engine docker.io containerd runc -yInstall prerequisite packages:
sudo apt install -y ca-certificates curl gnupgSet up Docker’s GPG key:
sudo install -m 0755 -d /etc/apt/keyrings
sudo curl -fsSL https://download.docker.com/linux/ubuntu/gpg -o /etc/apt/keyrings/docker.asc
sudo chmod a+r /etc/apt/keyrings/docker.asc
Add the repository. As of this writing, Docker’s official Ubuntu repo hasn’t yet published a dedicated “resolute” codename branch, so the practical (and Docker-recommended) approach is to point to the most recent supported LTS codename, “noble” (24.04), which remains binary-compatible with 26.04’s userspace for Docker’s purposes:
echo \
  "deb [arch=$(dpkg --print-architecture) signed-by=/etc/apt/keyrings/docker.asc] https://download.docker.com/linux/ubuntu noble stable" | \
  sudo tee /etc/apt/sources.list.d/docker.list > /dev/null
Update the package index and install Docker:
sudo apt update
sudo apt install -y docker-ce docker-ce-cli containerd.io docker-buildx-plugin docker-compose-plugin
Enable and start the Docker service:
sudo systemctl enable --now dockerVerify it’s running correctly:
sudo systemctl status docker
docker --version
You should see the Docker service active and a version string that starts with something like Docker version 27.x or higher, depending on what’s current in the repo at install time.
A Note on Rootless Access
Add your working user to the docker group so you’re not prefixing every command with sudo. This is a convenience step, but it also has a security implication worth understanding: membership in the docker group is effectively root-equivalent, since anyone in that group can mount the host filesystem into a container. Only add users you’d trust with root anyway.
sudo usermod -aG docker $USER
newgrp docker
Test it without sudo:
docker run hello-worldIf that pulls the image and prints the welcome message, Docker is functioning correctly.
Step 3: Create a Persistent Volume for Portainer
Portainer stores its configuration, user accounts, and endpoint data in a SQLite-backed data directory. If you skip mounting a persistent volume, every container restart wipes your admin account and settings, which is a frustrating way to discover the importance of data persistence.
docker volume create portainer_dataConfirm it was created:
docker volume ls | grep portainer_dataStep 4: Deploy Portainer Community Edition
Portainer publishes both a Community Edition (CE, free and open source) and a Business Edition (BE, license-gated with additional enterprise features). For most self-managed setups, CE covers everything you need: container management, stacks, volumes, networks, and basic RBAC.
Run the container using the LTS-tagged image, which pins to the last stable long-term-support release rather than tracking bleeding-edge changes:
docker run -d \
  -p 8000:8000 \
  -p 9443:9443 \
  --name portainer \
  --restart=always \
  -v /var/run/docker.sock:/var/run/docker.sock \
  -v portainer_data:/data \
  portainer/portainer-ce:lts
A quick breakdown of what each flag is doing, because understanding this matters when you’re troubleshooting later:
-p 8000:8000exposes the edge agent tunnel port, used if you’re managing remote Docker endpoints or edge devices. Skip it if you’re only managing the local host.-p 9443:9443exposes the HTTPS web UI, which Portainer serves with a self-signed certificate by default.-v /var/run/docker.sock:/var/run/docker.sockmounts the Docker socket so Portainer can talk to the Docker daemon on the host. This is also the single biggest security consideration in this entire setup, more on that shortly.-v portainer_data:/datapersists Portainer’s own database across restarts and upgrades.--restart=alwaysensures Portainer comes back up automatically after a reboot or Docker daemon restart.
Verify the container is running:
docker ps | grep portainerYou should see a status of Up and the mapped ports listed.
Step 5: Access the Portainer Web UI
Open a browser and navigate to your server’s IP or hostname on port 9443:
https://your-server-ip:9443You’ll hit a browser warning about the self-signed certificate. That’s expected on first run, and clicking through it (or adding an exception) is fine for now. We’ll cover proper TLS with a real certificate further down for anyone exposing this beyond an internal network.
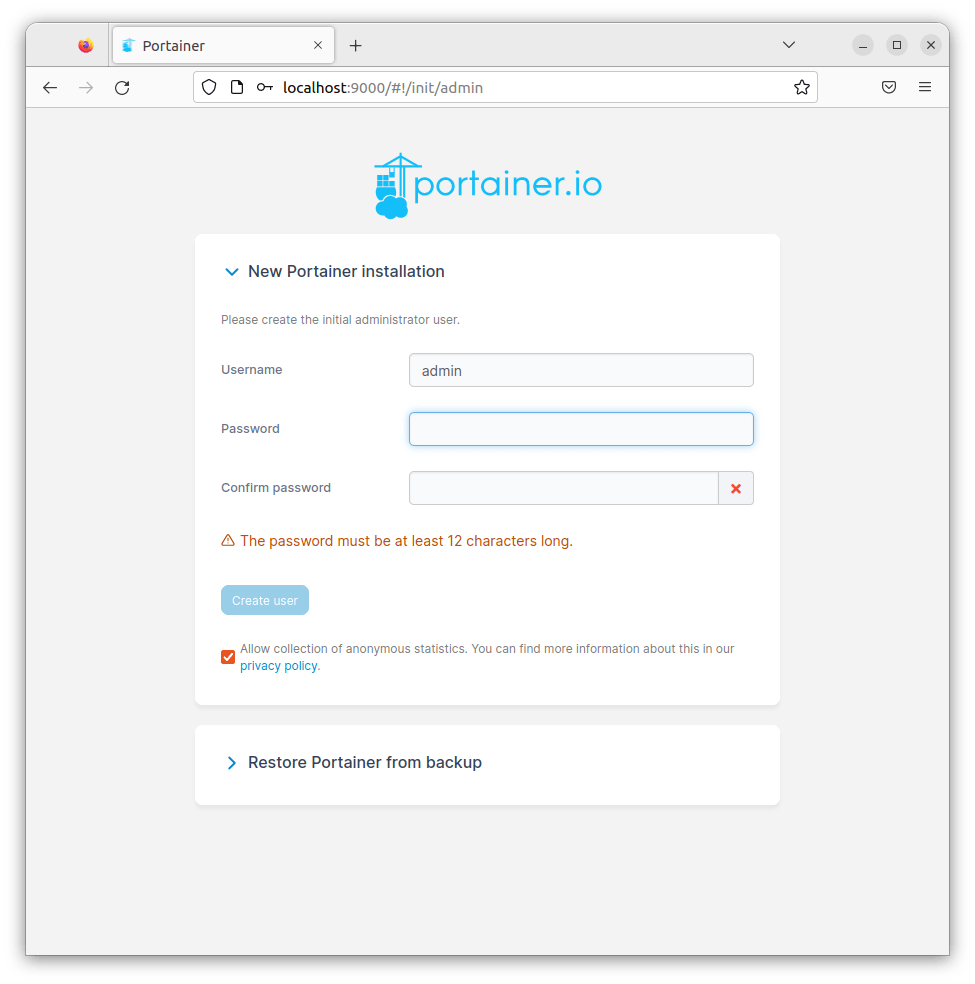
On first load, Portainer prompts you to create an initial admin account. Use a genuinely strong password here, not the throwaway one you might use for a test VM, because this account has full control over every container, volume, and network on the host once it’s connected.
After account creation, Portainer asks you to select an environment to manage. Choose “Docker” and then “Get Started” to connect to the local Docker socket you mounted earlier. Within a few seconds, you should see your existing containers (including the hello-world test container’s remnants and Portainer itself) listed in the dashboard.
Step 6: Lock Down the Firewall
Leaving 9443 open to the entire internet is a mistake that shows up in audit logs more often than it should. Portainer’s UI is a direct control surface for your Docker environment, and it deserves the same access restrictions you’d apply to SSH.
If you’re using UFW, which ships enabled by default on most Ubuntu server images:
sudo ufw allow from YOUR_TRUSTED_IP to any port 9443 proto tcp
sudo ufw allow from YOUR_TRUSTED_IP to any port 8000 proto tcp
sudo ufw status
Replace YOUR_TRUSTED_IP with your office IP, VPN subnet, or a specific admin IP range. If you genuinely need broader access, at minimum put Portainer behind a VPN or SSH tunnel rather than exposing it raw.
For teams running cloud infrastructure on AWS, GCP, or DigitalOcean, security groups or cloud firewall rules should mirror this restriction at the network layer too, not just at the host firewall. Defense in depth isn’t a buzzword here, it’s what keeps a single misconfigured rule from becoming an incident.
Step 7: Put Portainer Behind a Real TLS Certificate (Recommended)
Self-signed certificates are fine for internal testing, but for anything customer-facing or accessed outside a trusted network, run Portainer behind Nginx as a reverse proxy with a proper Let’s Encrypt certificate. This also lets you serve Portainer on the standard 443 port with a clean subdomain instead of a nonstandard 9443 port that’s easy to forget.
Install Nginx and Certbot:
sudo apt install -y nginx certbot python3-certbot-nginxCreate a server block, for example /etc/nginx/sites-available/portainer.conf:
server {
    listen 80;
    server_name portainer.yourdomain.com;

    location / {
        proxy_pass https://127.0.0.1:9443;
        proxy_ssl_verify off;
        proxy_set_header Host $host;
        proxy_set_header X-Real-IP $remote_addr;
        proxy_set_header X-Forwarded-For $proxy_add_x_forwarded_for;
        proxy_set_header X-Forwarded-Proto $scheme;

        proxy_http_version 1.1;
        proxy_set_header Upgrade $http_upgrade;
        proxy_set_header Connection "upgrade";
    }
}
The WebSocket upgrade headers matter here, Portainer’s UI relies on WebSocket connections for real-time log streaming and terminal access, and without those headers you’ll get a UI that loads but silently fails on container console access.
Enable the site and reload Nginx:
sudo ln -s /etc/nginx/sites-available/portainer.conf /etc/nginx/sites-enabled/
sudo nginx -t
sudo systemctl reload nginx
Issue a certificate:
sudo certbot --nginx -d portainer.yourdomain.comOnce that completes, rebind the Docker container’s exposed port to localhost only, so the raw HTTPS port isn’t reachable directly from outside anymore:
docker stop portainer
docker rm portainer
docker run -d \
  -p 127.0.0.1:8000:8000 \
  -p 127.0.0.1:9443:9443 \
  --name portainer \
  --restart=always \
  -v /var/run/docker.sock:/var/run/docker.sock \
  -v portainer_data:/data \
  portainer/portainer-ce:lts
Now Nginx handles TLS termination on 443 with a trusted certificate, and the raw Portainer port is only reachable from the loopback interface. This is the setup pattern used across most of the client deployments I’ve built, since it also simplifies certificate renewal (Certbot’s cron job handles that centrally instead of juggling certs inside the container).
Real-World Scenarios and Best Practices
A few situations come up often enough that they’re worth addressing directly rather than leaving them as an afterthought.
Managing multiple remote Docker hosts. If you’re administering several servers, don’t install a separate Portainer instance on every box. Instead, deploy one central Portainer instance and connect remote hosts as “Edge Agents” or standard Docker endpoints over TLS. This centralizes visibility and avoids the sprawl of a dozen half-maintained dashboards.
Traffic spikes and resource contention. Portainer itself is lightweight, typically under 100MB RAM at idle, but it does poll the Docker API on an interval to refresh container states. On hosts running dozens of containers with frequent restarts, that polling can add measurable CPU overhead. If you notice load creeping up, check Portainer’s polling interval in settings and extend it from the default if near-real-time updates aren’t critical.
Upgrading without losing data. Because the data volume is separate from the container, upgrades are straightforward: stop the container, remove it, pull the new image, and run it again with the same volume mount. The persistent volume means your users, settings, and endpoint connections survive the upgrade untouched.
docker pull portainer/portainer-ce:lts
docker stop portainer
docker rm portainer
docker run -d -p 127.0.0.1:8000:8000 -p 127.0.0.1:9443:9443 --name portainer --restart=always -v /var/run/docker.sock:/var/run/docker.sock -v portainer_data:/data portainer/portainer-ce:lts
Role-based access for teams. If more than one person touches this dashboard, set up Teams and Roles inside Portainer rather than sharing the admin account. Scoped access means a developer restarting a staging container can’t accidentally touch a production stack they were never supposed to see.
Troubleshooting Common Issues
Portainer container exits immediately after starting. Check the logs first, always.
docker logs portainerThe most common cause is a port conflict, usually something already bound to 9443 or 8000. Check with:
sudo ss -tulpn | grep -E '8000|9443'If something else owns that port, either stop it or remap Portainer to a different external port, for example -p 9444:9443.
Can’t connect to the Docker socket, “permission denied” errors in logs. This happens when SELinux or AppArmor policies restrict socket access, or when the socket file permissions were changed by another tool. Verify the socket exists and is accessible:
ls -l /var/run/docker.sockIt should be owned by root with group docker. If Portainer still can’t reach it despite correct permissions, double-check that Docker itself is running and that the --group-add isn’t needed for a rootless Docker setup, which behaves differently and typically requires a user-specific socket path instead.
Browser shows “connection refused” on port 9443 after installation. Nine times out of ten this is a firewall issue, not a Portainer issue. Confirm UFW or your cloud provider’s security group actually allows the port from your IP.
sudo ufw status verboseIf UFW shows the rule but the connection still fails, check whether Docker’s own iptables rules are conflicting with UFW, which happens on some configurations since Docker manipulates iptables directly and can bypass UFW’s rules entirely. A common fix is installing ufw-docker to reconcile the two.
Login page loads but WebSocket features (console, logs) don’t work. This almost always traces back to a reverse proxy missing the Upgrade and Connection headers, as covered in the Nginx configuration above. Double-check those two lines specifically if console access hangs on a blank screen.
Portainer forgets settings after a server reboot. This means the data volume wasn’t actually mounted, or the container was started without --restart=always and never came back up after the Docker daemon restarted. Verify with:
docker inspect portainer --format='{{.HostConfig.RestartPolicy.Name}}'It should return always. If it doesn’t, remove and recreate the container with the correct flag.