How To Install Timeshift on Fedora 39

In this tutorial, we will show you how to install Gradle on Fedora 39. Timeshift is a powerful system backup and snapshot utility that allows you to easily create and manage incremental backups of your Linux system. With its ability to quickly roll back your system to a previous state, Timeshift provides an essential safety net for users who want to protect their data and system configuration.
This article assumes you have at least basic knowledge of Linux, know how to use the shell, and most importantly, you host your site on your own VPS. The installation is quite simple and assumes you are running in the root account, if not you may need to add ‘sudo‘ to the commands to get root privileges. I will show you the step-by-step installation of the Timeshift backup and restore utility on a Fedora 39.
Prerequisites
Before diving into the installation process, let’s ensure that you have everything you need:
- A server running one of the following operating systems: Fedora 39.
- It’s recommended that you use a fresh OS install to prevent any potential issues.
- You will need access to the terminal to execute commands. Fedora 39 provides the Terminal application for this purpose. It can be found in your Applications menu.
- A network connection or internet access to download the Timeshift package.
- A non-root sudo user or access to the root user. We recommend acting as a non-root sudo user, however, as you can harm your system if you’re not careful when acting as the root.
Install Timeshift on Fedora 39
Step 1. Keeping your system up-to-date is crucial for security and stability. Start by running the following command to update your Fedora 39 installation:
sudo dnf clean all
sudo dnf update
Step 2. Installing Timeshift on Fedora 39.
While Timeshift is available in the official Fedora repositories, the version included is often outdated. To ensure that we have access to the latest features and bug fixes, we’ll add the official Timeshift COPR (Cool Other Package Repo) repository to our system.
COPR is a Fedora-specific platform that allows developers to host and distribute their own packages. By adding the Timeshift COPR repository, we can easily install and update Timeshift using the standard dnf package manager.
To add the Timeshift COPR repository, open a terminal and run the following command:
sudo dnf copr enable teejee2008/timeshift
With the Timeshift COPR repository now enabled, we can proceed with installing Timeshift and its related packages:
sudo dnf install timeshift timeshift-autosnap-dnf grub-btrfs
Step 3. Launch and Configure Timeshift on Fedora.
Now that Timeshift is installed, let’s launch the application and configure it to suit our needs. You can launch Timeshift from your desktop’s application menu or by running the following command in a terminal:
sudo timeshift
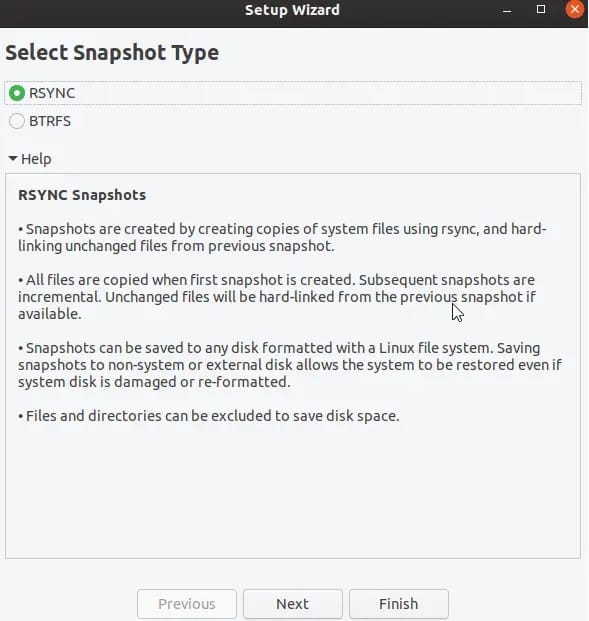
Upon launching Timeshift for the first time, you’ll be presented with a configuration wizard. Follow these steps to set up Timeshift:
- Select “BTRFS” as the snapshot type, as we’re using the
btrfsfilesystem on Fedora 39. - Choose the snapshot location. You can store snapshots on the same disk as your system or on an external disk. For optimal performance and safety, it’s recommended to use a separate disk.
- Configure your snapshot schedule. Timeshift offers hourly, daily, weekly, and monthly snapshot options. Choose a schedule that best fits your needs and available storage space.
- Set your snapshot retention policy. This determines how many snapshots of each type (hourly, daily, etc.) to keep before older ones are automatically removed.
- Select any specific directories you want to include or exclude from your snapshots. By default, Timeshift will include your home directory and exclude system directories like /tmp and /var/cache.
Once you’ve completed the configuration wizard, click “Finish” to save your settings.

Step 4. Create Your First Snapshot.
With Timeshift configured, it’s time to create your first system snapshot. To do this, simply click the “Create” button in the main Timeshift window.
Timeshift will now begin creating a snapshot of your system. The time required to complete the snapshot will depend on the size of your system and the speed of your storage device. On most modern systems, the process should take just a few minutes.
Once the snapshot is created, it will appear in the list of available snapshots in the main Timeshift window. Each snapshot is labeled with a timestamp, making it easy to identify when it was created.
Step 5. Restore a Snapshot.
In the event that you need to restore your system to a previous state, Timeshift makes the process simple and straightforward. However, before you can restore a snapshot, you’ll need to boot your system from a Fedora live USB or CD. This is because the restoration process requires access to the filesystem without any other processes interfering.
To restore a snapshot, follow these steps:
- Boot your system from a Fedora live USB or CD.
- Open Timeshift from the live environment.
- Select the snapshot you want to restore from the list of available snapshots.
- Click the “Restore” button to begin the restoration process.
- Follow the prompts in the restore wizard to confirm your selection and start the restoration.
Once the restoration is complete, Timeshift will prompt you to reinstall the bootloader. This is necessary to ensure that your system can boot properly from the restored snapshot.
After reinstalling the bootloader, reboot your system. Your system will now be restored to the state it was in when the selected snapshot was created.
Congratulations! You have successfully installed Timeshift. Thanks for using this tutorial for installing the Timeshift backup and restore utility on your Fedora 39 system. For additional or useful information, we recommend you check the official Timeshift website.