![]()
In this tutorial, we will show you how to install TYPO3 on Rocky Linux 9. For those of you who didn’t know, TYPO3 is a robust and popular open-source content management system (CMS) that empowers website developers and administrators to create and manage dynamic websites efficiently.
This article assumes you have at least basic knowledge of Linux, know how to use the shell, and most importantly, you host your site on your own VPS. The installation is quite simple and assumes you are running in the root account, if not you may need to add ‘sudo‘ to the commands to get root privileges. I will show you the step-by-step installation of the TYPO3 CMS on Rocky Linux 9 or RHEL-based.
Prerequisites
- A server running one of the following operating systems: Rocky Linux 9.
- It’s recommended that you use a fresh OS install to prevent any potential issues.
- SSH access to the server (or just open Terminal if you’re on a desktop).
- An active internet connection. You’ll need an internet connection to download the necessary packages and dependencies for TYPO3.
- A
non-root sudo useror access to theroot user. We recommend acting as anon-root sudo user, however, as you can harm your system if you’re not careful when acting as the root.
Install TYPO3 on Rocky Linux 9
Step 1. The first step is to update your system to the latest version of the package list. To do so, run the following commands:
sudo dnf check-update
sudo dnf install dnf-utils epel-release mod_ssl
Step 2. Installing Apache.
By default, Apache is available on the Rocky Linux 9 base repository. Now we install the latest version of Apache using dnf the command:
sudo dnf install httpd httpd-tools
You can start the httpd service and configure it to run on startup by entering the following commands:
sudo systemctl start httpd
sudo systemctl enable httpd
sudo systemctl status httpd
To make your pages available to the public, you will have to edit your firewall rules to allow HTTP and HTTPS requests on your web server by using the following commands:
sudo firewall-cmd --permanent --zone=public --add-service=http
sudo firewall-cmd --permanent --zone=public --add-service=https
sudo firewall-cmd --reload
For additional resources on installing Apache, read the post below:
Step 3. Installing PHP.
PHP is a popular scripting language that powers the dynamic content of millions of websites and apps. Now we run the commands below to install PHP 8 to your Rocky Linux:
sudo dnf epel-release
sudo dnf install https://rpms.remirepo.net/enterprise/remi-release-9.rpm
sudo dnf --disablerepo="*" --enablerepo="remi-safe" list available
sudo dnf module enable php:remi-8.1
Once Remi PHP 8.1 module is enabled, you can now install PHP 8.1 and commonly used PHP extensions as follows:
sudo dnf install php php-cli php-mysqlnd php-opcache php-xml php-gd php-pdo php-bcmath php-intl php-mbstring php-json php-zip unzip
Check and verify the installed version:
php -v
For additional resources on installing PHP, read the post below:
Step 4. Installing MariaDB.
By default, MariaDB is available on the Rocky Linux 9 base repository. Simply install the MariaDB package by using the dnf command:
sudo dnf install mariadb-server mariadb
After the installation is completed, start the service of the Database server and then enable the same, so that it could start itself automatically with the system reboot:
sudo systemctl restart mariadb
sudo systemctl status mariadb
sudo systemctl enable mariadb
By default, MariaDB is not hardened. You can secure MariaDB using the mysql_secure_installation script. you should read and below each step carefully which will set a root password, remove anonymous users, disallow remote root login, and remove the test database and access to secure MariaDB:
mysql_secure_installation
First, log into the MariaDB shell with the following command:
mysql
Now we create a database and user for Joomla with the following command:
MariaDB [(none)]> CREATE DATABASE typo3db;
MariaDB [(none)]> CREATE USER 'typo3_user'@'localhost' IDENTIFIED BY 'your-strong-password';
MariaDB [(none)]> GRANT ALL ON typo3db.* TO 'typo3_user'@'localhost' IDENTIFIED BY 'your-strong-password' WITH GRANT OPTION;
MariaDB [(none)]> flush privileges;
MariaDB [(none)]> exit;
For additional resources on installing MariaDB Database, read the post below:
Step 5. Installing TYPO3 on Rocky Linux 9.
Now download the latest version of TYPO3 from the official TYPO3 CMS website using the following command:
wget --content-disposition https://get.typo3.org/12.4.1
Next, extract the downloaded package using the following command:
tar xzvf typo3_src-12.4.1.tar.gz
cd typo3_src-12.4.1
cp -r . /var/www/html/
We will need to change some folders permissions:
chown apache:apache -R /var/www/html/
Step 6. Configuring Apache vHost.
Now we configure the TYPO3 VirtualHost file using the following command below:
nano /etc/httpd/conf.d/typo.conf
Add the following file:
<VirtualHost *:80>
   ServerAdmin admin@your-domain.com
   ServerName your-domain.com
   DocumentRoot /var/www/html/
   DirectoryIndex index.php

 <Directory /var/www/html/>
   Options Indexes FollowSymLinks MultiViews
   AllowOverride All
   Order allow,deny
   allow from all
 </Directory>

   ErrorLog /var/log/httpd/joomla_error.log
   CustomLog /var/log/httpd/joomla_access.log combined
</VirtualHost>
Save and close the file, then restart the Apache web server for the changes to take effect:
sudo systemctl restart httpd
Step 7. Secure TYPO3 with Let’s Encrypt SSL.
First, install the Certbot client using the following command below:
sudo dnf install certbot python3-certbot-apache
Then, run the following command to generate certificates with Apache:
sudo certbot --apache
Let’s Encrypt certificates have 90 days of validity, and it is highly advisable to renew the certificates before they expire. You can test automatic renewal for your certificates by running this command:
sudo certbot renew --dry-run
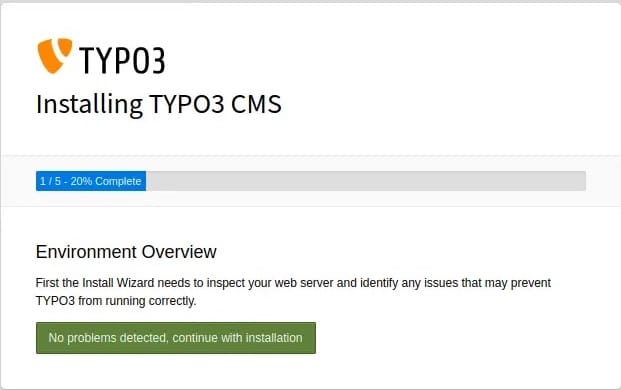
Step 8. Accessing TYPO3 Web Interface.
Once successfully installed, open your web browser and access TYPO3 CMS using the URL https://your-domain.com. You will be redirected to the following page:
Congratulations! You have successfully installed TYPO3. Thanks for using this tutorial for installing the TYPO3 Content Management System on your Rocky Linux 9 system. For additional help or useful information, we recommend you check the official TYPO3 website.
[su_box title=”VPS Manage Service Offer” style=”bubbles” box_color=”#000000″ radius=”10″]If you don’t have time to do all of this stuff, or if this is not your area of expertise, we offer a service to do “VPS Manage Service Offer”, starting from $10 (Paypal payment). Please contact us to get the best deal![/su_box]