How To Install WebERP on Rocky Linux 9

In this tutorial, we will show you how to install WebERP on Rocky Linux 9. WebERP is a powerful web-based accounting and business management software that provides a comprehensive solution for businesses to manage their operations efficiently. With its full integration capabilities, WebERP allows users to handle everything from inventory to financial reporting seamlessly. This article serves as a step-by-step guide to installing WebERP on Rocky Linux 9, ensuring that you can leverage its features for your business needs.
Prerequisites
Before diving into the installation process, ensure you have the following prerequisites in place:
- A server running Rocky Linux 9.
- Access to the server via SSH as a non-root user with sudo privileges.
- Basic knowledge of command-line operations.
- An active internet connection for downloading necessary packages.
Step 1: Update Your System
Keeping your system updated is crucial for security and performance. Start by updating the package repository cache and installed packages:
sudo dnf update -yThis command ensures that all existing packages are up-to-date, which can help prevent compatibility issues during the installation process.
Step 2: Install the LAMP Stack
The LAMP stack, consisting of Linux, Apache, MySQL/MariaDB, and PHP, is essential for running WebERP. Follow these steps to install each component:
Installing Apache
Apache is the web server that will host WebERP. Install it using the following command:
sudo dnf install httpd -yOnce installed, start and enable the Apache service so it runs on boot:
sudo systemctl start httpd
sudo systemctl enable httpd
You can verify that Apache is running by checking its status:
sudo systemctl status httpdInstalling MariaDB
MariaDB serves as the database management system for WebERP. Install it using:
sudo dnf install mariadb-server -yAfter installation, start and enable MariaDB:
sudo systemctl start mariadb
sudo systemctl enable mariadb
Run the security script to improve the security of your MariaDB installation:
sudo mysql_secure_installationThis script will prompt you to set a root password and configure other security settings.
Installing PHP
WebERP requires PHP to function correctly. Install PHP along with necessary extensions by executing:
sudo dnf install php php-mysqlnd php-gd php-mbstring php-json -yAfter installation, restart Apache to ensure it recognizes PHP:
sudo systemctl restart httpdStep 3: Configure MariaDB for WebERP
You need to create a database and user specifically for WebERP. Log into MariaDB with:
sudo mysql -u root -pCreate a database and user by running the following commands in the MariaDB shell:
CREATE DATABASE weberp;
CREATE USER 'weberpuser'@'localhost' IDENTIFIED BY 'your_secure_password';
GRANT ALL PRIVILEGES ON weberp.* TO 'weberpuser'@'localhost';
FLUSH PRIVILEGES;
EXIT;
This setup creates a dedicated database for WebERP and grants appropriate permissions to the user.
Step 4: Download and Install WebERP
The next step is downloading WebERP and setting it up on your server. Navigate to your web root directory:
cd /var/www/html/Download the latest version of WebERP from SourceForge:
wget https://sourceforge.net/projects/web-erp/files/webERP_4.15.2.zipUnzip the downloaded file and rename the directory for easier access:
unzip webERP_4.15.2.zip
mv webERP_4.15.2 weberp
Set appropriate permissions for the WebERP directory:
sudo chown -R apache:apache /var/www/html/weberp/
sudo chmod -R 755 /var/www/html/weberp/
Step 5: Configure Apache for WebERP
You need to create a virtual host configuration file for WebERP in Apache. Open a new configuration file using your preferred text editor:
sudo nano /etc/httpd/conf.d/weberp.confAdd the following configuration details to this file:
<VirtualHost *:80>
    ServerAdmin admin@example.com
    DocumentRoot /var/www/html/weberp/
    ServerName example.com

    <Directory /var/www/html/weberp/>
        AllowOverride All
        Require all granted
    </Directory>

    ErrorLog /var/log/httpd/weberp-error.log
    CustomLog /var/log/httpd/weberp-access.log combined
</VirtualHost>
This configuration allows Apache to serve WebERP at your specified domain or IP address.
If you haven’t already enabled mod_rewrite, do so now by installing it if necessary and restarting Apache:
sudo dnf install mod_rewrite
sudo systemctl restart httpd
Step 6: Final Configuration Steps
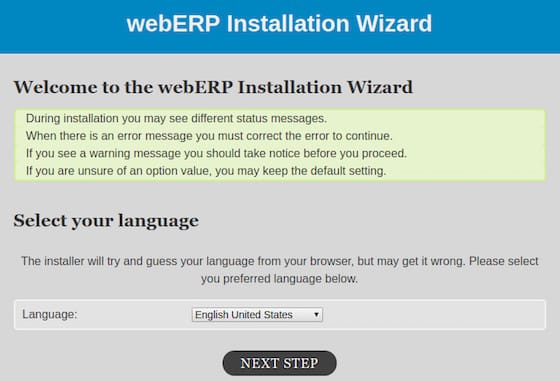
Your installation of WebERP is nearly complete! Open your web browser and navigate to http://your_server_ip/weberp. You should see the WebERP installation wizard.
- Select your preferred language.
- Enter database details using the credentials created earlier.
- Configure initial settings such as company name and admin user details.

Troubleshooting Common Issues
If you encounter issues during installation or while accessing WebERP, consider these troubleshooting tips:
-
- Error 403 Forbidden: Check directory permissions; ensure that Apache has access rights.
- Error establishing a database connection: Verify database credentials in your configuration file.
- No input file specified: Ensure that your DocumentRoot path is correct in your virtual host configuration.
- If problems persist, check Apache error logs for more detailed error messages:
sudo tail -f /var/log/httpd/error_log Congratulations! You have successfully installed WebERP. Thanks for using this tutorial for installing WebERP on the Rocky Linux 9 system. For additional help or useful information, we recommend you check the official WebERP website.