![]()
In this tutorial, we will show you how to install Wiki.js on CentOS 8. For those of you who didn’t know, Wiki.js is a free open source and modern wiki application built on Node.js, MongoDB, Git, and Markdown. Wiki.js allows the saving of your content directly into Markdown (.md) files & is synced with your remote Git repository.
This article assumes you have at least basic knowledge of Linux, know how to use the shell, and most importantly, you host your site on your own VPS. The installation is quite simple and assumes you are running in the root account, if not you may need to add ‘sudo‘ to the commands to get root privileges. I will show you the step-by-step installation of the Wiki.js open-source Wiki software on CentOS 8.
Prerequisites
- A server running one of the following operating systems: CentOS 8.
- It’s recommended that you use a fresh OS install to prevent any potential issues.
- A
non-root sudo useror access to theroot user. We recommend acting as anon-root sudo user, however, as you can harm your system if you’re not careful when acting as the root.
Install Wiki.js on CentOS 8
Step 1. First, let’s start by ensuring your system is up-to-date.
sudo clean all
sudo dnf install epel-release
sudo dnf update
Step 2. Installing Node.js.
Wiki.js requires Node.js, so we will first need to install Node.js:
curl -sL https://rpm.nodesource.com/setup_12.x | bash -
sudo dnf install nodejs
Step 3. Installing Redis.
Run the following command to install Redis:
sudo dnf install redis
After installing, start the Redis service and enable it to start at system reboot with the following command:
sudo systemctl start redis
sudo systemctl enable redis
Step 4. Installing Nginx.
Now we install the Nginx web server on the CentOS system:
sudo dnf install nginx
After installing, start the Nginx service and enable it to start at system reboot with the following command:
sudo systemctl start nginx
sudo systemctl enable nginx
Step 5. Installing MariaDB database server.
Now we install the MariaDB database server to your system using the following command:
sudo dnf install mariadb
Once upon installation, start the MariaDB service and enable it to start at system reboot with the following command:
sudo systemctl start mariadb
sudo systemctl enable mariadb
By default, MariaDB is not hardened. You can secure MariaDB using the mysql_secure_installation script. you should read and below each step carefully which will set a root password, remove anonymous users, disallow remote root login, and remove the test database and access to secure MariaDB:
mysql_secure_installation
Configure it like this:
- Set root password? [Y/n] y
- Remove anonymous users? [Y/n] y
- Disallow root login remotely? [Y/n] y
- Remove test database and access to it? [Y/n] y
- Reload privilege tables now? [Y/n] y
Next, we will need to log in to the MariaDB console and create a database for Wiki.js. Run the following command:
mysql -u root -p
This will prompt you for a password, so enter your MariaDB root password and hit Enter. Once you are logged in to your database server you need to create a database for Wiki.js installation:
MariaDB [(none)]> CREATE DATABASE wikidb;
MariaDB [(none)]> GRANT ALL PRIVILEGES ON wikidb.* TO 'wiki'@'localhost' IDENTIFIED BY 'your-password';
MariaDB [(none)]> FLUSH PRIVILEGES;
MariaDB [(none)]> EXIT;
For additional resources on installing and managing MariaDB, read the post below:
Step 6. Installing Wiki.js on CentOS 8.
First, create a separate user and group for Wiki.js with the following command:
groupadd --system wiki
useradd -s /sbin/nologin --system -g wiki wiki
Next, download the latest version of Wiki.js forms the official website with the following command:
curl -s https://api.github.com/repos/Requarks/wiki/releases/latest | grep browser_download_url | grep -v windows | cut -d '"' -f 4 | wget -qi -
After that, extract the downloaded file to the /var/www/html/wiki directory:
mkdir -p /var/www/html/wiki
tar zxf wiki-js.tar.gz -C /var/www/html/wiki
Then, change the directory to the wiki and copy the sample configuration file:
cd /var/www/html/wiki
cp config.sample.yml config.yml
Edit the config.yml file and define your MariaDB database:
nano config.yml
Add the following line:
db:
  type: mariadb

  # PostgreSQL / MySQL / MariaDB / MS SQL Server only:
  host: localhost
  port: 3306
  user: wiki
  pass: your-password
  db: wikidb
  ssl: false
Save and close and allow user permission for the directory:
chown -R wiki:wiki /var/www/html/wiki
Test your configurations by running Wiki.js:
node server
If everything is fine, you should get the following output:
Loading configuration from /var/www/html/wiki/config.yml... OK
2020-12-09T08:12:26.205Z [MASTER] info: =======================================
2020-12-09T08:12:26.207Z [MASTER] info: = Wiki.js 2.5.170 =====================
2020-12-09T08:12:26.207Z [MASTER] info: =======================================
2020-12-09T08:12:26.207Z [MASTER] info: Initializing...
2020-12-09T08:12:26.801Z [MASTER] info: Using database driver mysql2 for mariadb [ OK ]
2020-12-09T08:12:26.805Z [MASTER] info: Connecting to database...
2020-12-09T08:12:26.834Z [MASTER] info: Database Connection Successful [ OK ]
2020-12-09T08:12:28.571Z [MASTER] warn: DB Configuration is empty or incomplete. Switching to Setup mode...
2020-12-09T08:12:28.572Z [MASTER] info: Starting setup wizard...
2020-12-09T08:12:28.747Z [MASTER] info: Starting HTTP server on port 3000...
2020-12-09T08:12:28.747Z [MASTER] info: HTTP Server on port: [ 3000 ]
2020-12-09T08:12:28.751Z [MASTER] info: HTTP Server: [ RUNNING ]
2020-12-09T08:12:28.751Z [MASTER] info:
2020-12-09T08:12:29.751Z [MASTER] info:
2020-12-09T08:12:29.751Z [MASTER] info: Browse to http://YOUR-SERVER-IP:3000/ to complete setup!
2020-12-09T08:12:29.751Z [MASTER] info:
2020-12-09T08:12:30.751Z [MASTER] info:
Step 7. Create Systemd Service for Wiki.js
Now configure the Wiki.js application to run as a service:
nano /etc/systemd/system/wiki.service
Add the following lines:
[Unit]
 Description=Wiki.js
 After=network.target
 [Service]
 Type=simple
 ExecStart=/usr/bin/node server
 Restart=always
 User=wiki
 Environment=NODE_ENV=production
 WorkingDirectory=/var/www/html/wiki
[Install]
 WantedBy=multi-user.target
Reload systemd and start service:
sudo systemctl daemon-reload
sudo systemctl start wiki
sudo systemctl enable wiki
Step 8. Configure Nginx as a Reverse Proxy.
Now we configure Nginx as a reverse proxy to access Wiki.js on port 80. First, create an Nginx virtual host configuration file with the following command:
nano /etc/nginx/conf.d/wikijs.conf
Add the following lines:
server {
     listen      80;
     server_name wiki.idroot.us;
 location /
       {
 proxy_set_header Host $http_host;
 proxy_set_header X-Real-IP $remote_addr;
 proxy_pass http://127.0.0.1:3000;
 proxy_http_version 1.1;
 proxy_set_header Upgrade $http_upgrade;
 proxy_set_header Connection "upgrade";
 proxy_next_upstream error timeout http_502 http_503 http_504;

 }
}
Save and close the file then restart the Nginx service to apply the changes:
sudo systemctl restart nginx
If you have firewalld service running, allow the service:
sudo firewall-cmd --add-service=http --permanent
sudo firewall-cmd --reload
For additional resources on installing and managing Nginx, read the post below:
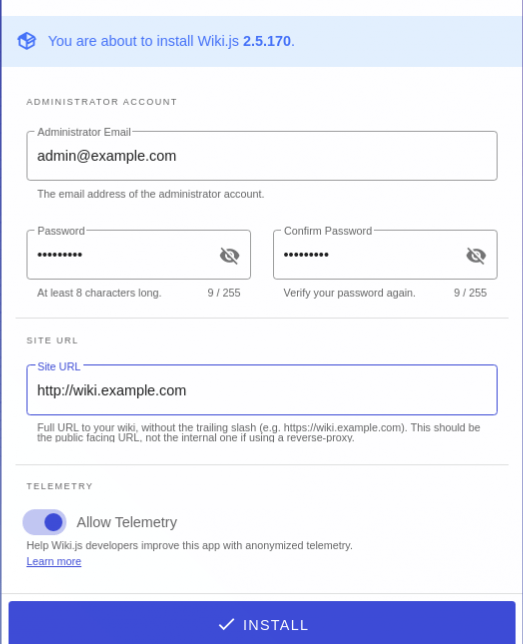
Step 9. Accessing Wiki.js on CentOS.
Now, using your web browser, navigate to http://wiki.idroot.us, you will be redirected to the following page fill required admin details then click “Install” button.
Congratulations! You have successfully installed Wiki.js. Thanks for using this tutorial for installing Wiki.js open source Wiki software on CentOS 8 systems. For additional help or useful information, we recommend you check the official Wiki.js website.
[su_box title=”VPS Manage Service Offer” style=”bubbles” box_color=”#000000″ radius=”10″]If you don’t have time to do all of this stuff, or if this is not your area of expertise, we offer a service to do “VPS Manage Service Offer”, starting from $10 (Paypal payment). Please contact us to get the best deal![/su_box]