
There’s something satisfying about spinning up a fresh WordPress instance on a clean Ubuntu server. No bloated control panels, no mysterious background processes eating RAM, just you, the command line, and a stack that does exactly what you tell it to do. After more than a decade managing production Linux servers and optimizing WordPress infrastructure for high-traffic sites, I’ve learned that the difference between a site that crawls and one that flies often comes down to how carefully you build it from the ground up.
Ubuntu 26.04 LTS, codenamed “Resolute Raccoon,” shipped in April 2026 with some meaningful upgrades that matter for WordPress deployments. You get Nginx 1.28 with improved HTTP/3 support, MariaDB 11.8 with better query optimization, and PHP 8.5 right out of the repositories. That last point is worth emphasizing: running stock PHP 8.5 from Ubuntu’s official archives means you’re aligned with what Canonical tests and supports, which matters when you’re debugging issues at 3 AM.
This guide walks through installing WordPress on Ubuntu 26.04 LTS the way I’d do it on a client’s production server. We’ll cover the full LEMP stack (Linux, Nginx, MariaDB, PHP-FPM), proper file permissions, database configuration, SSL with Let’s Encrypt, and the security hardening steps that keep brute-force bots and plugin vulnerabilities at bay. Every command has been tested on fresh Ubuntu 26.04 installations, and I’ll point out the gotchas that trip people up, like PHP-FPM socket paths changing between Ubuntu versions, or why you should never use the admin username.
Whether you’re deploying a personal blog or a WooCommerce store expecting traffic spikes, the fundamentals remain the same: build it right once, automate what you can, and leave yourself room to scale when you need it. Let’s get started.
Prerequisites and Server Requirements
Before diving into commands, make sure your environment matches what this guide expects. Skipping the prep work is how you end up with half-configured services and cryptic errors.
Minimum Hardware Specifications
WordPress itself is lightweight, but modern themes and plugins add overhead quickly. Here’s what I recommend based on actual production deployments:
- CPU: 2 vCPU cores minimum (4+ for WooCommerce or high-traffic sites)
- RAM: 2 GB minimum (4 GB recommended for production)
- Storage: 40 GB SSD (NVMe preferred for database performance)
- Network: Public IP with DNS records configured
A 2 GB droplet on DigitalOcean or equivalent handles a small business site with room to spare. If you’re running WooCommerce with hundreds of products or expecting 10K+ daily pageviews, start with 4 GB RAM and keep the database on separate storage if possible.
Ubuntu 26.04 LTS Installation
You need a clean Ubuntu 26.04 LTS server with sudo access. If you’re still on 24.04 or 22.04, that’s fine too. The commands are nearly identical, just with different PHP versions (8.3 and 8.1 respectively). Ubuntu 26.04 ships PHP 8.5 by default, which is ideal for WordPress 6.9+ compatibility.
Before exposing anything web-facing, run through the standard post-install checklist:
sudo apt update && sudo apt upgrade -y
sudo apt install -y curl wget unzip ufw fail2ban
Set up a non-root sudo user if you haven’t already. Running everything as root is a habit that catches up with you eventually.
Domain and DNS Configuration
You’ll need a domain or subdomain pointing to your server’s IP address. Create an A record before starting:
Type: A
Name: @ (or your subdomain, e.g., blog)
Value: your.server.ip.address
TTL: 300
DNS propagation can take a few minutes to a few hours. Test with dig or nslookup before proceeding:
dig yourdomain.comIf you’re using Cloudflare, set the DNS record to “DNS only” (grey cloud) temporarily during SSL setup, then re-enable proxying afterward.
Installing the LEMP Stack on Ubuntu 26.04
LEMP stands for Linux, Nginx (replacing Apache), MariaDB (MySQL-compatible), and PHP-FPM. This stack is lighter and faster than LAMP for WordPress, especially under concurrent load.
Step 1: Install Nginx
Nginx 1.28 ships with Ubuntu 26.04 and includes HTTP/3/QUIC support out of the box. Install it directly from the default repositories:
sudo apt install -y nginxVerify the installation:
nginx -v
# Output: nginx version: nginx/1.28.3 (Ubuntu)

systemctl status nginx
# Should show: active (running)
Nginx starts automatically on Ubuntu 26.04. Check that it’s enabled for boot:
systemctl is-enabled nginx
# Output: enabled
Step 2: Install MariaDB
Ubuntu 26.04 includes MariaDB 11.8, a significant upgrade from the 10.x series in older releases. The 11.x branch brings better query optimization and improved JSON handling, which matters if you’re running plugins that leverage custom tables.
sudo apt install -y mariadb-server mariadb-clientCheck the version and service status:
mariadb --version
# Output: mariadb from 11.8.6-MariaDB

systemctl status mariadb
# Should show: active (running)
Secure MariaDB Installation
MariaDB on Ubuntu uses Unix socket authentication by default, meaning the root user can connect without a password when logged in as system root. For production, you should still run the security script:
sudo mariadb-secure-installationFollow the prompts:
- Switch to unix_socket authentication: Y (keep this enabled)
- Change root password: N (optional, but recommended for remote access)
- Remove anonymous users: Y
- Disallow root login remotely: Y
- Remove test database: Y
- Reload privilege tables: Y
This removes default insecure configurations that could be exploited.
Step 3: Install PHP 8.5 with Required Extensions
PHP 8.5 is the star of Ubuntu 26.04’s web stack. WordPress 6.9+ requires PHP 8.1 minimum, but 8.5 brings performance improvements and security patches that make it the obvious choice.
Install PHP-FPM along with the extensions WordPress actually uses:
sudo apt install -y php-fpm php-mysql php-cli php-curl php-gd php-mbstring php-xml php-zip php-intl php-bcmath php-imagickThis single command pulls in php8.5-fpm and all the extensions needed for themes, plugins, image processing, and internationalization. Verify the installation:
php -v
# Output: PHP 8.5.4 (cli)

systemctl status php8.5-fpm
# Should show: active (running)
Check that the PHP-FPM socket exists. Nginx communicates with PHP through this Unix socket:
ls -la /run/php/php8.5-fpm.sock
# Output: srw-rw---- 1 www-data www-data ... php8.5-fpm.sock
List enabled PHP modules to confirm everything installed:
php -m | grep -iE 'mysql|curl|gd|mbstring|xml|zip|imagick|intl'All requested extensions should appear in the output.
Configuring the Firewall with UFW
Ubuntu includes UFW (Uncomplicated Firewall) by default. Before enabling it, make sure you allow SSH or you’ll lock yourself out.
sudo ufw allow OpenSSH
sudo ufw allow 'Nginx Full'
sudo ufw enable
The Nginx Full profile opens both HTTP (80) and HTTPS (443). Verify the rules:
sudo ufw status verboseExpected output shows SSH and Nginx allowed from anywhere. If you’re running SSH on a custom port, replace OpenSSH with sudo ufw allow 2222/tcp (or your port).
Creating the WordPress Database
Never use the MariaDB root account for WordPress. Create a dedicated database and user with limited privileges. This is defense in depth at its simplest.
Open a MariaDB session:
sudo mariadbRun these commands, replacing the placeholder values with your own:
CREATE DATABASE wordpress_db DEFAULT CHARACTER SET utf8mb4 COLLATE utf8mb4_unicode_ci;
CREATE USER 'wp_user'@'localhost' IDENTIFIED BY 'YourStrongPassword#2026';
GRANT ALL PRIVILEGES ON wordpress_db.* TO 'wp_user'@'localhost';
FLUSH PRIVILEGES;
EXIT;
Key points:
- utf8mb4 character set supports emoji and four-byte Unicode characters (essential for modern themes)
- Dedicated user limits damage if WordPress is compromised
- Strong password is non-negotiable. Use a password manager
Test the credentials:
mariadb -u wp_user -p wordpress_dbEnter your password. If you get the MariaDB prompt, the user and permissions are correct.
Downloading and Configuring WordPress Files
Set Up the Web Root Directory
I prefer naming the web root after the domain for clarity when hosting multiple sites. Create the directory and set proper ownership:
sudo mkdir -p /var/www/yourdomain.com
sudo chown -R www-data:www-data /var/www/yourdomain.com
The www-data user is what Nginx and PHP-FPM run as. This ownership allows WordPress to write uploads and update files.
Download WordPress
Fetch the latest stable release from WordPress.org:
cd /tmp
wget https://wordpress.org/latest.tar.gz
tar -xzf latest.tar.gz
sudo cp -R /tmp/wordpress/. /var/www/yourdomain.com/
Set secure permissions:
sudo find /var/www/yourdomain.com -type d -exec chmod 755 {} \;
sudo find /var/www/yourdomain.com -type f -exec chmod 644 {} \;
Directories get 755 (owner can write, others can read/execute), files get 644 (owner can write, others can read). Never set everything to 777. That’s a security risk.
Configure wp-config.php
Copy the sample configuration file and set database credentials:
cd /var/www/yourdomain.com
sudo cp wp-config-sample.php wp-config.php
sudo nano wp-config.php
Find and update these lines:
define( 'DB_NAME', 'wordpress_db' );
define( 'DB_USER', 'wp_user' );
define( 'DB_PASSWORD', 'YourStrongPassword#2026' );
define( 'DB_HOST', 'localhost' );
define( 'DB_CHARSET', 'utf8mb4' );
define( 'DB_COLLATE', '' );
Generate Security Salt Keys
WordPress uses salt keys to encrypt cookies and session data. The sample file has placeholder values. Replace them with unique keys from the WordPress API:
https://api.wordpress.org/secret-key/1.1/salt/
Copy the entire block of define() statements and paste them into wp-config.php, replacing the existing salt section. These keys should be unique per installation. If you ever suspect a compromise, regenerate them to invalidate all active sessions.
Recommended Security Settings
Add these lines just above the “That’s all, stop editing!” comment:
define( 'DISALLOW_FILE_EDIT', true );  // Disable theme/plugin editor in admin
define( 'WP_AUTO_UPDATE_CORE', 'minor' );  // Auto-update for minor releases only
define( 'WP_MEMORY_LIMIT', '256M' );  // Increase memory limit for plugins
The DISALLOW_FILE_EDIT setting prevents attackers from modifying PHP files through the admin panel if they gain access.
Configuring Nginx for WordPress
Create a Server Block
Nginx uses server blocks (similar to Apache virtual hosts) to define how requests are handled. Create a new configuration file:
sudo nano /etc/nginx/sites-available/yourdomain.comPaste this configuration, replacing yourdomain.com with your actual domain:
server {
    listen 80;
    listen [::]:80;
    server_name yourdomain.com www.yourdomain.com;
    root /var/www/yourdomain.com;
    index index.php index.html;

    client_max_body_size 64M;

    location / {
        try_files $uri $uri/ /index.php?$args;
    }

    location ~ \.php$ {
        include snippets/fastcgi-php.conf;
        fastcgi_pass unix:/run/php/php8.5-fpm.sock;
        fastcgi_param SCRIPT_FILENAME $document_root$fastcgi_script_name;
        include fastcgi_params;
    }

    location ~ /\.ht {
        deny all;
    }

    location = /favicon.ico {
        log_not_found off;
        access_log off;
    }

    location = /robots.txt {
        log_not_found off;
        access_log off;
        allow all;
    }

    location ~* \.(css|gif|ico|jpeg|jpg|js|png|webp|svg|woff2?)$ {
        expires max;
        log_not_found off;
    }
}
Key configuration notes:
- try_files directive handles WordPress permalinks by falling back to
index.php - fastcgi_pass points to the PHP 8.5 socket (adjust if using a different PHP version)
- client_max_body_size allows larger file uploads (themes, plugins, media)
- Static file caching improves performance for CSS, JS, and images
Enable the Site and Test Configuration
Enable the server block and disable the default Nginx page:
sudo ln -s /etc/nginx/sites-available/yourdomain.com /etc/nginx/sites-enabled/
sudo rm -f /etc/nginx/sites-enabled/default
Test the configuration for syntax errors:
sudo nginx -tExpected output:
nginx: the configuration file /etc/nginx/nginx.conf syntax is ok
nginx: configuration file /etc/nginx/nginx.conf test is successful
Reload Nginx to apply changes:
sudo systemctl reload nginxInstalling SSL with Let’s Encrypt
HTTPS is non-negotiable in 2026. Let’s Encrypt provides free certificates that auto-renew. Certbot handles the entire process.
Install Certbot
sudo apt install -y certbot python3-certbot-nginxObtain and Install Certificate
Run Certbot with the Nginx plugin:
sudo certbot --nginx --agree-tos --redirect --hsts --staple-ocsp -m your@email.com -d yourdomain.com -d www.yourdomain.comFlags explained:
--nginx: Automatically configures Nginx with the certificate--redirect: Forces HTTP to HTTPS redirect--hsts: Enables HTTP Strict Transport Security--staple-ocsp: Adds OCSP stapling for faster SSL validation-m: Your email for renewal notifications-d: Your domain(s)
Certbot will:
- Verify domain ownership via HTTP challenge
- Download and install the certificate
- Update your Nginx config to use HTTPS
- Set up automatic renewal
Verify Auto-Renewal
Certbot installs a systemd timer for automatic renewal. Check its status:
systemctl is-active certbot.timer
systemctl is-enabled certbot.timer
# Both should show: active / enabled
Test renewal with a dry run:
sudo certbot renew --dry-runCertificates are valid for 90 days and renew automatically when 30 days remain.
Completing the WordPress Installation
Access the Web Installer
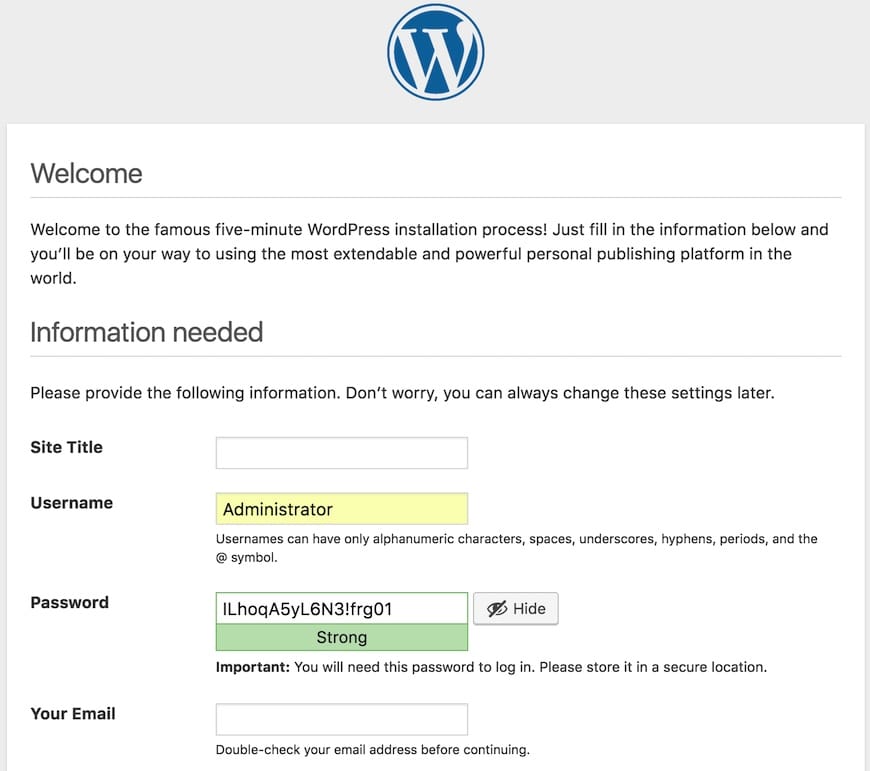
Open your browser and navigate to https://yourdomain.com. WordPress detects the empty database and launches the setup wizard.
Step 1: Choose Language
Select your preferred language and click Continue.
Step 2: Site Information
Fill in:
- Site Title: Your website name
- Username: NOT “admin” (use something unique)
- Password: Strong, randomly generated password
- Email: Your admin email
- Search Engine Visibility: Check this if the site is under construction
Critical Security Note: Never use admin as the username. Every WordPress brute-force bot tries it first. Use a unique username like your site name or a random string.
Step 3: Complete Installation
Click “Install WordPress.” The process takes a few seconds. You’ll see a success screen with a “Log In” button.
Initial Dashboard Setup
After logging in, you’re in the WordPress admin dashboard. Before publishing content, configure these essentials:
Set Permalinks
Go to Settings → Permalinks and select Post name. This creates SEO-friendly URLs like yourdomain.com/sample-post/ instead of yourdomain.com/?p=123.
Click Save Changes. The Nginx try_files directive we configured earlier makes these pretty URLs work.
Install Essential Plugins
Start with a minimal plugin set. Every plugin adds code you didn’t write running in your admin context. Here’s my baseline:
- Wordfence Security – Firewall, malware scanner, login attempt limiter
- WP Super Cache or W3 Total Cache – Page caching for performance
- Yoast SEO or Rank Math – XML sitemaps, meta tags, structured data
- UpdraftPlus – Automated backups to cloud storage
Install from Plugins → Add New Plugin. Search, install, and activate each one.
Choose a Theme
The default Twenty Twenty-Five theme works, but consider a performance-focused alternative:
- Astra – Lightweight, highly customizable, works with page builders
- GeneratePress – Fast, clean codebase, good for developers
- Kadence – Modern blocks, good free tier
Install from Appearance → Themes → Add New Theme.
Performance Optimization for Production
A default WordPress install works, but production sites need tuning. These optimizations come from managing high-traffic WordPress deployments.
PHP-FPM Configuration
The default PHP-FPM settings are conservative. Adjust based on your server’s RAM:
sudo nano /etc/php/8.5/fpm/pool.d/www.confFind and modify these settings:
pm = dynamic
pm.max_children = 50
pm.start_servers = 5
pm.min_spare_servers = 5
pm.max_spare_servers = 35
pm.max_requests = 500
Calculation for max_children:
max_children = (Total RAM - System overhead) / Average PHP process sizeOn a 4 GB server with ~1 GB for OS/MariaDB/Nginx, that leaves 3 GB for PHP. At ~40 MB per process: 3072 MB / 40 MB ≈ 75 children. Adjust based on actual memory usage.
Restart PHP-FPM:
sudo systemctl restart php8.5-fpmNginx Worker Tuning
Edit the main Nginx configuration:
sudo nano /etc/nginx/nginx.confIn the events block:
events {
    worker_connections 2048;
    multi_accept on;
}
With worker_processes auto (default) and 2048 connections per worker, a 2-core server handles ~4096 concurrent connections.
Reload Nginx:
sudo systemctl reload nginxMariaDB Buffer Pool
The InnoDB buffer pool caches table data in memory. Default is 128 MB, which is too small for production:
sudo nano /etc/mysql/mariadb.conf.d/50-server.cnfUnder [mariadbd]:
innodb_buffer_pool_size = 1G
innodb_log_file_size = 256M
innodb_flush_log_at_trx_commit = 2
On a 4 GB server, 1-2 GB for the buffer pool is reasonable. Setting innodb_flush_log_at_trx_commit = 2 improves write performance at the cost of potentially losing one second of transactions in a crash, acceptable for most web apps.
Restart MariaDB:
sudo systemctl restart mariadbEnable OPcache
PHP OPcache is enabled by default in PHP 8.5 on Ubuntu 26.04, but verify it’s active:
php -v | grep -i opcacheIf not showing, ensure it’s enabled in /etc/php/8.5/fpm/conf.d/10-opcache.ini:
opcache.enable=1
opcache.memory_consumption=128
opcache.max_accelerated_files=10000
opcache.revalidate_freq=60
Restart PHP-FPM after changes.
Security Hardening Checklist
Security isn’t a one-time setup. It’s ongoing maintenance. Start with these fundamentals.
Disable XML-RPC
WordPress ships with an XML-RPC endpoint that most sites don’t need and attackers love to exploit. Block it in Nginx:
Add to your server block:
location = /xmlrpc.php {
    deny all;
    access_log off;
    log_not_found off;
}
Reload Nginx:
sudo systemctl reload nginxIf you need XML-RPC for Jetpack or mobile apps, restrict it to specific IPs instead.
Limit Login Attempts
Install Wordfence or Limit Login Attempts Reloaded to block brute-force attacks. Configure:
- Max login attempts: 3-5
- Lockout duration: 24 hours
- Notify admin on lockout
Set Up Fail2ban
Fail2ban monitors logs and bans IPs after repeated failed login attempts. Install and configure for WordPress:
sudo apt install -y fail2ban
sudo nano /etc/fail2ban/jail.local
Add:
[wordpress]
enabled = true
filter = wordpress
logpath = /var/www/yourdomain.com/wp-content/uploads/*.log
maxretry = 3
bantime = 86400
Restart Fail2ban:
sudo systemctl restart fail2banRegular Updates
Enable unattended security updates:
sudo apt install -y unattended-upgrades
sudo dpkg-reconfigure --priority=low unattended-upgrades
This ensures security patches install automatically. Review /etc/apt/apt.conf.d/50unattended-upgrades to customize what updates.
File Permissions Audit
Periodically check file permissions:
find /var/www/yourdomain.com -type f -perm 777
find /var/www/yourdomain.com -type d -perm 777
No files or directories should be 777. Fix with:
find /var/www/yourdomain.com -type f -exec chmod 644 {} \;
find /var/www/yourdomain.com -type d -exec chmod 755 {} \;
Automated Backups
A backup strategy is your last line of defense. Automate it so you’re not scrambling after a crash.
Server-Side Backup Script
Create a backup script:
sudo nano /usr/local/bin/wp-backup.shPaste:
#!/bin/bash
set -euo pipefail

SITE="yourdomain.com"
WP_ROOT="/var/www/${SITE}"
BACKUP_ROOT="/var/backups/wordpress/${SITE}"
RETENTION_DAYS=14
STAMP="$(date +%Y%m%d-%H%M%S)"

# Extract DB credentials from wp-config.php
DB_NAME="$(grep -oP "define\s*\(\s*'DB_NAME'\s*,\s*'\K[^']+" ${WP_ROOT}/wp-config.php)"
DB_USER="$(grep -oP "define\s*\(\s*'DB_USER'\s*,\s*'\K[^']+" ${WP_ROOT}/wp-config.php)"
DB_PASS="$(grep -oP "define\s*\(\s*'DB_PASSWORD'\s*,\s*'\K[^']+" ${WP_ROOT}/wp-config.php)"

mkdir -p "${BACKUP_ROOT}/${STAMP}"

# Database dump
mariadb-dump --single-transaction --quick --routines --triggers \
  -u"${DB_USER}" -p"${DB_PASS}" "${DB_NAME}" \
  | gzip -9 > "${BACKUP_ROOT}/${STAMP}/${DB_NAME}.sql.gz"

# Archive wp-content (exclude cache)
tar --exclude="${WP_ROOT}/wp-content/cache" \
    --exclude="${WP_ROOT}/wp-content/upgrade" \
    -czf "${BACKUP_ROOT}/${STAMP}/wp-content.tar.gz" \
    -C "${WP_ROOT}" wp-content

# Delete old backups
find "${BACKUP_ROOT}" -mindepth 1 -maxdepth 1 -type d -mtime +${RETENTION_DAYS} -print -exec rm -rf {} \;

echo "Backup complete: ${BACKUP_ROOT}/${STAMP}"
Make executable and test:
sudo chmod 700 /usr/local/bin/wp-backup.sh
sudo mkdir -p /var/backups/wordpress/yourdomain.com
sudo /usr/local/bin/wp-backup.sh
Schedule with Cron
Create a cron job to run daily at 2:30 AM:
echo '30 2 * * * root /usr/local/bin/wp-backup.sh >> /var/log/wp-backup.log 2>&1' | sudo tee /etc/cron.d/wp-backup
sudo chmod 644 /etc/cron.d/wp-backup
Off-Site Backup
Backups on the same server aren’t true backups. Use rclone to sync to S3, Backblaze, or another cloud:
sudo apt install -y rclone
rclone config
Follow prompts to configure your cloud storage, then add a sync command to the backup script or run separately.
Troubleshooting Common Issues
Even with careful setup, things can go wrong. Here are the most common WordPress-on-Ubuntu issues and fixes.
Error Establishing Database Connection
Symptoms: White screen with “Error establishing a database connection”
Causes:
- MariaDB service not running
- Wrong credentials in
wp-config.php - Database user lacks permissions
Fix:
systemctl status mariadb
# If inactive: sudo systemctl start mariadb

# Test credentials manually
mariadb -u wp_user -p wordpress_db
If manual login fails, recheck wp-config.php credentials and database user permissions.
502 Bad Gateway
Symptoms: Nginx returns 502 error
Causes:
- PHP-FPM not running
- Wrong socket path in Nginx config
Fix:
systemctl status php8.5-fpm
# If inactive: sudo systemctl start php8.5-fpm

# Verify socket exists
ls -la /run/php/php8.5-fpm.sock
Check Nginx error log:
sudo tail -f /var/log/nginx/error.logLook for “connect() to unix:/run/php/php8.5-fpm.sock failed” messages.
404 Errors on Permalinks
Symptoms: Homepage works, but individual posts return 404
Causes:
- Nginx
try_filesdirective missing or incorrect - Permalinks not saved in WordPress
Fix:
Verify Nginx config has:
location / {
    try_files $uri $uri/ /index.php?$args;
}
In WordPress admin, go to Settings → Permalinks and click “Save Changes” without modifying anything. This flushes rewrite rules.
Mixed Content Warnings
Symptoms: Browser shows padlock with warning triangle
Causes:
- Site URL still set to
http://in database - Hardcoded HTTP links in theme or content
Fix:
In WordPress admin: Settings → General
Ensure both WordPress Address and Site Address use https://.
For existing content, use a plugin like “Better Search Replace” to update http:// to https:// in the database.
PHP Session Errors
Symptoms: Plugins fail with session write errors
Fix:
sudo chown -R www-data:www-data /var/lib/php/sessions/This ensures PHP-FPM can write session files.
Maintenance and Monitoring
A WordPress site needs ongoing care. Build these habits early.
Regular Updates
- WordPress core: Update within 48 hours of release
- Plugins: Update weekly, test on staging first
- Themes: Update when compatible with your version
- Ubuntu packages:
sudo apt update && sudo apt upgrademonthly
Monitor Resources
Install monitoring tools:
sudo apt install -y htop iotop nethogsCheck resource usage:
- htop: CPU and RAM per process
- iotop: Disk I/O by process
- nethogs: Network bandwidth per process
Set up alerts for:
- Disk usage > 80%
- RAM usage > 90%
- CPU load > 2x core count
Log Rotation
Ubuntu handles log rotation by default, but verify WordPress logs don’t grow unbounded:
sudo ls -lh /var/log/nginx/
sudo ls -lh /var/log/php8.5-fpm.log
Configure custom rotation in /etc/logrotate.d/ if needed.
Security Audits
Monthly:
- Review user accounts, remove inactive admins
- Scan for malware with Wordfence or WPScan CLI
- Check file integrity against known WordPress checksums
- Review failed login attempts in logs
Scaling Beyond a Single Server
When your site outgrows a single Ubuntu 26.04 server, consider these architectures:
Database Separation
Move MariaDB to a dedicated server or managed service (AWS RDS, DigitalOcean Managed Databases). Update DB_HOST in wp-config.php to point to the remote database.
Load Balancing
Use Nginx as a reverse proxy to distribute traffic across multiple WordPress instances. Requires:
- Shared database (external)
- Shared uploads directory (NFS or S3)
- Object caching (Redis or Memcached)
CDN Integration
Offload static assets to a CDN like Cloudflare, CloudFront, or BunnyCDN. Configure your caching plugin to rewrite URLs to the CDN domain.
Object Caching
Install Redis and the Redis Object Cache plugin:
sudo apt install -y redis-server
sudo systemctl enable --now redis-server
In WordPress, install “Redis Object Cache” plugin and enable it. This caches database queries in memory, dramatically reducing load on MariaDB.