
Every sysadmin has a folder somewhere named “temp_transfer” or “please_delete_later” sitting on a USB stick, because moving a file from a phone to a workstation, or between two Linux boxes on the same LAN, still trips people up in 2026. Cloud storage works, sure, but it burns bandwidth, introduces a third party into a transfer that should stay local, and adds latency you simply don’t need when both devices are sitting three feet apart on the same subnet. That’s the itch LocalSend scratches, and it’s why it’s become a staple utility on machines running Ubuntu 26.04 LTS, codenamed Resolute Raccoon, which landed as the newest long-term support release with kernel 7.0, GNOME 50, and a Wayland-only session by default.
LocalSend is an open-source, cross-platform file-sharing tool that behaves like an AirDrop replacement, minus Apple’s walled garden. It runs a lightweight HTTP server on your machine, broadcasts its presence over the local network using multicast discovery, and lets nearby devices — phones, tablets, other Linux boxes, Windows PCs, whatever — pick it up and exchange files, folders, or plain text without touching the internet. No account, no cloud relay, no data leaving your LAN. For a Linux admin who already treats “why does this need internet access” as a reflexive question, that’s a refreshing design choice.
This guide walks through every practical installation path available on Ubuntu 26.04 LTS: Snap, Flatpak, the native .deb package, and the portable AppImage, plus the official APT repository if you want update automation baked in. It also covers the firewall configuration that trips up almost everyone the first time (LocalSend’s discovery mechanism relies on multicast, which most default firewall profiles quietly block), permission considerations, and the troubleshooting steps that actually resolve the “device not found” problem instead of just restating the obvious. None of this is theoretical — these are the same steps used when rolling LocalSend out across a small office network or a home lab with mixed Linux and Android devices.
Why LocalSend Matters for Ubuntu 26.04 Users Specifically
Ubuntu 26.04’s shift to Wayland-only sessions changes a few things under the hood that are worth knowing before you install anything GUI-based. Snap and Flatpak packages generally handle the X11-to-Wayland transition gracefully because they ship their own runtime dependencies, but native .deb builds occasionally assume XWayland compatibility layers that behave slightly differently across releases. This matters for LocalSend because its interface is built with Flutter, and Flutter’s Linux embedder has had a rocky history with fractional scaling and multi-monitor setups under pure Wayland. In practice, most users won’t notice anything, but if the window renders oddly on a high-DPI display, that’s the first place to look.
There’s also a networking angle unique to this release. Ubuntu 26.04 tightened some default firewall behaviors as part of its broader security hardening push, and ufw ships active-by-default in more desktop images than it used to. If you’re coming from Ubuntu 24.04 where LocalSend “just worked” without any firewall fuss, don’t assume that carries over — verify it, because assumptions are how outages happen.
Choosing the Right Installation Method
There isn’t a single “correct” way to install LocalSend, but there is a correct way for your situation. Here’s how the four main methods stack up:
| Method | Update mechanism | Sandbox isolation | Best for |
|---|---|---|---|
| Snap | Automatic, background | Strong (confined) | Desktop users who want zero maintenance |
| Flatpak | Manual or automatic via GNOME Software | Strong (confined) | Users already on Flatpak-first workflows |
| .deb package | Manual, tied to apt if repo added | None (native) | Servers, minimal installs, precise version control |
| AppImage | Fully manual | None (bundled deps) | Air-gapped machines, testing, portable use |
Snap comes pre-installed on stock Ubuntu 26.04 images, which makes it the path of least resistance. Flatpak requires one extra setup step but integrates cleanly with GNOME Software if you’re running a desktop environment. The .deb package is what you want on headless servers or minimal installs where you’re avoiding both Snap and Flatpak runtimes for footprint reasons. AppImage is the fallback for locked-down environments where you can’t install system packages at all but can still execute a binary from your home directory.
Method 1: Installing via Snap (Recommended for Most Desktop Users)
Snap is baked into Ubuntu by default, so this is genuinely the fastest route from zero to a working install.
Step 1 — Confirm snapd is present and current
sudo apt update
sudo apt install snapd
On a fresh Ubuntu 26.04 install this will report snapd is already the newest version, which is expected — the command is here for anyone coming from a stripped-down server image or a minimized cloud instance where snapd was deliberately excluded.
Step 2 — Install LocalSend
sudo snap install localsendThat single line pulls the confined LocalSend package straight from the Snap Store. Snap’s confinement model means LocalSend runs in its own sandbox with restricted filesystem access by default — it can read/write to your home directory’s standard locations, but it won’t have blanket access to arbitrary system paths. That’s a feature, not a limitation, especially on a machine that also handles other duties.
Step 3 — Verify the install and launch
snap list localsendYou should see the package version and confinement level (strict). Launch it from the application menu, or run:
localsendTo remove it later: sudo snap remove localsend.
One caveat worth flagging from real-world use: Snap’s sandboxing occasionally interferes with file picker dialogs reaching certain mounted network drives or external storage that hasn’t been explicitly granted access through snap connect. If you’re transferring files that live on an NFS mount or a secondary drive that isn’t under /home, check snap connections localsend and grant the removable-media interface if it’s not already connected:
sudo snap connect localsend:removable-mediaMethod 2: Installing via Flatpak
Flatpak is the other confined-runtime option, and it’s the preferred route if your workflow already leans on Flathub for other applications.
Step 1 — Install Flatpak and enable the Flathub remote
sudo apt install flatpak
flatpak remote-add --if-not-exists flathub https://flathub.org/repo/flathub.flatpakrepo
Step 2 — Restart your session
This part gets skipped constantly and it’s the source of half the “Flatpak apps don’t show up in my menu” complaints on forums. A full logout/login (or reboot, if you’re not in a hurry) is often necessary for desktop integration to register properly.
sudo rebootStep 3 — Install LocalSend from Flathub
flatpak install flathub org.localsend.localsend_appYou’ll be prompted to confirm the installation and accept any additional runtime dependencies it pulls in — this is normal, since Flatpak apps bundle their own dependency tree separate from your system libraries.
Step 4 — Run it
flatpak run org.localsend.localsend_appOr launch it from your applications menu once desktop integration has registered.
To uninstall: flatpak uninstall org.localsend.localsend_app.
Method 3: Installing the Native .deb Package
This is the method server admins and anyone doing precise version control will gravitate toward, because it avoids the Snap and Flatpak runtimes entirely and behaves like any other apt-managed package.
Step 1 — Grab the latest .deb from the official downloads page
Head to the LocalSend downloads page and copy the link for the Linux .deb build, or download it directly from the terminal:
cd ~/Downloads
wget https://github.com/localsend/localsend/releases/latest/download/LocalSend-1.17.0-linux-x86-64.deb
Check the GitHub releases page first to confirm the current version number and adjust the filename accordingly — pinning to a version number in a script that will go stale is a rookie mistake.
Step 2 — Install using apt, not dpkg directly
sudo apt install ./LocalSend-1.17.0-linux-x86-64.debUsing apt install ./package.deb instead of raw dpkg -i matters here because apt will automatically resolve and pull any missing dependencies from your configured repositories, whereas dpkg -i will install the package regardless and leave you to manually chase down broken dependencies afterward with apt --fix-broken install. It’s a small habit, but it saves a step every single time.
Step 3 — Confirm the binary is registered
dpkg -l | grep localsend
which localsend
Launch from the applications menu or run localsend directly from the terminal.
Setting Up the Official APT Repository (Optional, for Auto-Updates)
If you want LocalSend to update alongside your regular apt upgrade cycle instead of manually re-downloading .deb files every release, add the official repository:
wget -O - https://repo.localsend.org/key.gpg | sudo gpg --dearmor -o /etc/apt/trusted.gpg.d/localsend.gpg
echo "deb [arch=amd64] https://repo.localsend.org/apt/ stable main" | sudo tee /etc/apt/sources.list.d/localsend.list
sudo apt update
sudo apt install localsend
Adjust the arch=amd64 line to arm64 if you’re running this on an ARM-based device such as a Raspberry Pi or an ARM server instance. This is the cleanest long-term approach for anyone managing multiple machines through configuration management tools like Ansible, since it lets you standardize on a repo definition rather than chasing binary URLs in a playbook.
Method 4: Running LocalSend as an AppImage
AppImage is your escape hatch when you can’t or won’t install anything system-wide — think locked-down corporate laptops, air-gapped test VMs, or quick one-off testing where you don’t want residue left behind after uninstalling.
Step 1 — Download the AppImage
cd ~/Downloads
wget https://github.com/localsend/localsend/releases/latest/download/LocalSend-1.17.0-linux-x86-64.AppImage
Step 2 — Make it executable
chmod +x LocalSend-1.17.0-linux-x86-64.AppImageStep 3 — Run it
./LocalSend-1.17.0-linux-x86-64.AppImageAppImages bundle their own dependencies, so they generally run without a fuss, but on Ubuntu 26.04’s Wayland-only sessions you may occasionally need libfuse2 installed for older AppImage runtimes to mount correctly:
sudo apt install libfuse2If you want it to appear in your application launcher rather than being run manually every time, a tool like AppImageLauncher handles the desktop integration automatically — worth installing if you’re going to make AppImage your regular workflow rather than a one-off.
Configuring the Firewall (The Step Everyone Forgets)
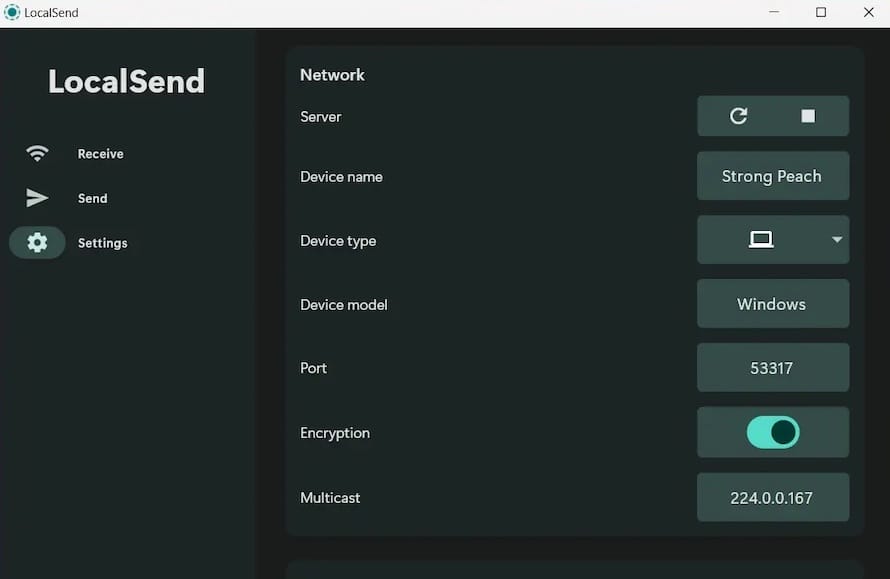
Here’s where most “LocalSend won’t find my other device” complaints actually originate — not from a broken install, but from an untouched firewall. LocalSend’s discovery protocol depends on UDP multicast to the address 224.0.0.167 and both TCP and UDP traffic on port 53317 by default. If your firewall silently drops that multicast packet, the app installs fine, launches fine, and then simply never sees anything on the network — no error, no obvious symptom, just an empty device list staring back at you.
Using UFW
Ubuntu’s default firewall tool is ufw, and on 26.04 it’s more likely to be active out of the box than on previous releases. Check its status first:
sudo ufw status verboseIf it reports “active,” open the required port for both protocols:
sudo ufw allow 53317/tcp
sudo ufw allow 53317/udp
sudo ufw reload
That’s the whole fix, in most cases. If you’re running LocalSend on a machine that also serves other traffic — say, a home server doing double duty — scope the rule to your LAN subnet instead of leaving it open globally:
sudo ufw allow from 192.168.1.0/24 to any port 53317 proto tcp
sudo ufw allow from 192.168.1.0/24 to any port 53317 proto udp
Replace the subnet with whatever your actual LAN range is. This is a small habit that pays off — there’s no reason to expose a file-transfer listener to anything beyond your local segment, and scoping the rule costs you nothing in convenience.
Using firewalld
If you’re on a system where firewalld is the active firewall manager instead (more common on hybrid environments or machines migrated from RHEL-family setups), the equivalent commands are:
sudo firewall-cmd --zone=public --permanent --add-port=53317/tcp
sudo firewall-cmd --zone=public --permanent --add-port=53317/udp
sudo firewall-cmd --reload
Adjust --zone=public to whatever zone your active network interface is bound to — check with firewall-cmd --get-active-zones if you’re not sure.
Router-Level Considerations
Firewall rules on the host only solve half the problem if your router or a managed switch between devices is also filtering multicast traffic — some consumer routers with “AP isolation” or “guest network isolation” enabled will silently block device-to-device discovery entirely, and no amount of ufw tweaking on the Ubuntu side will fix that. If two devices are on the same Wi-Fi network but one is on a guest SSID, that’s almost always the actual culprit, not the Linux firewall.
Verifying the Installation Works End-to-End
Don’t just trust that the app opened — confirm the listener is actually bound and reachable before assuming everything’s fine.
sudo ss -tulnp | grep 53317You should see LocalSend’s process bound to port 53317 for both TCP and UDP. If nothing shows up here, the application either isn’t running or crashed silently on startup — check journalctl or launch it from a terminal to see stdout errors directly.
From a second device on the same network, a quick reachability test:
nc -zv <target-ip> 53317A successful connection confirms the port is open and reachable at the network layer, which isolates the problem to either the application layer or discovery mechanism if devices still aren’t finding each other in the GUI.
Real-World Troubleshooting
Problem: The app opens, but no other devices show up in the “Nearby” list
This is almost always the multicast/firewall issue described above. Double-check both the local firewall and any AP isolation setting on the router. Also confirm both devices are genuinely on the same subnet — a device connected via a VPN client that reroutes all traffic, even LAN traffic, through a tunnel interface will not see local multicast at all. Temporarily disable the VPN and retest.
Problem: “Failed to create server socket” on launch
This means port 53317 is already bound by another process, which can happen if you accidentally have two instances running (e.g., one from Snap and a leftover AppImage process from earlier testing). Check what’s holding the port:
sudo lsof -i :53317Kill the conflicting process, or change LocalSend’s port in its settings menu if you need both to coexist temporarily.
Problem: File transfers start but stall partway through on large files
This is usually a Wi-Fi signal or MTU issue rather than a LocalSend bug, particularly over 802.11 connections with a weak signal. For consistent large-file transfers — say, moving multi-gigabyte VM images or backup archives between machines — a wired Ethernet connection on at least one end dramatically improves reliability. If both machines are on Ethernet and you’re still seeing stalls, check for duplex mismatches with ethtool:
sudo ethtool eth0 | grep -i duplexProblem: Snap version shows a permission denied error writing to a destination folder
Classic Snap sandboxing behavior. The destination directory likely falls outside Snap’s default allowed paths. Grant the relevant interface:
sudo snap connect localsend:homeOr switch the download target inside LocalSend’s settings to a path under your home directory that’s already accessible.
Problem: Flatpak version doesn’t appear in the applications menu after install
Almost always a stale desktop database cache. Force a refresh:
sudo update-desktop-database /var/lib/flatpak/exports/share/applicationsOr simply log out and back in — Flatpak’s desktop integration registers on session start in most cases.
Security and Best Practices for Production Use
LocalSend’s design already limits exposure by keeping everything on the local network, but a few habits are worth adopting if you’re deploying it across multiple machines rather than just your personal desktop.
Enable the PIN or approval prompt in LocalSend’s settings so incoming transfers require manual acceptance rather than auto-accepting from any device on the network. On a shared office LAN, auto-accept is convenient but turns your machine into an open drop target for anyone who joins the same Wi-Fi.
Keep the software updated regardless of which installation method you chose. Snap and Flatpak handle this mostly automatically, but the .deb and AppImage routes require you to actively check for new releases — subscribing to the GitHub releases feed or scripting a periodic version check with curl against the GitHub API is a reasonable low-effort solution for fleet management.
Scope firewall rules to your LAN subnet rather than leaving 53317 open to all sources, especially on machines that also happen to be reachable from outside your local network through port forwarding misconfigurations elsewhere. It’s a small detail, but small details are exactly where LAN-facing services get accidentally exposed to the wider internet.
If you’re deploying LocalSend across a fleet of workstations via configuration management, the .deb-plus-official-repo method is the one to standardize on — it plays nicely with Ansible, Puppet, or plain shell provisioning scripts, and it keeps updates consistent with your normal apt upgrade cadence instead of relying on each user to remember to check for a new AppImage.
Performance Notes Worth Knowing
LocalSend itself is lightweight — it’s not going to meaningfully tax CPU or RAM on any machine capable of running Ubuntu 26.04 in the first place. The bottleneck in almost every real transfer is the network link, not the application. For consistently fast transfers of large datasets, prioritize a wired connection over Wi-Fi where possible, and if you’re moving files repeatedly between the same set of machines, consider whether a dedicated point-to-point Ethernet link or a small managed switch segment makes more sense than routing everything through a congested household Wi-Fi network shared with streaming devices and other traffic.
Disk I/O matters more than people expect when transferring very large files — if either endpoint is writing to a spinning HDD rather than an SSD, that will visibly cap your transfer speed well below what the network link itself could sustain. Worth checking with iostat -x 1 during a transfer if speeds feel unexpectedly slow.
