
Every network engineer eventually hits a wall where logs simply don’t tell the whole story. A service times out intermittently, a firewall rule silently drops legitimate traffic, or an application behaves fine in staging but chokes in production — and none of that shows up in journalctl. That’s the exact moment Wireshark earns its keep. It’s the tool that shows you what’s actually crossing the wire, packet by packet, instead of what your application logs claim happened.
Ubuntu 26.04 LTS, codenamed Resolute Raccoon, ships with Wireshark 4.6.x sitting comfortably in the Universe repository — a meaningful jump from the 4.2 branch on Noble Numbat and the aging 3.6 line still lingering on some 22.04 installs. That matters more than it sounds. Newer Wireshark releases decode a wider range of modern protocols out of the box, including QUIC, HTTP/3, and updated TLS 1.3 handshake parsing, which means less manual dissector fiddling when you’re staring down a packet capture at 2 a.m. trying to figure out why a CDN edge node is misbehaving.
This guide walks through installing Wireshark on Ubuntu 26.04 the way a production sysadmin actually does it — not just apt install and hope for the best, but with proper non-root capture permissions, group management, verification steps, and the troubleshooting checklist you’ll actually need when something inevitably doesn’t work on the first try. Whether you’re running this on a desktop workstation for ad-hoc debugging or a headless server where the GUI isn’t even an option, the steps below cover both scenarios, including where tshark becomes your only realistic path forward.
There’s also a security angle here that gets glossed over far too often. Wireshark grants elevated packet-capture privileges, and if you configure that carelessly on a shared or internet-facing box, you’re opening a door you didn’t mean to open. We’ll cover that too, not as an afterthought but as a core part of doing this properly.
Why Ubuntu 26.04 Changes the Installation Calculus
On older Ubuntu releases — 22.04 and even 24.04 — the default Universe package for Wireshark trailed noticeably behind the upstream stable release. That’s why so many older tutorials insist on adding the ppa:wireshark-dev/stable PPA as a mandatory step. It wasn’t optional advice; it was often the only way to get a Wireshark build that could parse current-day protocol traffic correctly.
Ubuntu 26.04 flips that logic. Resolute ships Wireshark 4.6.4 directly through Universe, which at the time of writing is actually slightly ahead of the PPA’s 4.6.3 candidate for this release. Practically speaking, that means most people running 26.04 don’t need the PPA at all. It’s one less external repository to manage, one less GPG key to track, and one less thing that can break during an unattended apt upgrade six months from now.
If you’re still running 24.04 or 22.04 alongside 26.04 in a mixed fleet, keep in mind the PPA is still relevant there — 24.04 defaults to the 4.2 branch, and 22.04 sits on 3.6. But for 26.04 specifically, the default repository is the cleaner, lower-maintenance choice.
Prerequisites Before You Start
Before touching the terminal, confirm a few basics:
- An Ubuntu 26.04 system, either desktop or server, with sudo access on your account.
- An active internet connection to pull packages from Ubuntu’s repositories.
- A graphical desktop environment if you intend to run the Wireshark GUI. Headless VPS instances and cloud servers won’t have this by default.
- Roughly 200–300 MB of free disk space for Wireshark plus its dependency chain, including Qt libraries, GLib, and libpcap.
If you’re on a headless server — which describes a large chunk of production environments — plan on using tshark, Wireshark’s command-line sibling, instead of the GUI. It shares the same capture engine and dissectors, just without the windowed interface. More on that later.
Step 1: Update Your Package Index
Start clean. Don’t skip this even if you updated recently — package metadata can drift, especially right after a fresh 26.04 install where the initial repo mirrors might not have fully synced.
sudo apt updateIf you want to bring existing packages current at the same time, which is generally good hygiene before installing anything new that touches system libraries:
sudo apt upgrade -yThis step matters more than it looks. Wireshark depends on a chain of shared libraries — libpcap, Qt6 components, and GLib — and if those are stale or partially updated, you can end up with dependency resolution errors that have nothing to do with Wireshark itself but everything to do with an inconsistent package cache.
Step 2: Install Wireshark from the Ubuntu Repository
With the package index fresh, install Wireshark directly:
sudo apt install wireshark -yThis single command pulls in the Wireshark GUI, the shared wireshark-common package, and dumpcap — the actual low-level capture binary that does the heavy lifting. Wireshark itself is really just a sophisticated frontend; dumpcap is what talks to the network interface and libpcap underneath.
Somewhere in this process, a configuration dialog will appear asking:
“Should non-superusers be able to capture packets?”
Select Yes. This is the single most important prompt in the entire installation, and it’s worth understanding why before you just click through it.
Why This Prompt Actually Matters
By default, raw packet capture requires root-level access because it involves putting a network interface into promiscuous mode and reading raw frames off the wire — capabilities the kernel doesn’t hand out casually. The naive solution is running sudo wireshark every time, but that’s a genuinely bad habit. Running a GUI application with the full Qt rendering stack as root increases your attack surface unnecessarily, and if Wireshark ever has a parsing vulnerability in a malformed packet dissector, you don’t want that exploit running with root privileges.
Selecting “Yes” here configures dumpcap to run with specific Linux capabilities — cap_net_raw and cap_net_admin — instead of full root. That’s a meaningfully smaller blast radius. It’s the difference between handing someone a master key and handing them a key that only opens one door.
Step 3: Configure Non-Root Packet Capture Properly
If you missed the prompt, selected “No” by accident, or you’re setting this up on a system where the package was already installed non-interactively, which is common in automated provisioning, you can reconfigure it manually:
sudo dpkg-reconfigure wireshark-commonSelect Yes in the dialog that appears. Then add your user account to the wireshark group:
sudo usermod -aG wireshark $USERPay close attention to that -aG flag combination. The -a means “append” — without it, usermod -G wireshark would replace your entire supplementary group list with just wireshark, silently kicking you out of every other group you were a member of, such as docker or sudo. This is a mistake that’s bitten more than a few admins who copy-pasted a command without reading it carefully.
Apply the new group membership immediately without logging out:
newgrp wiresharkConfirm it actually took effect:
id -nG "$USER" | tr ' ' '\n' | grep -Fx wiresharkIf that prints wireshark, you’re set. If it prints nothing, either the group addition didn’t apply, or you need a fresh login session for it to register system-wide. Some desktop environments cache group membership at login and won’t pick up mid-session changes cleanly.
Finally, verify that dumpcap actually has the capabilities it needs:
getcap /usr/bin/dumpcapExpected output:
/usr/bin/dumpcap cap_net_admin,cap_net_raw=eipIf this comes back empty, the capability bits weren’t set correctly — usually because the dpkg-reconfigure step didn’t complete, or a package upgrade reset the binary without reapplying capabilities. Re-running sudo dpkg-reconfigure wireshark-common typically fixes it.
Step 4: Install TShark for Headless and Scripted Captures
If you’re working over SSH on a remote server, or you want to build captures into a monitoring script or cron job, install tshark separately:
sudo apt install tshark -yNote that on current Ubuntu releases, apt install wireshark does not automatically pull in tshark — they’re separate packages that happen to share the wireshark-common dependency. This trips people up regularly: they install Wireshark on a server, try to run tshark -D to list interfaces, and get a “command not found” error.
Since tshark also depends on wireshark-common, the same non-root capture permissions and group membership you configured earlier apply here too. No separate setup is needed.
Step 5: Identify Available Network Interfaces
Before capturing anything, you need to know what interfaces exist on the box. On modern Ubuntu, interface naming follows predictable but not always intuitive patterns — eth0 is largely legacy at this point, replaced by systemd’s predictable naming scheme like enp0s3, ens33, or wlp2s0 depending on hardware and virtualization layer.
Check with the standard networking tool:
ip addrOr list capture-ready interfaces directly through tshark, which is often more useful because it filters to only interfaces the capture engine can actually see:
tshark -DOn a KVM or cloud VPS, expect something like enp1s0 or eth0 depending on the hypervisor’s virtual NIC driver. On a physical workstation with Wi-Fi, you’ll typically see both a wired interface and a wlp* wireless one.
Step 6: Verify the Installation
Confirm Wireshark installed correctly and check the version:
wireshark --versionOn Ubuntu 26.04 with the default repository, expect to see Wireshark 4.6.4 in the output. If you’re checking tshark separately:
tshark --versionBoth should report matching version numbers since they share the same underlying capture and dissection engine.
Step 7: Launch Wireshark and Start Capturing
On a desktop system with a graphical session, launch from the terminal:
wiresharkOr search for it in your application launcher. Either way works identically — launching from the terminal just gives you visibility into any startup errors that the GUI might silently swallow.
Once open, Wireshark displays the list of available interfaces, often with a small real-time activity graph next to each one showing current traffic volume. That graph is just a live indicator, not captured data — don’t mistake it for an actual packet log.
Double-click an interface, or hit the shark-fin “Start Capturing” icon, to begin. Traffic populates the packet list in real time. To stop, hit the red square “Stop Capturing” icon. Everything captured stays available in the session for filtering and analysis until you close it or clear it.
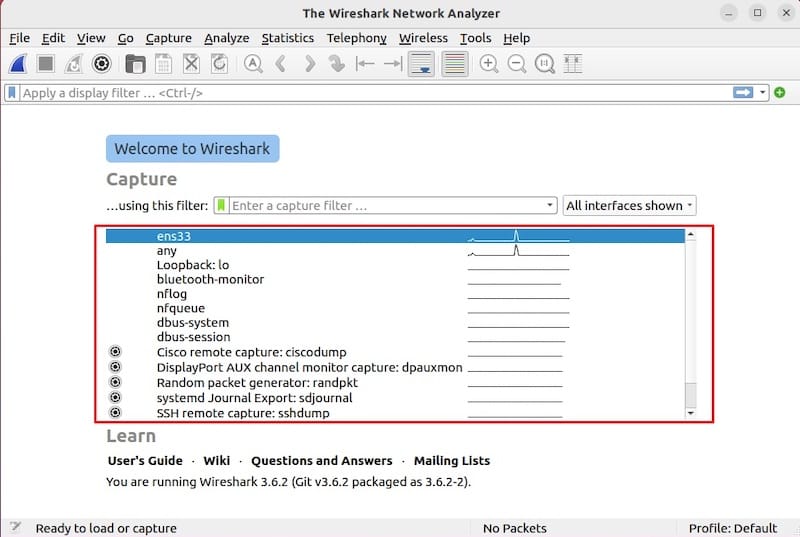
On a headless server without a desktop environment, this GUI simply won’t launch — you’ll get a display connection error. That’s expected. Use tshark instead:
tshark -i enp1s0Replace the interface name with whatever tshark -D reported for your system.
Real-World Use Cases Worth Knowing
Diagnosing intermittent connection drops. When an application reports sporadic timeouts but server-side logs show nothing unusual, a targeted capture filtered to the affected host and port often reveals TCP retransmissions or unexpected RST packets that logs never surface.
Verifying TLS handshake behavior. Wireshark 4.6’s improved TLS 1.3 decoding makes it far easier to inspect handshake failures — mismatched cipher suites, certificate chain issues, or SNI mismatches — without needing to decrypt full application payloads.
Capturing during a traffic spike. During a suspected DDoS or unexpected load event, a short, targeted capture using -c to limit packet count in tshark can quickly confirm whether you’re looking at a volumetric attack, a misconfigured retry loop from a client application, or a legitimate spike in real users.
Auditing firewall rule behavior. Running a capture on both sides of an nftables or iptables rule change is often the fastest way to confirm a rule is doing what you think it’s doing, rather than trusting the rule syntax alone.
Performance and Resource Considerations
Packet capture is not free. On high-throughput interfaces — think 10GbE production links — running Wireshark’s GUI directly against live traffic can consume significant CPU just from packet-list rendering and dissection, especially with deep protocol decoding enabled.
A few practical tips from working with this on busier boxes:
- Use capture filters, or BPF syntax applied before capture starts, rather than display filters applied after capture whenever you know roughly what you’re looking for. Capture filters reduce the volume dumpcap actually has to process and write, which matters a lot on high-traffic interfaces.
- For long-running or high-volume captures, prefer tshark writing to a ring buffer with options such as
-b filesize:100000 -b files:10rather than letting a single capture file balloon indefinitely and eat disk I/O. - Disable “Update list of packets in real time” in Wireshark’s capture options when doing large captures purely for later analysis. Rendering every packet live adds unnecessary CPU overhead when you don’t need to watch it happen.
- On memory-constrained VMs, watch capture buffer size settings. The default kernel buffer can silently drop packets under sustained high throughput if it’s too small for the traffic rate you’re capturing.
Security Considerations You Shouldn’t Skip
Granting cap_net_raw and cap_net_admin to the wireshark group is a real privilege escalation surface, even though it’s more contained than full root. Anyone in that group can capture all traffic visible to that interface, including anything unencrypted that other users or processes on the same host generate. On a shared multi-user server, that’s a meaningful consideration.
Practical hardening steps:
- Keep the
wiresharkgroup membership limited to accounts that genuinely need capture access. Don’t add it to every admin account by default. - On production servers, prefer tshark with scoped capture filters over leaving a GUI session open. This provides a smaller footprint and makes activity easier to audit through shell history and process monitoring.
- Regularly patch Wireshark. Packet dissectors parse untrusted, attacker-influenced data by design, and dissector vulnerabilities have historically been a real CVE category. Running the following command periodically closes that gap:
sudo apt update && sudo apt install --only-upgrade wireshark wireshark-common tshark- If you’re capturing on an internet-facing interface, be mindful that saved
.pcapfiles can contain sensitive payload data, including credentials in unencrypted protocols, session tokens, and internal hostnames. Treat capture files with the same handling discipline you’d apply to log files containing secrets. - Consider firewall-level restrictions if you’re exposing a remote capture setup, such as
rpcapdfor remote packet capture. That daemon should never be reachable from an untrusted network.
Troubleshooting Common Issues
Empty Interface List in the GUI
This almost always traces back to group membership not being active in the current session. Re-check with:
id -nG "$USER" | grep wiresharkIf the group is missing, log out and back in rather than assuming newgrp fully propagated to every process.
“You Don’t Have Permission to Capture on That Device”
Re-run getcap /usr/bin/dumpcap to confirm capabilities are set:
getcap /usr/bin/dumpcapIf capabilities look correct but the error persists, check whether a recent kernel or package update reset them. This can happen after certain security updates that touch binary capabilities.
Wireshark Opens and Immediately Closes
A corrupted per-user profile directory is the usual suspect. Rename it out of the way and let Wireshark regenerate a clean one:
mv ~/.config/wireshark ~/.config/wireshark.backupRelaunch and confirm it opens normally before selectively restoring any custom profile settings from the backup.
“Command Not Found” After Installing Wireshark
As mentioned earlier, Wireshark and tshark are separate packages. Install tshark explicitly:
sudo apt install tshark -yNo Graphical Output on a VPS or Cloud Instance
This is expected behavior because most VPS instances do not have a display server. Either use tshark for command-line capture, or set up a minimal desktop environment and X forwarding or VNC if you specifically need the GUI remotely.
Best Practices for Ongoing Use
Keep Wireshark updated on a regular patch cycle rather than treating it as install-once-and-forget-forever software. Running apt install --only-upgrade wireshark wireshark-common tshark alongside your normal patching routine is enough.
Build a small library of saved capture filters for your common troubleshooting scenarios — specific hosts, ports, or protocols you deal with often — rather than typing them fresh every time.
On production systems, default to short, targeted captures with explicit filters and packet-count limits rather than open-ended captures that balloon into unmanageable file sizes and complicate later analysis.

