
Anyone who has spent a weekend wrestling with RAW files on Linux knows the frustration. Darktable feels bloated for quick edits, RawTherapee’s interface fights you at every turn, and GIMP simply wasn’t built for non-destructive workflows. LightZone occupies a strange but valuable niche in this landscape — a tool originally developed as commercial software, open-sourced years ago, and still quietly preferred by photographers who value its region-based editing model over layer stacks and sliders.
The problem is that LightZone hasn’t seen the kind of packaging attention that mainstream tools get. There’s no Snap, no Flatpak on Flathub with reliable maintenance, and the old PPA infrastructure that Ubuntu users relied on for years has become inconsistent across newer releases. With Ubuntu 26.04 LTS now the default target for fresh installs and server-adjacent workstation builds, a lot of the old tutorials floating around simply don’t apply anymore — dependency names have shifted, Java runtime requirements have changed, and the PPA compatibility matrix hasn’t caught up.
This guide walks through the actual installation process on Ubuntu 26.04 LTS, covering both the PPA route (when it works) and the build-from-source method (which, frankly, is becoming the more reliable path for this particular application). Along the way, expect real troubleshooting notes pulled from the kind of dependency conflicts that show up on fresh 26.04 installs, plus some practical advice on getting LightZone to perform well on modest hardware — because RAW processing is CPU and memory-hungry regardless of what desktop environment you’re running.
What Is LightZone and Why It Still Matters
LightZone is a non-destructive RAW image editor built around “ZoneMapper” tools and a region-based editing philosophy rather than traditional layers or brush masks. It handles most major RAW formats through LibRaw, supports 16-bit editing pipelines, and stores edits as an XML-based sidecar-style history rather than baking changes into the pixel data.
What separates it from Darktable or RawTherapee isn’t raw feature count — it’s workflow speed. Photographers who shoot events or high volumes of frames often find LightZone’s tool stack faster for quick tonal corrections and selective adjustments, without the steep learning curve of a full node-based or module-heavy editor. It’s not trying to be Lightroom. It’s trying to be a fast, focused darkroom replacement, and for a specific type of user, it succeeds.
Prerequisites Before Installing LightZone on Ubuntu 26.04
Before touching the terminal, confirm a few things. Ubuntu 26.04 LTS ships with a newer OpenJDK baseline and updated glibc, both of which affect how LightZone’s mixed Java/native codebase behaves.
- A clean Ubuntu 26.04 LTS installation (desktop or server with a GUI stack) with at least 4 GB RAM — 8 GB recommended for larger RAW files.
- Sudo privileges on the account you’re using.
- At least 2 GB of free disk space if you’re building from source, since the build toolchain and dependencies add up.
- A stable internet connection, since some dependency packages pull from Debian/Ubuntu unstable branches or third-party OBS repositories.
- Basic familiarity with apt, dpkg, and reading build logs — not because this is fragile software, but because RAW editors with native C++ components (LibRaw, LittleCMS, lensfun bindings) are more sensitive to library version mismatches than typical GUI apps.
Run a quick system update first. This isn’t optional — mismatched package indexes are the single most common cause of “unmet dependency” errors during LightZone installs.
sudo apt update && sudo apt full-upgrade -y
sudo reboot
The reboot matters if a kernel or glibc update was part of that upgrade. Skipping it and proceeding straight to dependency installation is a common shortcut that occasionally causes weird runtime linking errors later.
Method 1: Installing LightZone via PPA (Fastest Route)
The community-maintained PPA has historically been the path of least resistance for Ubuntu users, and it’s still worth trying first since it saves you the build overhead.
Step 1: Add the LightZone PPA
sudo add-apt-repository ppa:lightzone-team/lightzoneYou’ll be prompted for your password. Type it — no characters will show on screen, which trips up newer users who assume the terminal has frozen.
Step 2: Refresh the Package Index
sudo apt updateStep 3: Install LightZone
sudo apt install lightzone -yHere’s the catch with Ubuntu 26.04: PPA compatibility metadata often lags behind new LTS releases by several months after launch. If the PPA hasn’t published a build target for the 26.04 codename, apt will report an “unable to locate package” error or silently skip the repo during update. In that scenario, don’t waste time troubleshooting the PPA — move straight to the manual build method below. It’s more reliable long-term anyway, since you’re not depending on a third-party maintainer’s update cadence.
Verifying the Installation
lightzone --versionIf this returns a version string, you’re done. If it throws a “command not found,” the package likely installed but didn’t register its binary path correctly — check /usr/bin/lightzone or /opt/lightzone/bin/ depending on how the PPA package structures its files.
Method 2: Building LightZone From Source (Recommended for Ubuntu 26.04)
Given the PPA’s uncertain support window for brand-new LTS releases, building from source is currently the most dependable method on Ubuntu 26.04. It sounds intimidating if you’ve never compiled a Java/C++ hybrid application, but the process is well-documented upstream and takes maybe 15-20 minutes on modest hardware.
Step 1: Install Build Dependencies
LightZone’s build system relies on Ant, a JDK, and several native imaging libraries. Install them all in one pass:
sudo apt-get install debhelper devscripts build-essential ant git-core \
javahelp2 default-jdk default-jre-headless libglib2.0-dev \
libjiconfont-google-material-design-icons-java liblcms2-dev \
liblensfun-dev libjpeg-dev libraw-dev libtiff-dev libx11-dev \
libxml2-utils pkg-config rsync
A quick note here worth flagging: on some minimal server-style Ubuntu 26.04 installs, javahelp2 and libjiconfont-google-material-design-icons-java aren’t in the default universe repo enablement. If apt can’t find them, run sudo add-apt-repository universe and update again before retrying.
Step 2: Download the Source Tarball
Pick a stable release tag rather than pulling from master directly — the development branch occasionally has half-finished feature work that breaks builds.
cd /tmp
curl -L https://github.com/ktgw0316/LightZone/tarball/4.2.4 > lightzone_4.2.4.orig.tar.gz
mkdir lightzone
tar xf lightzone_4.2.4.orig.tar.gz -C lightzone --strip-components=1
cd lightzone
Step 3: Apply the Correct Debian Packaging Profile
This step trips up a lot of people because it’s easy to miss, and it’s the exact point where Ubuntu 26.04’s newer base diverges from older tutorials written for 20.04 or 22.04. Since Ubuntu 26.04 is built on a Debian 13-adjacent packaging lineage, use the Debian 12+ profile:
cp debian/lightzone-Debian_12.dsc debian/lightzone.dsc
cp debian/patches/series-Debian_12 debian/patches/series
If you’re building on an older Ubuntu base for comparison (20.04/22.10 and earlier), the equivalent Debian 11 profile applies instead — but for 26.04, always go with the 12 profile since the toolchain and library ABI expectations line up.
Step 4: Build the Package
debuild -uc -usThis compiles the native components via Ant and packages everything into a .deb. Expect several minutes of build output — Ant compiling the Java sources, then native library linking. Warnings about deprecated Java APIs are normal and don’t indicate failure; only hard errors halting the build matter.
Step 5: Install the Compiled Package
The .deb lands in the parent directory:
cd ..
sudo dpkg -i lightzone_*.deb
sudo apt install -f -y
That second command resolves any dependency gaps dpkg couldn’t handle on its own — a routine step, not a sign something went wrong.
Step 6: Launch and Confirm
lightzoneOr launch it from your application menu if you’re on a desktop environment. The first launch is slower than subsequent ones since it initializes its lens correction database and color profiles.
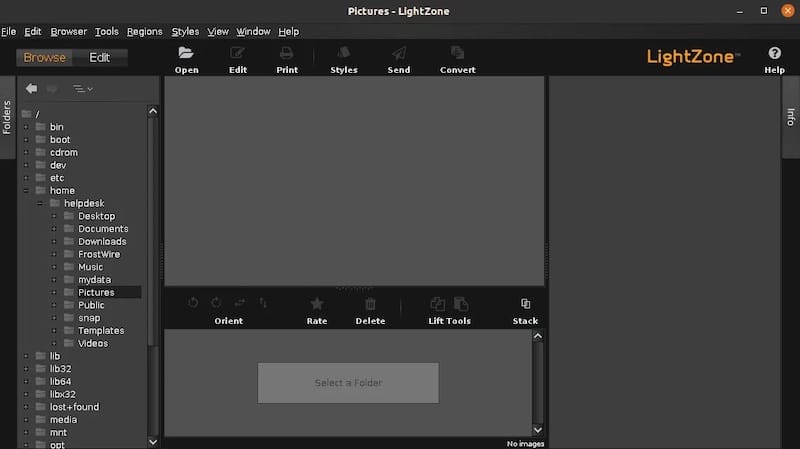
Alternative: Manual .deb Package Installation
If building from source feels like overkill and you’ve located a pre-built .deb for a compatible architecture, installation is straightforward:
uname -mConfirm you’re on x86_64 (most common) before downloading the matching package. Then:
sudo dpkg -i lightzone.deb
sudo apt install -f
The caveat: pre-built .deb files circulating online are frequently built against older library ABIs. On Ubuntu 26.04’s updated base libraries, this method has a real chance of pulling in outdated libjpeg or liblcms2 versions via apt install -f, which can create subtle color-management bugs during RAW conversion. Building from source avoids this entirely because it links against whatever’s actually installed on your system.
Troubleshooting Common LightZone Installation Errors
“Unable to locate package lightzone”
This almost always means the PPA hasn’t published metadata for Ubuntu 26.04’s codename yet. Check /etc/apt/sources.list.d/lightzone-team-ubuntu-lightzone-*.list — if the suite name inside doesn’t match your actual Ubuntu codename, apt silently ignores the repo entry. Fix it by switching to the source-build method, or manually editing the file to point at the closest compatible suite (risky, but sometimes works since LightZone’s actual binary dependencies haven’t changed much).
Build Fails on ant With Java Version Errors
If debuild throws Java compatibility errors, check your default JDK version:
java -version
sudo update-alternatives --config java
LightZone’s build scripts sometimes assume an older JDK target. If Ubuntu 26.04 ships a JDK newer than what the build expects, you may need openjdk-17-jdk explicitly installed alongside default-jdk, then switch the alternatives configuration before rerunning debuild.
Missing libjiconfont-google-material-design-icons-java
This package isn’t always present in default repo mirrors. If apt-get install can’t resolve it, check whether universe and multiverse components are enabled:
sudo add-apt-repository universe
sudo add-apt-repository multiverse
sudo apt update
LightZone Launches But Crashes on RAW Import
This usually points to a LibRaw version mismatch — common when mixing a source-built LightZone with a system libraw that’s been updated independently through unattended-upgrades. Rebuild against the current libraw-dev version, or pin the library version if you’re managing multiple photo tools on the same box.
Blank or Corrupted Thumbnails in the Browser Panel
Nine times out of ten, this is a color profile cache issue rather than a real bug. Clear LightZone’s cache directory:
rm -rf ~/.lightzone/cacheRelaunch and let it rebuild thumbnails from scratch. Slower the first time, but resolves most rendering glitches.
Performance Tuning for RAW Processing Workloads
RAW editors are deceptively resource-hungry, and LightZone is no exception when working with 40+ megapixel files. A few adjustments make a real difference on workstations that aren’t top-tier hardware.
- Allocate sufficient JVM heap: LightZone runs on a JVM under the hood. If you’re processing large batches, edit its launch script to increase -Xmx (max heap) — the default is conservative and can cause sluggish behavior on files above 30MP.
- Use an SSD for the working cache directory: RAW previews and thumbnail caching involve heavy disk I/O. Point ~/.lightzone/cache at an SSD-backed path via a symlink if your home directory sits on spinning disk.
- Disable unnecessary background services: On a workstation also running Docker containers or a local dev stack, CPU contention during RAW decode noticeably slows preview rendering. Pause non-essential services during editing sessions.
- Monitor memory pressure: Run htop or free -h during heavy edits. If swap usage climbs during batch exports, that’s your signal to either add RAM or reduce concurrent export jobs.
- Multi-core decode benefits: LibRaw’s demosaic algorithms scale reasonably well across cores. On multi-socket or high-core-count workstations, this translates to noticeably faster batch RAW-to-JPEG conversion.
Security Considerations for Third-Party PPAs and Build Tools
Adding third-party PPAs always introduces a trust dependency — you’re extending root-level package installation privileges to a repository maintainer you don’t control. A few habits reduce the risk surface without sacrificing convenience.
- Review PPA GPG keys before adding them; add-apt-repository fetches and trusts keys automatically, which is convenient but worth double-checking for anything running on production-adjacent machines.
- Remove PPAs you’re no longer using: sudo add-apt-repository –remove ppa:lightzone-team/lightzone — a dangling PPA is an unnecessary attack surface, however small.
- Keep build-essential and compiler toolchains isolated to workstation environments, not production servers. There’s rarely a legitimate reason to have a full build chain sitting on an internet-facing box.
- Run sudo apt list –upgradable regularly after adding new repos, since PPAs occasionally override system package versions in ways that create version pinning conflicts down the line.
- If building on a shared or multi-user machine, restrict the build directory permissions (chmod 700) to avoid other local users tampering with build artifacts before installation.
