
Anyone who has built a gaming rig or a workstation with a glass side panel knows the pattern. The motherboard ships with one vendor’s lighting utility, the RAM with another’s, the GPU with a third, and the keyboard wants its own tray application. None of them run on Linux. You end up with a desk that flashes a rainbow whenever it feels like it, and no way to calm it down.
OpenRGB solves this with one open source tool that talks to motherboards, DRAM modules, GPUs, coolers, keyboards, mice and LED strips from many vendors. It needs no cloud account and no background telemetry. The catch is that the hardware talks over USB HID and over the SMBus/I2C bus. Neither is open to a normal user by default, and that is where most installs go wrong.
Ubuntu 26.04 LTS, codenamed Resolute Raccoon, was released on April 23, 2026. It will receive standard security maintenance until May 2031. That makes it a sensible base for a long-lived desktop or a small workstation that also does real work. OpenRGB itself reached its stable 1.0 release on September 11, 2026, after several release candidates. Many older tutorials are written for 0.9 or the release candidates and no longer match what you will see.
This guide follows the way a sysadmin would approach it. Pick the right package format, fix permissions properly, verify the kernel side, then make the setup survive reboots. Troubleshooting comes at the end, because that is where most readers will end up.
Prerequisites and Quick Checks
Spend two minutes here and you will save an hour later.
Confirm the release and architecture first:
lsb_release -a
uname -m
uname -r
You want Ubuntu 26.04 and x86_64 on most desktops. Arm 64 builds exist, but they are rare on machines with RGB hardware.
Update the system before installing anything:
sudo apt update
sudo apt full-upgrade -y
Check which RGB-capable devices the kernel can see. The USB side is easy:
lsusbLook for vendor IDs from the usual suspects (Corsair, Razer, SteelSeries, Logitech, ASUS, MSI, Gigabyte, NZXT). For the SMBus side, install the I2C tools:
sudo apt install -y i2c-tools
sudo i2cdetect -l
If the second command lists adapters such as SMBus I801 adapter (Intel) or SMBus PIIX4 adapter (AMD), the bus exists. If it prints nothing, the modules are not loaded yet. The kernel section below covers that.
One more thing to settle early: do you want to run OpenRGB as a normal desktop app, or as a background service? The udev rules article on the OpenRGB site makes the distinction clear. A background service runs as root and already has access to all interfaces. A standalone run under your own account needs udev rules.
Choosing the Right Install Method
Ubuntu does not carry a current OpenRGB package in the way a person would hope, so you pick from upstream builds. The official downloads page lists a Linux AppImage, a Flatpak, and Debian packages for Bookworm and Trixie, for amd64, arm64, i386 and armhf. Release 1.0 also notes that the Debian and Fedora packages require the matching hidapi-hotplug packages.
| Method | Udev rules installed automatically | Sandboxed | Best for |
|---|---|---|---|
| .deb (Debian Trixie build) | Yes | No | Daily-driver desktops, headless service use |
| AppImage | No, generate manually | No | Quick tests, portable use, trying the pipeline build |
| Flatpak | No, install manually | Yes | Users who avoid system-wide packages |
Official guidance says rules are installed automatically for distribution packages (.deb, .rpm, or a package manager), while AppImage, Flatpak and self-compiled builds need them added by hand.
My recommendation, based on a lot of mixed hardware: use the .deb. It integrates with systemd, places files where Ubuntu expects them, and removes cleanly. The Flatpak sandbox is the usual culprit when “the rules are installed but nothing is detected,” and that complaint shows up regularly on the project’s issue tracker. Reach for the AppImage when you want to test a pipeline build without touching the system.
A note on which Debian build to choose. Ubuntu 26.04 is newer than Debian 12 (Bookworm), so the Trixie build is the closer match. Forum advice from earlier Ubuntu cycles was to pick the Bookworm build for Ubuntu 24.04 and newer. That advice predates the Trixie packages, so for 26.04 start with Trixie and fall back to Bookworm only if dependencies refuse to resolve.
Method 1: Install the .deb Package (Recommended)
Download the right file
Open the OpenRGB releases page, go to Release 1.0, and download the Trixie (amd64) package. Do this in a browser, then work from your Downloads folder. Hardcoding a filename in a tutorial is a good way to produce a broken command, because build names include a commit hash.
cd ~/Downloads
ls -1 | grep -i openrgb
Install it with apt, not dpkg
Using apt install with a local path resolves dependencies automatically. Plain dpkg -i does not, and leaves you with a half-configured package.
sudo apt install ./openrgb_*trixie*_amd64.debThe leading ./ matters. Without it, apt treats the argument as a package name from the repositories and fails.
Install the hidapi-hotplug dependency if it is missing
The release notes explicitly call for the hidapi-hotplug packages on Debian and Fedora builds. If the launch fails with a missing library message, or if apt complains about unmet dependencies, grab the matching hidapi-hotplug .deb from the same releases page and install it the same way:
sudo apt install ./hidapi-hotplug*.debIf the installer pulled everything in already, skip this.
Launch and check
openrgb --version
openrgb --list-devices
The second command prints every detected device with its zones and LED counts. If you see your hardware, you are done with the basics. If it prints nothing or warns about permissions, jump to the kernel and udev sections.
Method 2: Run the AppImage
An AppImage is a single executable file. Nothing is installed into the system, which is why it suits testing and one-off use. The AppImage project describes it as one app per file, which you make executable and run.
Ubuntu no longer ships the old FUSE 2 library by default, and AppImages need it. Install it first. On recent Ubuntu releases the package is named libfuse2t64:
sudo apt install -y libfuse2t64If apt cannot find that name on your system, search with apt search libfuse2.
Then make the file executable and run it:
cd ~/Downloads
chmod +x ./OpenRGB*.AppImage
./OpenRGB*.AppImage
Because there is no package to drop rules in place, generate them. Starting with 1.0, OpenRGB generates its own udev rules instead of relying on a separately downloaded file. The documented commands for an AppImage are:
sudo mkdir -p /etc/udev/rules.d
sudo ./OpenRGB.AppImage --generate-udev-rules /etc/udev/rules.d/60-openrgb.rules
sudo udevadm control --reload-rules
sudo udevadm trigger
Swap OpenRGB.AppImage for your real filename. This is a nice design: the rules always match the version you run, so you do not end up with a stale file missing a newly supported device.
To keep the AppImage tidy, move it somewhere permanent:
mkdir -p ~/Applications
mv ~/Downloads/OpenRGB*.AppImage ~/Applications/OpenRGB.AppImage
Method 3: Install the Flatpak
Flatpak is the right choice if you prefer isolated apps. First make sure Flatpak itself is present:
sudo apt install -y flatpak
flatpak remote-add --if-not-exists flathub https://dl.flathub.org/repo/flathub.flatpakrepo
Then install and run OpenRGB:
flatpak install flathub org.openrgb.OpenRGB
flatpak run org.openrgb.OpenRGB
The Flathub package page tells you to install the udev rules and to place 60-openrgb.rules in /usr/lib/udev/rules.d/ before reloading. The reload commands are the same as always:
sudo udevadm control --reload-rules
sudo udevadm trigger
A realistic warning: the sandbox adds one more layer that can hide a device. OpenRGB’s own warning dialog says that for Flatpak and AppImage builds the rules must be installed manually. Users on other distributions have reported that the Flatpak does not notice rules that are already installed. If that happens, switching to the .deb is the fastest fix.
Prepare the Kernel for SMBus and I2C Devices
USB-only gear (most keyboards, mice, headsets, many fan controllers) works the moment the udev rules are right. RAM, many motherboards, and some GPUs use I2C/SMBus instead, and those need kernel modules.
Load i2c-dev
sudo modprobe i2c-devMake it permanent:
echo "i2c-dev" | sudo tee /etc/modules-load.d/i2c-dev.confThe older OpenRGB instructions also called out loading i2c-dev for non-root access. That requirement still holds today.
Load the chipset driver
Intel platforms use i2c-i801. AMD platforms use i2c-piix4. Load whichever matches:
sudo modprobe i2c-i801
sudo modprobe i2c-piix4
Loading the wrong one is harmless; it simply fails. To make the right one persistent, add it to the same modules-load directory:
echo "i2c-piix4" | sudo tee /etc/modules-load.d/i2c-piix4.confOr for Intel:
echo "i2c-i801" | sudo tee /etc/modules-load.d/i2c-i801.confVerify with:
lsmod | grep i2c
sudo i2cdetect -l
The ACPI resource conflict
On some boards, the kernel refuses to hand the SMBus to a userland tool because ACPI claims the I/O region. The symptom is an entry in dmesg complaining about an ACPI resource conflict. Check:
sudo dmesg | grep -i -E "acpi|smbus|i801|piix4"If you do see a conflict, the common workaround is the kernel parameter acpi_enforce_resources=lax. Edit /etc/default/grub:
sudo nano /etc/default/grubAppend the parameter to the existing line:
GRUB_CMDLINE_LINUX_DEFAULT="quiet splash acpi_enforce_resources=lax"Then apply it and reboot:
sudo update-grub
sudo reboot
Treat this as a last resort. It relaxes a safety check, and poking an SMBus device blindly can, in rare cases, corrupt the SPD data on DRAM or confuse a motherboard’s embedded controller. OpenRGB is careful about what it scans, but an unfamiliar board deserves a little paranoia. Back up your BIOS settings before experimenting, and keep a note of what you changed so you can undo it.
Fix Permissions Properly
The most common beginner shortcut is sudo openrgb. It works, and it is wrong. Running a GUI app as root on a desktop session can leave root-owned files in your home directory, breaks Wayland integration in odd ways, and expands the blast radius of any bug.
Do it properly with the udev rules. Check whether they exist:
ls -l /etc/udev/rules.d/ | grep -i rgb
ls -l /usr/lib/udev/rules.d/ | grep -i rgb
You should see 60-openrgb.rules in one of the two. If the .deb installed it, you will find it under /usr/lib/udev/rules.d/. If you generated it for an AppImage, it lives in /etc/udev/rules.d/, which is the location the OpenRGB site documents for manual installs.
Reload and re-trigger after any change:
sudo udevadm control --reload-rules
sudo udevadm trigger
Then unplug and replug USB devices, or reboot. A reboot is cheap and removes doubt.
For I2C access, check the group ownership of the device nodes:
ls -l /dev/i2c-*If they are owned by root:root with no group access, add yourself to the i2c group when it exists, or rely on the rules to tag them:
getent group i2c || sudo groupadd i2c
sudo usermod -aG i2c "$USER"
Log out and back in for the group change to take effect. Confirm with id.
First Run: What to Expect
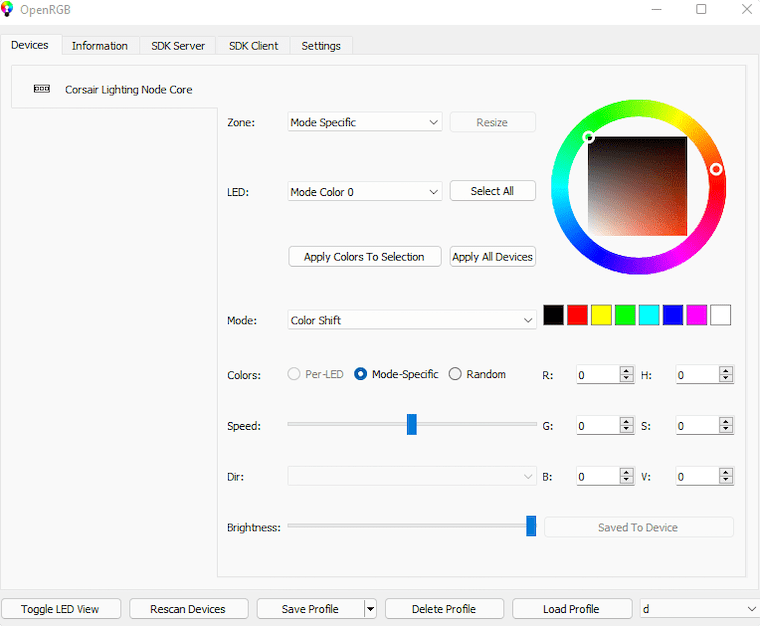
Open OpenRGB from the application menu or with openrgb. The 1.0 release brought UI cleanup and frames around interface elements, translation support, and automatic language detection from the operating system. If the interface looks different from a screenshot in an older tutorial, that is why.
On first launch the Devices tab will populate. Give it a few seconds, because the SMBus scan is not instant. Click Rescan Devices if something is missing.
A practical workflow:
- Select a device, choose a mode (Static, Rainbow, Breathing, Direct), and pick a colour.
- Use the Direct mode if you plan to sync many devices, as it gives per-LED control with the least firmware magic.
- Save a profile in the Profiles area once things look right.
If the app warns that the udev rules are not installed, it is not decoration. The warning explicitly says most devices will be unavailable unless OpenRGB runs as root. Fix the rules instead of dismissing it.
Command-Line Control and Scripting
The CLI is where OpenRGB pays off for admins. A few examples:
openrgb --list-devices
openrgb --device 0 --mode static --color FF0000
openrgb --device 1 --mode direct --color 00AAFF
openrgb --profile office.orp
The --profile flag loads a saved profile, and it is the one you will use in autostart entries. Device indexes can change between boots, because USB enumeration order is not guaranteed. For that reason, saved profiles are more reliable than a script of numbered --device calls.
A practical scenario
Consider a workstation under a desk in a shared office. A static warm white during work hours looks fine. At night, you want everything off so the room is not glowing. A pair of profiles, day.orp and night.orp, plus two cron entries, covers it:
crontab -e0 8 * * 1-5 /usr/bin/openrgb --profile day.orp
0 19 * * 1-5 /usr/bin/openrgb --profile night.orpCron runs without your desktop session variables, so test this by running the same command from a minimal shell. If the app needs a display, switch to server mode and use the SDK client, covered below.
Autostart at Login
For a desktop, a user-level autostart is the simplest approach. Create the entry:
mkdir -p ~/.config/autostart
nano ~/.config/autostart/openrgb.desktop
[Desktop Entry]
Type=Application
Name=OpenRGB
Exec=/usr/bin/openrgb --startminimized --profile default.orp
Icon=openrgb
X-GNOME-Autostart-enabled=trueCheck the binary path with which openrgb first. If you use the AppImage, point Exec at the file under ~/Applications.
One refinement: the first scan at login can race against device initialization, particularly with USB hubs that wake slowly. Add a small delay by wrapping the command:
Exec=sh -c "sleep 8 && /usr/bin/openrgb --startminimized --profile default.orp"Ugly, but it works, and it is far more reliable than expecting every device to be ready the instant the session starts.
Running OpenRGB as a Background Service
A headless setup, or a machine where lighting should be applied before anyone logs in, calls for server mode. The server listens on TCP port 6742 by default and speaks the SDK protocol, so other clients, plugins or scripts can control the lights.
Start it manually:
openrgb --serverFor a persistent setup, write a systemd unit. This one runs as root, which, per the OpenRGB documentation, gives a background service access to all interfaces without udev rules:
sudo nano /etc/systemd/system/openrgb.service[Unit]
Description=OpenRGB SDK Server
After=multi-user.target
[Service]
Type=simple
ExecStart=/usr/bin/openrgb --server --profile /etc/openrgb/default.orp
Restart=on-failure
RestartSec=5
[Install]
WantedBy=multi-user.targetPrepare the profile location, then enable it:
sudo mkdir -p /etc/openrgb
sudo cp ~/.config/OpenRGB/default.orp /etc/openrgb/default.orp
sudo systemctl daemon-reload
sudo systemctl enable --now openrgb.service
systemctl status openrgb.service
journalctl -u openrgb.service -b --no-pager | tail -n 50
Profile paths differ between versions and package formats, so confirm where your profile was actually written before copying. Run find ~/.config -name "*.orp" if unsure.
Lock down the SDK port
By default the server listens beyond localhost in some configurations, and the protocol has no authentication. Anyone who reaches port 6742 can change your lighting. That is a minor nuisance on a home network and a bigger deal on a shared one. Check what is listening:
ss -tlnp | grep 6742Then restrict access with UFW:
sudo ufw status
sudo ufw deny 6742/tcp
If you do need a remote client, allow only a single trusted address:
sudo ufw allow from 192.168.1.50 to any port 6742 proto tcpThe risk of the lights being changed is low. The principle is not: an unauthenticated service running as root should never be exposed to a network you do not control. Treat it with the same discipline as any other daemon.
Performance and Resource Considerations
Lighting software should be invisible in top. It usually is, but a few habits keep it that way.
CPU: Complex effects that update every LED at a high frame rate cost cycles. Watch with top or htop while an effect runs. Switching a busy effect to a static or hardware-native mode lets the device firmware do the animation and drops the CPU cost to nearly zero.
RAM: The footprint is small for the daemon. The GUI uses more because of the Qt libraries. If you only need the lights set at boot, use --profile with --startminimized or the server rather than keeping a full window open.
Disk I/O: Negligible. Profiles are tiny files. The only I/O of note is the log output, which journalctl handles for you.
SMBus contention: This is the genuinely important one. Sensor monitoring tools like lm-sensors, and any other tool that polls the SMBus, share the same bus as RAM RGB controllers. Heavy polling from two programs at once can cause timeouts or detection failures. If lights flicker or devices vanish, stop other monitoring tools and retest before blaming OpenRGB.
Network: Only relevant in server mode. A local client on loopback adds nothing measurable.
Security Considerations
A few points deserve a straight answer, since this tool touches low-level hardware.
- Prefer udev rules to
sudofor desktop use. Narrow, device-specific permissions beat running an entire GUI as root. - Download packages only from the official project site or Flathub, and check file sizes and names against the release page.
- Keep the system patched. Ubuntu 26.04 LTS gets five years of standard security maintenance for packages in Main, but OpenRGB itself comes from upstream, so you are responsible for updating it. Check the releases page now and then.
- Do not leave the SDK server open to the network, as covered above.
- Be careful with the ACPI lax parameter and with scanning unknown hardware, because SMBus writes to the wrong address can have real effects.
If this machine is more than a desktop, say a build server with a lit-up chassis in a rack, ask honestly whether you need RGB software running at all. Turning the lighting off in firmware or BIOS removes a moving part.
Keeping OpenRGB Updated
With the .deb there is no apt repository feeding updates, so upgrades are manual. Download the newer package and install it over the old one:
sudo apt install ./openrgb_NEWVERSION_amd64.debProfiles stay in your home directory, so they survive. For the Flatpak, updates are one command:
flatpak update org.openrgb.OpenRGBAppImages can use AppImageUpdate, which downloads only the changed portions of the file.
A word on release choice. Pipeline builds are the latest unreleased development versions, built automatically from the newest changes. They often have better device compatibility but may be unstable compared to the stable release. If your new motherboard or RAM kit is not detected on 1.0, try a pipeline AppImage before filing a bug. It costs a download and nothing else, since the AppImage does not change your system.
Troubleshooting Common Problems
“The OpenRGB udev rules are not installed” warning
You are on an AppImage, Flatpak or self-built binary with no rules. Generate or place the file, then reload. For AppImage, use the --generate-udev-rules command shown earlier. For Flatpak, copy the rules file and reload.
No devices detected at all
Work through this list in order:
- Run
openrgb --list-devicesfrom a terminal and read the output. - Run
lsusbto confirm the hardware is physically visible. - Run
sudo i2cdetect -lto check the SMBus adapters. - Check
ls -l /dev/i2c-*for permissions. - Reboot, since the rules and group membership both need a fresh session.
If devices appear only under sudo openrgb, the problem is permissions, and the rules are not applying.
Rules are installed but a Flatpak still sees nothing
This matches a reported issue where the Flatpak does not appear to detect installed rules. Sandboxing is the likely cause. Switch to the .deb or AppImage to confirm, and you will know within minutes.
RAM modules are not detected
Check that i2c-dev and the right chipset driver are loaded (lsmod | grep i2c). Then look at dmesg for ACPI resource conflicts. Also confirm the RAM is actually supported, since not every DIMM exposes its lighting controller the same way. The project publishes a supported devices list for each release, so check it before spending time on a kit that may not be supported.
AppImage will not start
Usually a missing FUSE library. Install libfuse2t64, and make sure the file is executable with chmod +x. If it still refuses, run it from a terminal and read the error. As a fallback, extract it:
./OpenRGB.AppImage --appimage-extract
./squashfs-root/AppRun
Dependency errors during .deb installation
Make sure you used apt install ./file.deb, not dpkg -i. If a library such as hidapi is missing, install the hotplug package that the release notes call for. If the Trixie package still conflicts, try the Bookworm build as a fallback.
Lights reset after suspend or reboot
Many controllers lose their software state when power is cycled. The fix is to re-apply the profile at login and after resume. For resume, create a small systemd sleep hook:
sudo nano /usr/lib/systemd/system-sleep/openrgb-resume#!/bin/sh
case "$1" in
post)
sleep 3
/usr/bin/openrgb --profile /etc/openrgb/default.orp
;;
esacsudo chmod +x /usr/lib/systemd/system-sleep/openrgb-resumeThe sleep matters. Devices need a moment to re-enumerate, and an immediate call often runs against hardware that is not ready yet.
GUI looks wrong or fails on Wayland
Ubuntu’s default session is Wayland. Most Qt apps cope, but if you see rendering glitches, test with the X11 platform plugin:
QT_QPA_PLATFORM=xcb openrgbIf that fixes it, put the variable in your autostart entry rather than living with the glitch.
Flickering or random colour changes
Two programs are probably controlling the same device. Close any vendor tool running in a Windows VM or dual-boot leftovers, and stop other SMBus pollers. Also check that you only have one OpenRGB instance running with pgrep -a openrgb.