
Wireshark is one of the most useful tools for network analysis on Linux. It helps you inspect packets, troubleshoot apps, and verify what happens on the wire, which is why sysadmins and developers use it often.
The tricky part is not the install itself. The real issue is making packet capture work safely for a normal user, which is where Fedora’s wireshark group and dumpcap capabilities matter.
In this How To Install Wireshark on Fedora 44 guide, I will show the exact install path, the permission setup, and the common fixes if capture does not work. I will also keep the steps simple, explain the WHY behind each command, and avoid the usual copy-paste style that leaves people stuck later.
Prerequisites
- Fedora 44 installed and updated. Fedora’s package flow and Wireshark packaging behavior are the base for this guide.
- A user account with sudo access. You need it to install packages and change group membership.
- A terminal and internet access. DNF installs Wireshark from the Fedora repositories.
- Optional but useful: a second terminal session for testing permissions after changes.
- Basic comfort with command-line tools such as
dnf,usermod, andsetcap.
Step 1: Update Your System
Run a full package refresh
sudo dnf update -yThis updates your package metadata and installed packages. It matters because a fresh package index reduces dependency issues and helps you install the newest Fedora build of Wireshark cleanly.
If your system has older repo metadata, DNF may pull outdated dependencies or show avoidable conflicts. A quick update saves time later and makes the install easier to trust.
Step 2: Install Wireshark
Install the Fedora package
sudo dnf install -y wireshark-qt wireshark-cliwireshark-qt gives you the graphical interface, and wireshark-cli gives you tshark for terminal-based packet work. Fedora Magazine notes that wireshark-qt installs both the Qt GUI and the CLI component, which makes it a good default package for most users.
You may also see wireshark-gtk in some guides or package searches. Fedora can offer multiple GUI variants, but Qt is the modern default and the one most people should start with.
Confirm the install
dnf list installed 'wireshark*'This confirms which Wireshark packages are present on the system. It helps you verify that the install completed and that you got the GUI and CLI pieces you expected.
Expected output will include packages like wireshark-qt and wireshark-cli. The exact version will vary by Fedora release and repository state.
Step 3: Understand Capture Permissions
Why capture needs extra setup
Wireshark itself should not run as root for normal use. Instead, Fedora uses a safer design where dumpcap gets the minimum capture privileges it needs, while the rest of Wireshark runs as a normal user.
That matters because packet capture needs low-level network access. Wireshark documentation says Linux captures typically rely on CAP_NET_RAW and CAP_NET_ADMIN, and Fedora packages handle this with group-based access.
Check that the wireshark group exists
getent group wiresharkThis command checks whether Fedora created the wireshark group. Fedora and Wireshark documentation say the official packages add this group for non-root capture access.
If the group exists, you will see a line with the group name and members. If you do not, something is wrong with the package install or the system state.
Add your user to the group
sudo usermod -aG wireshark $USERThis adds your account to the wireshark group so you can capture packets without launching the app as root. That is the right approach because it keeps most of Wireshark running with normal user privileges.
Replace $USER with your actual username if needed. Fedora Magazine also notes that you must log out and back in after this change.
Apply the new group membership
newgrp wiresharkThis opens a new shell session that uses the updated group membership immediately. It is useful for testing, but a full log out and log in is still the cleanest way to make GUI sessions pick up the change.
If you skip this step, Wireshark may still act like you are not in the group. That happens because group membership is usually read at login time.
Step 4: Verify Dumpcap Access
Check file capabilities
getcap $(command -v dumpcap)This checks whether dumpcap has the needed Linux capabilities. Wireshark’s own documentation recommends setcap cap_net_raw,cap_net_admin+eip for systems that use file capabilities directly.
On Fedora, the package usually sets this up for you. If capabilities are missing, packet capture will fail even if the GUI opens normally.
Expected result
/usr/bin/dumpcap cap_net_admin,cap_net_raw=eipThat output means dumpcap can capture traffic safely without giving the whole application root access. It is a strong sign that the permissions model is in place correctly.
Fix missing capabilities
sudo setcap cap_net_raw,cap_net_admin+eip $(command -v dumpcap)This grants only the capture rights that dumpcap needs. It matters because it avoids the much larger risk of running the whole Wireshark app as root.
If your Fedora system uses a different path for dumpcap, adjust the command accordingly. Wireshark’s documentation notes that some systems place it under /usr/bin instead of /usr/sbin.
Step 5: Launch Wireshark
Open the GUI
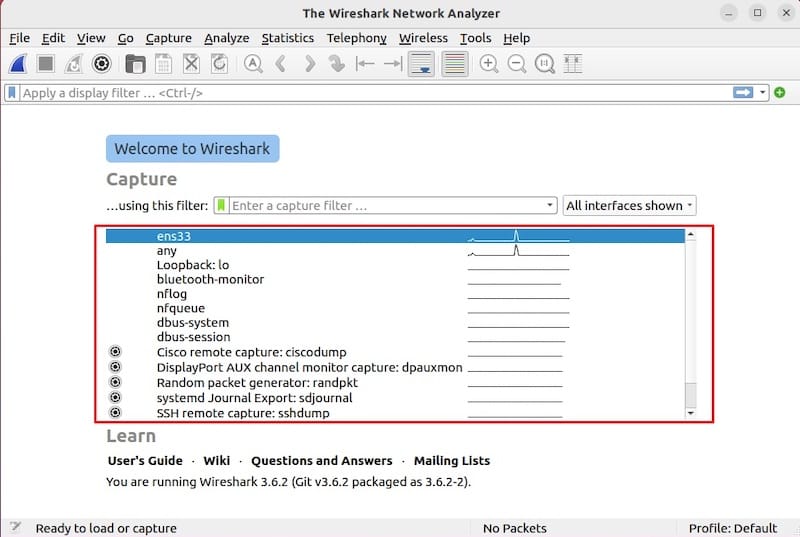
wiresharkThis starts the graphical application. If everything is correct, you should see your available interfaces and be able to choose one for capture.
If the app opens but no interfaces are visible, that usually points to a permission issue. It can also happen if the capture backend cannot access the network device.
Start a test capture
Choose a safe interface such as loopback or a test interface, then start capture. Fedora Magazine recommends picking an interface from the Capture menu and starting traffic from there.
A simple smoke test helps you confirm both the UI and the capture path. That is important before you use Wireshark on a production host.
Step 6: Use TShark for CLI Work
Capture from the terminal
tshark -DThis lists available interfaces. It is useful when you work over SSH or want to script packet checks on a server.
Then start a short capture:
sudo tshark -i lo -c 10This captures 10 packets from the loopback interface. It is a good way to confirm that the CLI tools work even before you open the GUI.
TShark is especially useful in a Linux server tutorial because it fits headless systems and automation better than a full GUI.
Step 7: Optional GUI Switch
Install the GTK version if needed
sudo dnf install -y wireshark-gtkThis installs the GTK-based GUI if you prefer the older interface or want to compare both styles. Fedora Magazine notes that both Qt and GTK variants are available in the repositories.
Switch between GUI versions
sudo alternatives --config wiresharkThis lets you choose which GUI command Fedora should use by default. It matters if you install both GUI variants and want one launch command to pick the right one.
For most users, Qt is the better default. Still, the alternatives system gives you flexibility without uninstalling anything.
Step 8: Capture Safely
Use capture filters wisely
wiresharkIn the GUI, you can set a capture filter before starting capture. Wireshark documentation recommends limiting scope when possible so you collect only the traffic you need.
That matters because smaller captures are easier to read and safer to store. It also reduces the chance of collecting sensitive data you do not need.
Use promiscuous mode with care
If you enable promiscuous mode, the interface will try to see more traffic on the local segment. Fedora Magazine notes this as an option during capture startup, but it should be used only when you need it.
For many troubleshooting tasks, a normal capture is enough. Less scope means less noise and less risk.
Troubleshooting
Error 1: “You do not have permission to capture”
This usually means your account is not in the wireshark group yet, or the session has not refreshed. Re-run the group check, then log out and back in.
Fix:
groups
sudo usermod -aG wireshark $USER
Then start a new login session. That is required because the system reads group membership when the session begins.
Error 2: No interfaces appear in Wireshark
This often points to missing dumpcap capabilities. Check them with getcap $(command -v dumpcap) and reapply setcap if needed.
Fix:
sudo setcap cap_net_raw,cap_net_admin+eip $(command -v dumpcap)This restores the minimum privileges dumpcap needs for live capture.
Error 3: Wireshark opens, but capture still fails after cloning a system
Wireshark’s issue tracker documents cases where file capabilities were lost after a clone or move. In that situation, dumpcap no longer has the needed rights.
Fix the capabilities again with setcap. Then test capture from a non-root account.
Error 4: The wireshark group is missing
Some systems or custom installs may not create the group correctly. Wireshark’s documentation explains that Fedora’s official packages normally create it, so a missing group usually means the package install did not complete as expected.
Fix:
sudo groupadd --system wireshark
sudo usermod -aG wireshark $USER
Then verify dumpcap permissions again. Do not replace this with a full-root Wireshark launch unless you are only doing a temporary test.
Error 5: SELinux or local policy gets in the way
Fedora may block some actions if policy, labels, or file contexts do not line up. In that case, check the audit log and confirm that your Wireshark package files are intact.
The safest fix is usually to restore package defaults and reapply setcap, not to weaken the whole system. That keeps your Wireshark on Fedora 44 configure setup secure.