
Fedora doesn’t get nearly enough credit as a WordPress host. Most tutorials online default to Ubuntu or Debian, and there’s a reason for that — better documentation coverage, more forum threads, more “just copy-paste this” solutions. But Fedora 44 is a genuinely capable platform for running WordPress, especially if you already run Fedora on your workstation or you’re comfortable with SELinux and DNF package management. It ships modern PHP versions faster than most enterprise distros, its package manager handles dependency resolution cleanly, and its default security posture — SELinux enforcing, firewalld active — forces you to build habits that translate directly into hardened production environments.
The catch is that most guides treat Fedora like it’s just “another RPM-based distro” and skip the parts that actually break things: SELinux booleans that silently block database connections, firewall zones that reject inbound traffic even after you “opened” a port, and PHP-FPM socket permissions that throw 502 errors if you’re not paying attention. I’ve deployed WordPress on Fedora Server for internal documentation sites, staging environments, and a handful of low-traffic production blogs where the client specifically wanted RPM-based infrastructure to match their existing RHEL fleet. Every single time, the installation itself takes fifteen minutes. The debugging afterward — when something’s misconfigured and nobody documented why — eats the rest of the afternoon.
This guide walks through the entire process: server prep, choosing between Apache and Nginx, installing MariaDB and PHP 8.3+, configuring the web server correctly the first time, wrestling SELinux into cooperation instead of fighting it blind, and locking the whole stack down before you point a domain at it. Along the way, there’s troubleshooting for the errors you’ll actually hit, not the sanitized ones from documentation. Whether you’re setting this up on a home lab VM, a Sleman-based VPS, or a client’s Fedora Server box, the steps below apply identically to fresh installs of Fedora 44 Server or Workstation edition running as a headless host.
Before You Start: Server Prep and Assumptions
Assume a fresh Fedora 44 installation with root or sudo access via SSH. A minimal install works fine — WordPress doesn’t need a desktop environment, and running one on a production server is wasted RAM and attack surface.
Update the system first. Skipping this step is the single most common cause of dependency conflicts during PHP or MariaDB installation:
sudo dnf upgrade --refresh -y
sudo dnf install -y curl wget vim tar unzip
Check your resources realistically. WordPress itself is lightweight, but MariaDB and PHP-FPM workers add up fast under concurrent traffic. For a low-to-moderate traffic site (a few thousand visits a day), 2 vCPUs and 2GB RAM is a comfortable floor. Anything less and you’ll be fighting OOM kills during traffic spikes, plugin-heavy dashboards, or WooCommerce checkout flows.
Decide on your web server now — Apache or Nginx — because it changes several downstream steps, including SELinux contexts and PHP-FPM pool configuration.
Apache vs. Nginx on Fedora 44: Which One Actually Fits
This isn’t a religious debate, it’s a resource allocation decision.
Apache with mod_php or PHP-FPM is the path of least resistance on Fedora. It’s what Fedora Magazine and the official Fedora docs default to, .htaccess support for WordPress permalinks and security rules works out of the box, and most WordPress plugins that touch server config assume Apache exists. If you’re managing a single site or a handful of low-traffic ones, Apache is fine and honestly easier to reason about at 2 a.m. when something breaks.
Nginx paired with PHP-FPM is the better choice if you’re running higher traffic, multiple WordPress instances on one box, or you care about squeezing out every bit of concurrency your RAM allows. Nginx’s event-driven model handles thousands of simultaneous connections with a fraction of Apache’s memory footprint. The tradeoff: no .htaccess, so permalink rewrites and security headers go into the server block directly, and a lot of “WordPress security plugin” instructions assume Apache and need translating.
This guide covers Apache as the primary path since it matches the majority of tutorials and Fedora’s own packaging conventions, with Nginx configuration included as an alternative later on.
Step 1: Install the LAMP Stack
Fedora bundles WordPress as an actual RPM package, which is unusual compared to most distros — you don’t have to manually download the tarball if you don’t want to. Both approaches are covered here because the packaged version has tradeoffs worth knowing about.
Install Apache, MariaDB, and PHP with the extensions WordPress actually needs:
sudo dnf install -y httpd mariadb-server php php-fpm php-mysqlnd \
  php-json php-xml php-gd php-mbstring php-curl php-zip php-intl php-opcache
Each of these extensions maps to a real WordPress feature: php-gd handles image resizing (thumbnails, featured images), php-mbstring is required for multibyte string handling in translations and non-Latin content, php-curl powers REST API calls, plugin update checks, and webhook integrations, and php-opcache is not optional if you care about performance — more on that later.
Verify your PHP version once it’s installed:
php -vFedora 44 ships PHP 8.3 or newer by default, which is well ahead of the WordPress minimum requirement and gives you meaningful performance and JIT improvements over PHP 7.x that older tutorials still reference.
Start and enable the services so they persist across reboots:
sudo systemctl enable --now httpd mariadb php-fpmCheck that all three are actually running, not just enabled:
sudo systemctl status httpd mariadb php-fpm --no-pagerA service showing “enabled” but “inactive (dead)” is a trap a lot of people miss — enable schedules it for next boot, it doesn’t start it now unless you use --now or a separate start command.
Step 2: Secure and Configure MariaDB
Run the interactive security script before touching WordPress. This is not optional busywork — it removes anonymous users, disables remote root login, and drops the test database that’s occasionally exploitable:
sudo mysql_secure_installationAnswer yes to removing anonymous users, disallowing remote root login, removing the test database, and reloading privilege tables. Set a strong root password when prompted.
Now create a dedicated database and user for WordPress. Never use the root MariaDB account in wp-config.php — if that database gets compromised through a plugin vulnerability, you don’t want it handing over root access to your entire database server.
sudo mysql -u root -pInside the MariaDB shell:
CREATE DATABASE wordpress_db CHARACTER SET utf8mb4 COLLATE utf8mb4_unicode_ci;
CREATE USER 'wp_user'@'localhost' IDENTIFIED BY 'Use_A_Strong_Password_Here!23';
GRANT ALL PRIVILEGES ON wordpress_db.* TO 'wp_user'@'localhost';
FLUSH PRIVILEGES;
EXIT;
The utf8mb4 charset matters more than people realize. It’s not legacy boilerplate — it’s what allows WordPress to store emoji, certain CJK characters, and some special punctuation correctly in post content and comments. Sites set up years ago with plain utf8 occasionally hit mangled character issues that only get diagnosed after a painful database export.
Step 3: Get WordPress Onto the Server
You have two legitimate paths here. Fedora’s packaged wordpress RPM installs to /usr/share/wordpress with configs symlinked into /etc/wordpress, which is convenient for automatic updates via DNF but occasionally lags behind the very latest WordPress release and confuses plugins that expect a standard /var/www/html/wordpress layout.
The manual tarball method gives full control and matches what most WordPress documentation, security scanners, and migration tools expect. This is the version worth using for anything beyond a quick test box.
cd /var/www/html
sudo wget https://wordpress.org/latest.tar.gz
sudo tar -xzvf latest.tar.gz
sudo rm latest.tar.gz
This extracts into a /var/www/html/wordpress subdirectory. If you want WordPress to live at the domain root instead of a subdirectory, move the contents up one level:
sudo mv wordpress/* .
sudo rmdir wordpress
Now set correct ownership and permissions. This step is where a lot of installs quietly break later — either too permissive (security risk) or too restrictive (WordPress can’t write to wp-content, so plugin and theme installs fail silently):
sudo chown -R apache:apache /var/www/html
sudo find /var/www/html -type d -exec chmod 755 {} \;
sudo find /var/www/html -type f -exec chmod 644 {} \;
Directories at 755, files at 644 is the standard baseline. wp-content/uploads and any cache directories need to remain writable by the apache user, which the recursive chown above already ensures since Apache owns the whole tree.
Step 4: Configure wp-config.php
Copy the sample config and populate the database credentials created earlier:
cd /var/www/html
sudo cp wp-config-sample.php wp-config.php
sudo vim wp-config.php
Update these three lines to match your database:
define( 'DB_NAME', 'wordpress_db' );
define( 'DB_USER', 'wp_user' );
define( 'DB_PASSWORD', 'Use_A_Strong_Password_Here!23' );
define( 'DB_HOST', 'localhost' );
Then generate fresh authentication salts. Never leave the placeholder salt values in production — they’re what makes session cookies and password hashes resistant to forgery:
curl -s https://api.wordpress.org/secret-key/1.1/salt/Paste the output over the corresponding block in wp-config.php, replacing the default put your unique phrase here lines entirely.
While you’re in there, add a couple of hardening and performance directives that aren’t in the default file:
define( 'DISALLOW_FILE_EDIT', true );
define( 'WP_AUTO_UPDATE_CORE', true );
define( 'WP_POST_REVISIONS', 5 );
DISALLOW_FILE_EDIT removes the theme/plugin file editor from the WordPress admin dashboard — a feature attackers love once they get admin access, and one almost no legitimate site owner actually uses. WP_POST_REVISIONS caps revision bloat, which otherwise silently fills your database with dozens of near-duplicate post rows over time.
Step 5: Apache Virtual Host Configuration
Create a dedicated virtual host file rather than editing httpd.conf directly — it keeps configuration modular and makes multi-site setups sane later.
sudo vim /etc/httpd/conf.d/wordpress.conf<VirtualHost *:80>
ServerAdmin admin@yourdomain.com
DocumentRoot /var/www/html
ServerName yourdomain.com
ServerAlias www.yourdomain.com
<Directory /var/www/html>
Options -Indexes +FollowSymLinks
AllowOverride All
Require all granted
</Directory>
ErrorLog /var/log/httpd/wordpress-error.log
CustomLog /var/log/httpd/wordpress-access.log combined
</VirtualHost>The Require all granted line is the piece that trips up almost everyone following older Fedora tutorials, because the packaged WordPress config ships with Require local by default — meaning only requests originating from the server itself get through. Leave it in place, and your WordPress install works perfectly from curl localhost and fails mysteriously from every browser on the internet. Change it explicitly.
AllowOverride All enables .htaccess, which WordPress uses for pretty permalinks, custom redirects, and security rules from plugins like Wordfence. Without it, your permalink structure settings in WordPress admin will silently fail to apply.
Test the config syntax before restarting anything:
sudo apachectl configtestRestart Apache:
sudo systemctl restart httpdStep 6: Firewall Configuration with firewalld
Fedora runs firewalld by default, and it’s enforcing from the moment the OS boots. Skipping this step is the single most common reason “WordPress works on localhost but not from outside” tickets get filed.
sudo firewall-cmd --permanent --add-service=http
sudo firewall-cmd --permanent --add-service=https
sudo firewall-cmd --reload
Verify the rules actually landed:
sudo firewall-cmd --list-servicesYou should see http and https in that output. If you’re also running SSH on a non-default port, make sure that’s allowed too, or you’ll lock yourself out entirely — a mistake more common than anyone wants to admit.
Step 7: SELinux — The Part Everyone Wants to Skip
Disabling SELinux is the worst advice you’ll find repeated across half the WordPress-on-Fedora tutorials online. It works, technically, in the sense that turning off your smoke detector also stops the beeping. On a production or even semi-public server, running with SELinux disabled removes an entire layer of mandatory access control that contains exactly the kind of exploit a compromised WordPress plugin would use to escalate into full filesystem access.
The correct move is setting the right booleans and contexts, not disabling enforcement.
First, confirm SELinux is enforcing:
getenforceSet the file contexts so Apache can actually read and write WordPress’s directory tree:
sudo semanage fcontext -a -t httpd_sys_rw_content_t "/var/www/html(/.*)?"
sudo restorecon -Rv /var/www/html
Then enable the two booleans WordPress specifically needs — one for database connectivity over the network, one for outbound mail (used by password reset emails and contact form plugins):
sudo setsebool -P httpd_can_network_connect_db 1
sudo setsebool -P httpd_can_sendmail 1
sudo setsebool -P httpd_can_network_connect 1
The last boolean matters if you’re using a REST API integration, an SMTP relay on a different port, or any plugin that makes outbound HTTP calls — which is most modern plugins doing update checks or license validation.
If something is still being blocked and you can’t figure out why, audit2allow is the diagnostic tool that actually tells you what SELinux denied and why:
sudo ausearch -m avc -ts recent | audit2allow -aRead the output before blindly applying a suggested policy — it’ll show you exactly which action was denied, which is far more useful than guessing.
Step 8: Complete the Web-Based Installer
Point a browser at your server’s IP or domain. You should land on the WordPress language selection screen, followed by the five-minute install form asking for site title, admin username, admin password, and admin email.
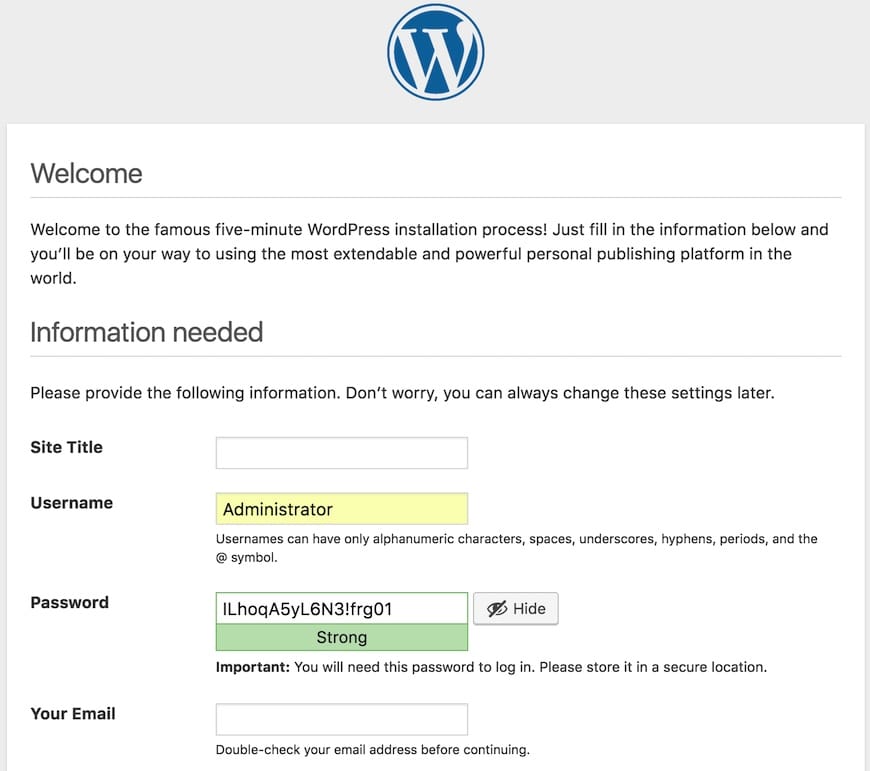
Two non-negotiable practices here: never use admin as the username — it’s the first credential every brute-force script tries — and generate the admin password with a password manager rather than typing something memorable. Automated login attempts against /wp-login.php are constant and untargeted; they hit every WordPress install with a public IP within hours of going live.
Nginx Alternative: PHP-FPM Server Block
If you chose Nginx instead of Apache, install it and configure PHP-FPM to listen on a Unix socket rather than a TCP port — it’s marginally faster and avoids exposing PHP-FPM to anything but Nginx itself:
sudo dnf install -y nginxEdit /etc/php-fpm.d/www.conf and confirm the socket owner matches Nginx’s user:
listen = /run/php-fpm/www.sock
listen.owner = nginx
listen.group = nginx
Then create the server block at /etc/nginx/conf.d/wordpress.conf:
server {
    listen 80;
    server_name yourdomain.com www.yourdomain.com;
    root /var/www/html;
    index index.php;

    location / {
        try_files $uri $uri/ /index.php?$args;
    }

    location ~ \.php$ {
        include fastcgi_params;
        fastcgi_pass unix:/run/php-fpm/www.sock;
        fastcgi_param SCRIPT_FILENAME $document_root$fastcgi_script_name;
    }

    location ~ /\.ht {
        deny all;
    }
}
Restart both services:
sudo systemctl restart nginx php-fpmThe try_files directive replicates what .htaccess does for Apache — it’s the piece that makes pretty permalinks (/2026/08/post-title/ instead of ?p=123) actually resolve instead of throwing 404s.
Troubleshooting: Errors You’ll Actually Hit
“Error establishing a database connection”
Usually one of three things: wrong credentials in wp-config.php, MariaDB not running, or SELinux blocking the network connection. Check systemctl status mariadb first, then re-verify the httpd_can_network_connect_db boolean before assuming the password is wrong.
White screen of death after activating a plugin
This is a PHP fatal error, not a WordPress bug per se. Enable debug logging temporarily by adding define('WP_DEBUG', true); define('WP_DEBUG_LOG', true); to wp-config.php, reproduce the issue, then check /var/www/html/wp-content/debug.log for the actual stack trace. Turn debug mode off again once resolved — leaving it on in production leaks file paths to anyone who finds the debug log publicly accessible.
502 Bad Gateway on Nginx setups
Almost always a PHP-FPM socket permission mismatch or the service not running. Check systemctl status php-fpm and confirm the socket path in the Nginx config matches exactly what’s in /etc/php-fpm.d/www.conf.
Uploads or media library failing silently
Permission issue on wp-content/uploads. Confirm ownership is apache:apache (or nginx:nginx if using Nginx with a different FPM pool user) and that SELinux context is httpd_sys_rw_content_t, not the default read-only httpd_sys_content_t.
Permalinks returning 404 on everything except the homepage
On Apache, AllowOverride All isn’t set, or mod_rewrite isn’t enabled. Confirm with httpd -M | grep rewrite. On Nginx, the try_files directive is missing or malformed in the server block.
Performance and Security Hardening
A working install is the starting line, not the finish. A few adjustments make a measurable difference under real traffic.
PHP-FPM process management
The default pm = dynamic settings are conservative. On a 2GB RAM server, tune /etc/php-fpm.d/www.conf with realistic child process limits based on average memory per PHP process (roughly 40-60MB per worker for a typical WordPress site with a moderate plugin count):
pm = dynamic
pm.max_children = 20
pm.start_servers = 5
pm.min_spare_servers = 3
pm.max_spare_servers = 8
OPcache
Without it, PHP recompiles every script on every request, which is wasteful CPU cycles for zero benefit. Confirm it’s enabled and give it enough memory in /etc/php.d/10-opcache.ini:
opcache.enable=1
opcache.memory_consumption=128
opcache.max_accelerated_files=10000
opcache.revalidate_freq=60
Object caching
Install Redis or Memcached and pair it with a WordPress object cache plugin. This is the single biggest performance lever for database-heavy sites, since it prevents WordPress from re-running the same query on every page load:
sudo dnf install -y redis
sudo systemctl enable --now redis
Disk I/O
If you’re on spinning disks or a heavily oversold VPS, database writes (comments, sessions, transients) become your bottleneck long before CPU does. Moving MariaDB’s data directory to NVMe storage, or at minimum enabling innodb_flush_log_at_trx_commit=2 in /etc/my.cnf.d/mariadb-server.cnf for non-financial workloads, reduces write latency noticeably — though it trades a small durability window for speed.
TLS with Let’s Encrypt
Non-negotiable in 2026, both for security and SEO ranking signals:
sudo dnf install -y certbot python3-certbot-apache
sudo certbot --apache -d yourdomain.com -d www.yourdomain.com
Rate limiting login attempts
Either through Fail2Ban watching Apache/Nginx access logs for repeated /wp-login.php hits, or a plugin like Limit Login Attempts Reloaded. Both work; Fail2Ban is more resource-efficient at the server level since it blocks at the firewall rather than the application layer.
Automatic updates for core
WordPress security patches for core are usually released quickly after a vulnerability disclosure. Leaving WP_AUTO_UPDATE_CORE enabled for minor releases closes that window automatically instead of relying on someone remembering to log in and click update.
Real-World Scenario: Handling a Traffic Spike
A blog post goes viral, gets shared on a large forum or picked up by an aggregator, and traffic jumps 20x in an hour. What actually breaks first on a default install is almost never Apache or Nginx — it’s MariaDB connection limits and PHP-FPM’s pm.max_children ceiling getting hit simultaneously, causing a cascade of 502s and slow queries.
The fix under pressure: enable a full-page caching layer (WP Super Cache, or better, an Nginx fastcgi_cache block if you’re already on Nginx) so repeat requests for the same page never touch PHP or MariaDB at all. This is the difference between a server that gracefully serves 10,000 concurrent visitors and one that falls over at 500, because cached responses cost almost nothing compared to a full WordPress bootstrap on every request.