
Setting up a home theater box on Fedora sounds simple until you actually try it — and then you remember that Fedora, unlike Ubuntu or Debian, doesn’t ship Kodi in its default repositories. Anyone who’s spent time administering Fedora systems knows the drill: Red Hat’s upstream policy keeps certain multimedia and codec-heavy packages out of the base repos for licensing reasons, and Kodi falls squarely into that bucket. That’s not a flaw in Fedora; it’s a deliberate legal boundary, and once you understand it, the installation process stops feeling mysterious.
This matters more than most quick-install tutorials let on. If you’ve ever pulled a random “install kodi.tv download” tarball onto a production HTPC or a media server sitting in a rack somewhere, you already know the pain of dependency mismatches, missing shared libraries, and codec backends that silently fail during playback. The right path on Fedora 44 is either the RPM Fusion repository — which gives you a natively packaged, DNF-managed Kodi build — or the Flatpak from Flathub, which sandboxes the app with its own runtime. Both work. Neither is objectively “better” in every scenario, and picking wrong just means more cleanup later.
What follows isn’t a copy-paste command list. It’s a walkthrough that covers why RPM Fusion exists, how to actually verify each step instead of blindly trusting output, how to lock down remote access with firewalld instead of leaving ports wide open, and what to do when Kodi opens to a black screen or silent audio — because it will, eventually, on some hardware combination you didn’t expect. Whether you’re building a dedicated set-top box, adding media center functionality to a workstation, or standardizing HTPC deployments across a household or small office, this guide gets you a working, secured Kodi install on Fedora 44 without the guesswork.
Why Fedora Doesn’t Ship Kodi Natively
Fedora’s package policy excludes software bundled with patent-encumbered codecs or non-free redistribution terms, and Kodi’s dependency tree touches both categories through things like H.264 decoding and various proprietary streaming protocols. RPM Fusion exists precisely to fill that gap — it’s a community-maintained repository that Fedora’s own documentation points users toward for exactly this class of software. Once you enable it, you’re not doing anything unsupported or hacky; you’re using the standard, well-trodden path that thousands of Fedora HTPC builds rely on.
The Flatpak alternative from Flathub takes a different approach entirely: it bundles its own runtime and codec set, sidestepping the RPM Fusion dependency altogether. That’s worth knowing before you commit to one method, because mixing both on the same machine creates duplicate launchers, separate config directories, and confusing troubleshooting sessions down the line.
Prerequisites Before You Start
Before touching a terminal, confirm the basics. You’ll need:
- Fedora 44 (Workstation or a minimal install with a desktop environment) with sudo access
- A GPU with OpenGL or OpenGL ES support — virtually any Intel iGPU, AMD GPU, or NVIDIA card from the last decade handles this fine
- Roughly 200 MiB of free disk space for Kodi itself, plus whatever your media library needs
- A stable network connection if you’re pulling media from SMB, NFS, or WebDAV shares
Run a full system refresh first. Skipping this step is one of the most common reasons dependency resolution breaks mid-install:
sudo dnf upgrade --refreshThis isn’t busywork. DNF resolves package dependencies against your currently installed metadata, and if that metadata is stale, you’ll hit version conflicts that look like RPM Fusion’s fault when they’re really just an out-of-date local cache.
Method 1: Installing Kodi via RPM Fusion (Recommended)
This is the path most Fedora Workstation and HTPC builds should take, because Kodi, its desktop launcher, and its firewalld service definitions all live inside the RPM database and update through normal dnf upgrade cycles.
Step 1: Enable the RPM Fusion Repository
Kodi is packaged in RPM Fusion Free, so technically you only need the Free repository for Kodi itself. That said, most real-world Fedora media setups eventually want the Non-Free repo too — for hardware-accelerated decoding, proprietary NVIDIA drivers, or extra codec packages — so enabling both up front saves a second trip later:
sudo dnf install -y \
  "https://download1.rpmfusion.org/free/fedora/rpmfusion-free-release-$(rpm -E %fedora).noarch.rpm" \
  "https://download1.rpmfusion.org/nonfree/fedora/rpmfusion-nonfree-release-$(rpm -E %fedora).noarch.rpm"
Notice the $(rpm -E %fedora) expression. It dynamically resolves to your installed Fedora release number, so the exact same command works whether you’re on Fedora 42, 43, or 44 — no manual version editing required. That’s the kind of detail that separates a command you copy blindly from one you actually understand.
Confirm the repositories registered correctly:
dnf repolist | grep -i rpmfusionYou should see four entries: rpmfusion-free, rpmfusion-free-updates, rpmfusion-nonfree, and rpmfusion-nonfree-updates. If nothing returns, the release RPM likely failed silently — check your internet connection and re-run the install command.
Step 2: Install Kodi
With the repos in place, a single line handles the rest:
sudo dnf install -y kodiExpect around 16 packages to pull in on a fresh Fedora 44 system, including the add-on SDK, binary add-on support, and AirPlay/DLNA libraries. On Fedora Workstation with firewalld running, DNF also automatically drags in kodi-firewalld — a companion package containing pre-written firewalld service definitions you’ll use later for remote control.
Step 3: Verify the Installation
Don’t just assume it worked because the terminal didn’t error out. Confirm the package landed correctly:
rpm -q --qf '%{NAME}\n' kodiAnd check the actual runtime version:
kodi --versionYou’ll see output resembling:
Kodi Media Center 21.3 (21.3.0) Git:20260223-nogitfound
Copyright (C) 2005-2025 Team Kodi - http://kodi.tv
This two-step verification habit — checking both the RPM database and the running binary — catches the rare case where a package installed but a conflicting older binary is still on the PATH.
Step 4: Install Optional Codec and PVR Add-ons
The base Kodi package covers common formats like H.264, H.265, AAC, FLAC, and MP3 through its bundled ffmpeg. But depending on how you use Kodi, you’ll likely want extras:
sudo dnf install -y \
  kodi-inputstream-adaptive \
  kodi-inputstream-rtmp \
  kodi-pvr-iptvsimple \
  kodi-pvr-hts
Here’s what each one actually buys you:
| Package | Purpose |
|---|---|
| kodi-inputstream-adaptive | Enables HLS, DASH, and Smooth Streaming — required for Netflix-style add-ons, YouTube, and BBC iPlayer |
| kodi-inputstream-rtmp | Supports older RTMP-based streaming sources |
| kodi-pvr-iptvsimple | IPTV playback via M3U playlists plus XMLTV EPG data |
| kodi-pvr-hts | Tvheadend backend integration for DVB tuner setups |
Don’t install everything blindly. Every add-on package is another dependency chain to maintain and another potential source of update conflicts down the road. Install what your actual media workflow needs.
Method 2: Installing Kodi via Flatpak
If you’d rather avoid touching RPM Fusion entirely — maybe you’re running a more locked-down system, or you just prefer Flathub’s sandboxing model — Team Kodi publishes an official build there.
Step 1: Add the Flathub Remote
Fedora Workstation ships with Flatpak preinstalled, but Flathub itself is opt-in:
sudo flatpak remote-add --if-not-exists flathub https://dl.flathub.org/repo/flathub.flatpakrepoVerify it registered at system scope:
flatpak remotes --columns=name,options | grep -E '^flathub[[:space:]]'Step 2: Install the Kodi Flatpak
sudo flatpak install flathub tv.kodi.KodiConfirm the app ID shows up in your installed list:
flatpak list --system --app --columns=application | grep -Fx tv.kodi.KodiWorth knowing before you commit: the Kodi Flatpak manifest grants fairly broad permissions by default — network access, audio, display sockets, removable media, and common music/video/picture directories. That means Flatpak here is really a packaging and update-scope decision rather than a strict security sandbox. If you’re deploying this on a shared or semi-trusted machine, that distinction matters.
Launching Kodi for the First Time
For an RPM Fusion install, launch from a terminal or the application menu:
kodiFor Flatpak:
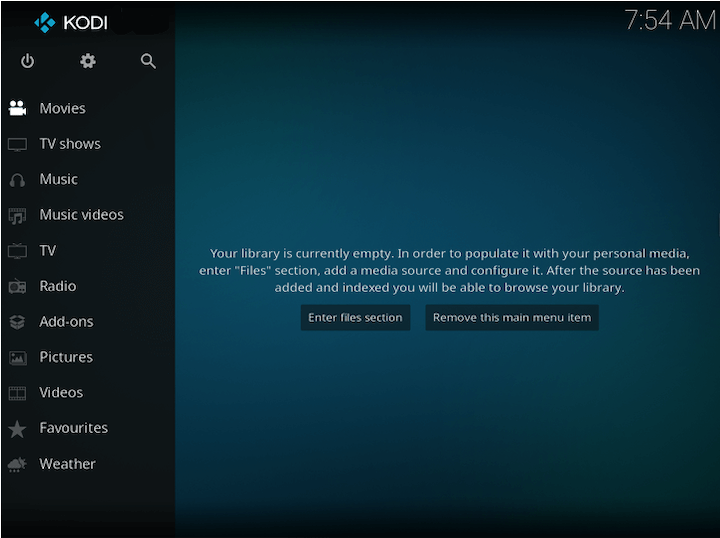
flatpak run tv.kodi.KodiOn first launch, Kodi opens to the Estuary skin’s home screen — Movies, TV Shows, Music, Live TV, Add-ons, and Pictures listed along the left. The library will be empty, and Kodi will prompt you to add a source. This is normal; Kodi doesn’t scan your filesystem automatically, and that’s by design — it avoids indexing directories you never intended to expose to the media scraper.
Adding Media Sources
Navigate to Videos > Files > Add videos > Browse for local storage. For network shares, the process differs slightly by protocol:
- SMB/Windows shares: Browse > Add network location > Protocol: Windows network (SMB) — enter server name, share, credentials
- NFS: Browse > Add network location > Protocol: NFS — Kodi handles the mount internally, no host-side
/etc/fstabentry required - WebDAV: Useful for Nextcloud-backed libraries or any HTTP-served content
After adding a source, Kodi asks what content type it contains. Answer honestly — picking “Movies” versus “None” determines whether the TheMovieDB scraper kicks in to pull posters and metadata. Get this wrong and you’ll spend an evening wondering why your library looks like a flat file list instead of a proper media wall.
Configuring Remote Access Securely
This is where a lot of home Kodi setups go wrong, and it’s worth treating with the same seriousness you’d apply to any exposed service on a production box. Kodi’s remote control features run over three distinct channels:
| Feature | Default Port | Protocol | Use Case |
|---|---|---|---|
| Web interface | 8080 | TCP | Browser-based control |
| JSON-RPC | 9090 | TCP | Third-party remote apps, automation |
| EventServer | 9777 | UDP | Remote input from compatible clients |
In Kodi, go to Settings > Services > Control, enable HTTP remote control only if you actually need it, and — this part is non-negotiable — set authentication credentials. Kodi’s own documentation explicitly warns against exposing the control interface without authentication. Never forward these ports to the public internet. If you need remote access outside your LAN, put it behind a VPN, not an open port.
Opening Ports with Firewalld the Right Way
If you installed via RPM Fusion, the kodi-firewalld package already shipped readable service definitions. Confirm they exist:
rpm -ql kodi-firewalld | grep '/firewalld/services/kodi-'You should see kodi-eventserver.xml, kodi-http.xml, and kodi-jsonrpc.xml. Rather than opening raw ports, use these named services — it keeps your firewall rules self-documenting for whoever inherits this system later:
zone=$(firewall-cmd --get-default-zone)
sudo firewall-cmd --zone="$zone" --add-service=kodi-http --add-service=kodi-jsonrpc --add-service=kodi-eventserver --permanent
sudo firewall-cmd --reload
Verify each service landed:
zone=$(firewall-cmd --get-default-zone)
for service in kodi-http kodi-jsonrpc kodi-eventserver; do
  firewall-cmd --zone="$zone" --query-service="$service"
done
If you went the Flatpak route and don’t have those service files, open the raw ports instead:
zone=$(firewall-cmd --get-default-zone)
sudo firewall-cmd --zone="$zone" --add-port=8080/tcp --add-port=9090/tcp --add-port=9777/udp --permanent
sudo firewall-cmd --reload
Treat these rules as temporary. If you stop using remote control, remove them. An open port that nobody remembers opening is exactly the kind of thing that shows up in a security audit six months later with no explanation attached.
Setting Up Kodi as a Dedicated HTPC (Boot-to-Kodi)
For a box that exists purely to run Kodi on a TV — no desktop, no distractions — you can boot straight into a standalone Kodi session using systemd rather than launching a full GNOME desktop first. This is the setup most real dedicated media boxes actually use in practice.
Create a dedicated user with the right group memberships:
sudo useradd -m -G video,audio,input -s /bin/bash kodiThen define the systemd unit:
sudo vi /etc/systemd/system/kodi.service[Unit]
Description=Kodi standalone
After=systemd-user-sessions.service network.target sound.target
[Service]
User=kodi
Group=kodi
Type=simple
PAMName=login
ExecStart=/usr/bin/kodi-standalone
Restart=on-abort
RestartSec=5
[Install]
WantedBy=multi-user.targetEnable it:
sudo systemctl enable --now kodi.serviceThe Restart=on-abort directive is doing real work here — if Kodi crashes (and every media center app crashes eventually, usually from a bad add-on), systemd brings it back up automatically without anyone needing to walk over and power-cycle the box. That’s the difference between a toy setup and something you can actually leave running unattended for months.
To revert back to a normal desktop session:
sudo systemctl disable --now kodi.servicePerformance Tuning for Smooth Playback
Kodi’s performance issues rarely come from Kodi itself — they come from misconfigured hardware acceleration or an underpowered storage path. A few things worth checking on any HTPC build:
GPU acceleration matters more than raw CPU clock speed. 4K HEVC content decoded purely in software will choke even a decent CPU. Confirm your GPU driver stack is actually active rather than falling back to software rendering:
glxinfo -B | grep -E 'Device|OpenGL renderer'If this shows llvmpipe, you’re running software rendering, and playback will stutter on anything beyond low-bitrate SD content.
Network-attached storage benefits from NFS over SMB in most Linux-to-Linux setups, since NFS avoids the SMB protocol overhead and Kodi mounts it natively without extra host-side configuration.
Disk I/O matters for library scans. If your media library lives on spinning disks and you’ve got tens of thousands of files, the initial library scrape can take a long time. Running the scan during off-peak hours, or excluding folders you don’t need scraped, keeps things snappier for everyone sharing that storage.
Troubleshooting Common Issues
Kodi Launches to a Black Screen
Almost always an OpenGL mismatch between Kodi and your GPU driver. Test with forced software rendering to isolate the cause:
LIBGL_ALWAYS_SOFTWARE=1 kodiIf Kodi renders correctly under software mode, the GPU driver is the culprit. On NVIDIA hardware, install the proprietary driver from RPM Fusion Nonfree. On Intel or AMD systems running Mesa, a simple update usually resolves it:
sudo dnf upgrade --refreshNo Audio During Playback
Fedora 44 runs PipeWire by default, and Kodi needs to correctly negotiate with it. Check the relevant user-level sockets:
systemctl --user is-enabled pipewire.socket pipewire-pulse.socket wireplumber.serviceIf any show disabled, re-enable them:
systemctl --user enable --now pipewire.socket pipewire-pulse.socket wireplumber.serviceThen head into Kodi’s Settings > System > Audio and explicitly select the correct output device — for HDMI-connected TVs, that’s usually the HDMI audio sink rather than the default analog output.
Add-on Installation Fails with a Dependency Error
Usually a transient RPM Fusion mirror sync issue, or a Python version mismatch (Kodi 21 runs on Python 3.11). Refresh the add-on repository metadata first through Add-ons > cog icon > Check for updates. If it persists, confirm the specific add-on lists Kodi 21 compatibility in its description before troubleshooting further.
Remote Control From a Phone Won’t Connect
Work through this in order: confirm HTTP remote control is actually enabled in Settings > Services > Control, confirm the phone sits on the same LAN segment, and confirm firewalld is passing the right ports. Test directly from the Kodi host itself:
curl -u "USER:PASS" http://localhost:8080/jsonrpc -d '{"jsonrpc":"2.0","method":"JSONRPC.Ping","id":1}'A correctly configured setup returns a Pong response. If that works locally but fails from the phone, the firewall — not Kodi — is almost certainly the blocker.
Keeping Kodi Updated Long-Term
RPM Fusion packagers typically have new Kodi releases mirrored within a few days of an upstream Team Kodi release. Updates ride along with regular system maintenance:
sudo dnf upgrade -y kodi 'kodi-*'For Flatpak installs:
sudo flatpak update tv.kodi.KodiSet a habit of checking this monthly rather than letting it drift indefinitely — outdated Kodi builds on older codec libraries are a common source of “it worked last year but not now” support tickets.