
Anyone who has spent time in a server room or a home lab knows the drill: you need to reinstall an OS, flash a rescue ISO, or test a new distro, and the first thing you reach for is a USB stick. The old way meant wiping that drive, burning a single ISO with dd, testing it, realizing it didn’t boot properly, wiping it again, and repeating the cycle until your patience ran out. Ventoy changed that equation entirely, and if you’re running Fedora 44 as your daily driver or your provisioning workstation, getting Ventoy installed correctly the first time saves you a genuinely annoying afternoon.
Fedora 44 ships with a newer kernel, updated systemd, and a slightly different package landscape than its predecessors, which means some of the older Ventoy installation guides floating around the internet are already stale. COPR repository naming conventions shift with every Fedora release, dependency chains for udisks and polkit occasionally break GUI installers, and Secure Boot behavior has quietly evolved. None of this is catastrophic, but it does mean a “just copy-paste this command” approach from a three-year-old blog post can leave you staring at a Package not found error at 11 PM.
This guide walks through every practical route for getting Ventoy running on Fedora 44 — DNF via COPR, the official tarball with the CLI script, and the GUI/WebUI methods — along with the reasoning behind each step, not just the commands themselves. We’ll also cover partitioning choices, Secure Boot considerations, performance tuning for the resulting USB drive, and the troubleshooting steps that actually work when something goes sideways. By the end, you’ll have a working Ventoy USB and a real understanding of what’s happening under the hood, which matters the next time you’re doing this on a client’s machine at 2 AM with no internet access.
What Ventoy Actually Does (And Why It Matters for Sysadmins)
Ventoy is an open-source tool that installs a small bootloader and partition layout onto a USB drive once, after which you simply drag ISO, WIM, IMG, VHD(x), or EFI files onto the drive like any other storage device. There’s no re-flashing, no re-partitioning, no dd if=image.iso of=/dev/sdX ritual every time you need a different installer. The drive presents a boot menu listing every image it finds, and you pick one at boot time.
For someone managing infrastructure across multiple sites — say, a small cluster in Depok and another set of boxes upstate — this is the difference between carrying a binder of labeled USB sticks and carrying one drive loaded with a dozen ISOs: Fedora Server, Ubuntu netinstall, SystemRescue, Clonezilla, memtest86, maybe a Windows Server ISO for that one legacy app nobody wants to migrate yet. Ventoy’s compatibility list already covers most enterprise Linux distros, BSD variants, and rescue tools you’d realistically need.
Prerequisites Before You Start
Get these sorted before touching the terminal, because half of the “Ventoy won’t boot” complaints trace back to skipped prep work rather than actual bugs.
- A USB drive you’re comfortable wiping completely — Ventoy’s installer formats the target device, destroying existing data.
- Fedora 44 fully updated (
sudo dnf upgrade --refresh) to avoid dependency mismatches with kernel modules Ventoy’s installer touches. - Root or sudo access, since partitioning and writing boot sectors requires elevated privileges.
dnf-command(copr)plugin if you’re going the COPR route, though on Fedora this ships enabled by default in most cases.- Basic familiarity with
lsblkto correctly identify your USB device — this is not optional, mislabeling/dev/sdainstead of/dev/sdbhas wiped more than one unlucky admin’s primary disk.
Method 1: Installing Ventoy via COPR and DNF (Recommended for Fedora 44)
This is the cleanest method for Fedora specifically, since it integrates Ventoy into your normal package management workflow, meaning updates arrive through dnf upgrade rather than manual tarball downloads.
Step 1: Enable the COPR Repository
sudo dnf copr enable karlisk/ventoyCOPR (Cool Other Package Repo) is Fedora’s community repository system, and karlisk/ventoy is the maintained build that packages Ventoy’s upstream releases into RPM format. You’ll be prompted to confirm enabling the third-party repo — type y and continue.
Step 2: Install Ventoy
sudo dnf install ventoyIf DNF reports it can’t locate the package immediately after enabling the repo, refresh the cache first:
sudo dnf makecache
sudo dnf install ventoy
Or combine both in one line, which is the habit worth building:
sudo dnf install ventoy --refreshThis “refresh then install” pattern isn’t Ventoy-specific — it’s a general fix for any freshly-enabled COPR repo where DNF’s metadata cache hasn’t caught up yet.
Step 3: Verify the Installation
rpm -q ventoy
which VentoyGUI.x86_64 2>/dev/null || ls /opt/ventoy/
The RPM package typically drops Ventoy’s binaries in /opt/ventoy/, including Ventoy2Disk.sh for CLI use, VentoyGUI.x86_64 for the graphical installer, and a WebUI launcher script.
Method 2: Manual Installation via Official Tarball
Some environments — hardened production workstations, air-gapped machines, or setups where you distrust third-party COPR maintainers for anything touching disk partitioning — call for grabbing the binary straight from upstream instead.
Step 1: Download the Latest Release
As of this writing, Ventoy’s current stable release is 1.1.17, published July 24, 2026. Always check the official site or GitHub releases page before downloading, since Ventoy ships frequent point releases fixing Secure Boot edge cases and distro compatibility.
cd ~/Downloads
wget https://github.com/ventoy/Ventoy/releases/download/v1.1.17/ventoy-1.1.17-linux.tar.gz
If GitHub is throttled or unreachable from your network (common on some ISPs in Indonesia during peak hours), SourceForge mirrors the same releases.
Step 2: Verify the Checksum
Skipping this step is how corrupted downloads turn into “why won’t my USB boot” support tickets three hours later.
sha256sum ventoy-1.1.17-linux.tar.gzCompare the output against the SHA-256 hash published on the official download page.
Step 3: Extract and Navigate
tar -xzf ventoy-1.1.17-linux.tar.gz
cd ventoy-1.1.17
Step 4: Identify Your USB Device
lsblk -o NAME,SIZE,TYPE,MOUNTPOINTLook for your USB drive by size and confirm it’s unmounted. If it auto-mounted (GNOME Files does this by default), unmount every partition on it:
sudo umount /dev/sdX1
sudo umount /dev/sdX2
Replace sdX with your actual device letter — never assume, always confirm via lsblk output first.
Step 5: Run the Installer
sudo sh Ventoy2Disk.sh -i /dev/sdXThe -i flag performs a fresh install and will refuse to proceed if Ventoy is already present on the disk. Use -I (capital) to force a reinstall regardless of existing state. This script formats the drive, creates two partitions — a small hidden boot partition and a larger data partition — and writes Ventoy’s bootloader across both.
Common optional flags worth knowing:
sudo sh Ventoy2Disk.sh -i -g -s /dev/sdX-g forces GPT partitioning instead of the MBR default, which matters if your USB drive exceeds 2TB or you specifically need GPT for UEFI-only hardware. -s enables Secure Boot support, which we’ll cover in more depth further down.
Method 3: GUI and WebUI Installation
Not everyone wants to live in a terminal, and honestly, for a one-off task like this, the GUI is perfectly fine.
Native GTK/QT GUI
cd /opt/ventoy   # or wherever your extraction landed
sudo ./VentoyGUI.x86_64
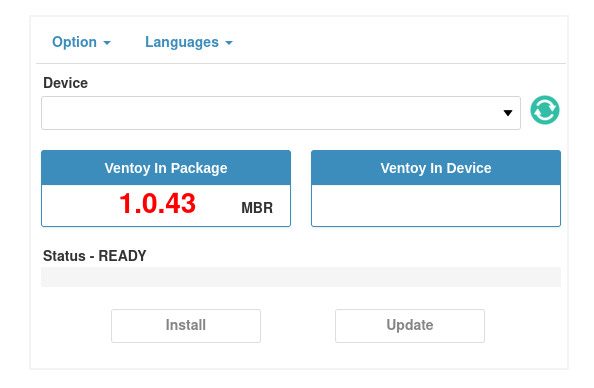
On Fedora 44’s default GNOME session, this launches a straightforward window: select your device from the dropdown, choose your partition style, tick Secure Boot if needed, and click Install. If the GUI fails to render or crashes on launch, it’s almost always a missing GTK dependency — install gtk3 and libX11 and try again.
WebUI Method (Most Reliable Across Environments)
This is genuinely underrated. It sidesteps GUI toolkit issues entirely by running a local web server you interact with through a browser.
cd /opt/ventoy
sudo bash ./VentoyWeb.sh
Then open http://127.0.0.1:24680 in Firefox or whatever browser Fedora 44 ships with. The interface mirrors the native GUI but runs through your browser, which is handy when you’re SSH’d into a headless box with X11 forwarding enabled or troubleshooting a GTK theming conflict you don’t feel like fixing.
Copying ISOs and Using the Drive
Once installation completes, the drive shows two partitions: the first, formatted exFAT by default, is where your ISO files live; the second is a small hidden Ventoy reserved partition — leave it alone.
sudo mkdir -p /mnt/ventoy
sudo mount /dev/sdX1 /mnt/ventoy
cp ~/isos/fedora-44-workstation.iso /mnt/ventoy/
cp ~/isos/systemrescue-latest.iso /mnt/ventoy/
sync
sudo umount /mnt/ventoy
Ventoy scans recursively through directories on that partition, so organizing ISOs into subfolders by category — /isos/linux/, /isos/rescue/, /isos/windows/ — keeps a large collection manageable without breaking Ventoy’s detection logic. On boot, you’ll get a menu listing everything alphabetically, and you select what you need.
Secure Boot: Why It Trips People Up
Secure Boot is the single biggest source of confusion for Ventoy users, and it’s worth explaining rather than glossing over. By default, Ventoy’s bootloader isn’t signed with a key trusted by your motherboard’s Secure Boot chain, so on systems with Secure Boot enabled, you’ll either need to disable it in firmware settings or install with the -s flag to enable Ventoy’s own Secure Boot support mechanism.
The -s flag works by having Ventoy’s bootloader chain-load through a Microsoft-signed shim, which then validates Ventoy’s own components against an included certificate. It’s not flawless — some heavily locked-down enterprise firmware (think certain Dell OptiPlex or Lenovo ThinkCentre BIOS builds with vendor-specific Secure Boot policies) still reject it. In those cases, disabling Secure Boot temporarily during the boot session, then re-enabling it after your OS install completes, remains the pragmatic path. It’s not elegant, but it’s what actually works in the field.
Real-World Use Cases
- Emergency recovery kit for production servers — keep Clonezilla, SystemRescue, and memtest86 all on one drive for when a RAID array starts throwing errors at 3 AM.
- Client site visits where you don’t know in advance which OS a machine needs reimaged with, so carrying five separate flash drives isn’t practical.
- Testing multiple distro releases side by side before committing infrastructure decisions — spin up Fedora 44, AlmaLinux 9, and Debian 12 installers from the same stick without re-flashing.
- Air-gapped environments where you need a portable, verified toolkit that doesn’t require internet access once loaded.
Performance Considerations
Ventoy itself adds negligible boot-time overhead — the boot menu appears in under a second on modern hardware — but the physical characteristics of your USB drive matter more than people assume.
USB 3.0 or 3.1 drives with real NAND flash (not the cheap TLC-with-thin-controller drives sold in bulk packs) noticeably reduce ISO load times, especially for larger images like Windows Server ISOs that can exceed 5GB. If you’re frequently booting into live environments for troubleshooting rather than just running installers, a fast USB drive genuinely changes the day-to-day experience — waiting 90 seconds versus 15 seconds to get a rescue environment loaded adds up when you’re doing it multiple times a week.
For the exFAT partition Ventoy creates by default, consider reformatting to ext4 if you’re exclusively booting Linux images and don’t need Windows readability of the data partition — ext4 handles very large numbers of small files slightly more efficiently, though this rarely matters unless you’re storing dozens of ISOs with deeply nested directory structures.
Security Considerations
Treat your Ventoy drive like any other piece of infrastructure tooling — because functionally, that’s what it is.
- Verify SHA-256 checksums on every ISO before copying it to the drive, not just on the Ventoy binary itself. A compromised installer ISO is a far bigger risk vector than most people account for.
- Keep the drive itself physically secured if it contains images with embedded credentials or kickstart files referencing internal infrastructure.
- Update Ventoy periodically — running
sudo sh Ventoy2Disk.sh -u /dev/sdXpulls in security fixes without wiping your existing ISO collection on the data partition. - Avoid leaving Secure Boot permanently disabled on production hardware after you’ve finished using the Ventoy drive; re-enable it once your task is done.
Troubleshooting Common Issues
“dnf install ventoy” reports package not found after enabling COPR
Run sudo dnf makecache immediately after enabling the repo, then retry, or use sudo dnf install ventoy --refresh to force cache refresh in one step.
GUI installer window doesn’t open or crashes silently
Launch it from a terminal to see the actual error output rather than a silent failure:
sudo ./VentoyGUI.x86_64 2>&1 | tee ventoy-error.logNine times out of ten this reveals a missing X11 authorization issue when running under sudo in a Wayland session. Try xhost +local: before launching, or default to the WebUI method instead, which avoids this entirely.
USB drive not detected in Ventoy2Disk.sh
Confirm the kernel actually sees the device with dmesg | tail -30 right after plugging it in. If nothing appears, try a different USB port — USB-C hubs on some laptops are notoriously unreliable for older USB 2.0 flash drives.
System won’t boot from the Ventoy USB at all
Check your firmware boot order first — this sounds obvious, but it’s the most common culprit. If boot order is correct, Secure Boot is almost certainly the blocker; either disable it temporarily or reinstall Ventoy with the -s flag.
ISO shows in the boot menu but fails partway through booting
Not every ISO is Ventoy-compatible out of the box, particularly some Windows Server editions with unusual boot.wim configurations. Check Ventoy’s official tested-image list before assuming it’s a Ventoy bug rather than an ISO compatibility gap.
“Partition table doesn’t match” or drive shows unexpected size after install
This typically means the drive had a prior partition layout that didn’t fully clear. Wipe it manually with sudo wipefs -a /dev/sdX before reinstalling Ventoy.
