
Installing a new browser on your Linux box should not feel like solving a puzzle. Yet many Fedora users search for “how to install Vivaldi Browser Fedora 44” only to find outdated guides or half-finished forum threads. This guide fixes that gap.
You will get a clear, tested path to install Vivaldi Browser on Fedora 44 using the official DNF repository, plus backup methods with RPM and Flatpak. Every command comes with a plain English explanation of what it does and why it matters, written from the point of view of someone who has managed Fedora servers and desktops for over a decade.
By the end, you will have Vivaldi running, updating automatically, and configured the way a smart sysadmin would set it up. No filler. No guesswork. Just working commands and the reasoning behind each one.
Why Choose Vivaldi on Fedora 44
Vivaldi is a Chromium based browser built by former Opera developers. It stands out because of deep customization options like tab stacking, tab tiling, and built in tracker blocking.
Fedora 44 users often pick Vivaldi over Firefox or Chrome for three reasons:
- Full control over the interface, from tab bar position to keyboard shortcuts.
- A maintained official RPM repository, so updates arrive through normal system channels.
- Built in privacy tools like ad blocking without needing separate extensions.
For a Linux server tutorial audience, this matters because repo based software is easier to manage at scale. You are not chasing manual downloads every time a security patch drops.
Prerequisites Before You Start
Before you touch the terminal, confirm these basics. Skipping this step is the top reason installs fail halfway through.
- A working Fedora 44 installation. Check with
cat /etc/fedora-release. - A user account with sudo or root privileges.
- An active internet connection to reach Vivaldi’s servers.
- At least 300 MB of free disk space for the browser and its dependencies.
- Terminal access, either through your desktop’s terminal app or SSH.
You do not need any special developer tools. This is a standard package install using Fedora’s built in package manager, DNF.
Step 1: Update Your System First
Before adding any new software source, bring your system up to date. This avoids dependency conflicts that show up later during install.
sudo dnf update -yWhat this does: it refreshes every installed package on your system to its latest version.
Why it matters: Vivaldi depends on shared libraries like glibc and GTK. If those are outdated, the installer may pull in broken dependencies or fail the GPG check entirely. Running this first clears that risk before it becomes a problem.
Expected output looks something like this:
Last metadata expiration check: 0:12:44 ago
Dependencies resolved.
Nothing to do.
Complete!
If you see a long list of packages updating instead, let it finish before moving to the next step.
Step 2: Install Required DNF Plugins
Fedora needs the dnf-utils package to run the config-manager command used in the next step. Some minimal Fedora installs skip this tool by default.
sudo dnf install dnf-utils -yWhat this does: it installs a small set of DNF plugins that add extra repository management commands, including config-manager.
Why it matters: without this plugin, the command to add Vivaldi’s repository in Step 3 will fail with a “command not found” style error. This single package prevents that headache.
Step 3: Add the Official Vivaldi Repository
This is the core step for a clean, update friendly install. Adding the repo tells your system where to find Vivaldi packages now and in the future.
sudo dnf config-manager --add-repo https://repo.vivaldi.com/archive/vivaldi-fedora.repoWhat this does: it downloads Vivaldi’s repository configuration file and drops it into /etc/yum.repos.d/, registering Vivaldi’s servers as a trusted source for DNF.
Why it matters: once this repo is registered, Vivaldi becomes a normal system package. You get automatic updates through dnf upgrade just like any other Fedora software, instead of manually downloading new versions every few weeks.
You should see a short confirmation message showing the repo file was added, typically pointing to a .repo file inside /etc/yum.repos.d/.
Handling the GPG Key Prompt
During the next install step, DNF will likely ask you to confirm importing Vivaldi’s GPG signing key. Type y and press Enter when prompted.
Why this matters: the GPG key verifies that the package you are downloading actually came from Vivaldi and was not altered in transit. Skipping this check is how users end up hitting the well documented “Signature verification failed” error on Fedora’s own community forums.
Step 4: Install Vivaldi Browser on Fedora 44 via DNF
With the repository added, installing Vivaldi is now a single command.
sudo dnf install vivaldi-stable -yWhat this does: it downloads and installs the latest stable build of Vivaldi Browser along with any required dependencies.
Why it matters: this is the same setup process that Fedora uses for its own native packages. That consistency means fewer surprises during future system updates or upgrades to a new Fedora release.
Expected output during install:
Downloading Packages:
vivaldi-stable-x86_64.rpm     45 MB/s | 105 MB    00:02
Running transaction check
Transaction test succeeded.
Installing       : vivaldi-stable
Complete!
If the install finishes without errors, Vivaldi is now on your system.
Step 5: Verify the Installation
Never assume an install worked just because the terminal did not throw an error. Confirm it directly.
vivaldi --versionWhat this does: it prints the exact version number of the installed Vivaldi build.
Why it matters: this confirms you got the stable channel and not a broken or partial install. It also gives you a reference point if you need to report a bug or compare versions later during troubleshooting.
You can also confirm the app appears in your applications menu under Internet or Web Browsers, depending on your desktop environment.
Step 6: Launch Vivaldi and Complete Setup
Now open Vivaldi for the first time, either from your applications menu or directly from the terminal.
vivaldiWhat this does: it launches the browser and triggers Vivaldi’s first run setup wizard.
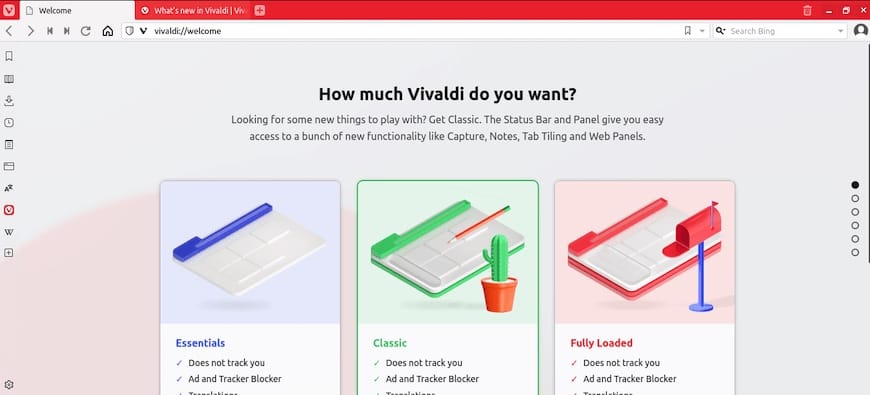
Why it matters: the setup wizard configures core preferences like theme, tab bar position, and whether to import bookmarks from another browser. Getting this right on the first launch saves time hunting through nested settings menus later.
During setup, you will be asked:
- Whether to set Vivaldi as your default browser.
- Your preferred color theme and accent color.
- Tab bar position, top, bottom, left, or right.
- Whether to import data from Firefox or Chrome if installed.
This is also the point where Vivaldi Browser on Fedora 44 setup is essentially complete. From here, all further changes happen inside Vivaldi’s own settings panel.
Alternative Method: Manual RPM Install
If you already downloaded the .rpm file directly from Vivaldi’s website instead of using the repo method, install it like this.
sudo dnf install ./vivaldi-stable.x86_64.rpmWhat this does: it installs the local RPM file directly without needing the repository added first.
Why it matters: this route works well for offline machines or when you want to test a specific version before rolling it out across multiple systems. The tradeoff is that you lose automatic repo based updates unless Vivaldi configures the repo for you afterward, which it usually does after the first launch.
Fixing GPG Errors During Manual RPM Install
If you see this error:
Signature verification failed. OpenPGP check for package "vivaldi-stable" has failedUse this command instead:
sudo dnf --nogpgcheck -y install ./vivaldi-stable.x86_64.rpmWhat this does: it skips the GPG signature check for this single install.
Why it matters: this error happens because the local RPM file has no repository attached yet, so DNF has no key to check against. This is a one time workaround. Vivaldi configures its own signing key and repo automatically after the first successful install.
Alternative Method: Install via Flatpak
Fedora Silverblue and other atomic desktop variants handle traditional RPM installs differently. Flatpak is the safer choice on those systems.
flatpak install flathub com.vivaldi.VivaldiWhat this does: it installs Vivaldi as a sandboxed Flatpak application from Flathub.
Why it matters: atomic Fedora variants use an immutable base filesystem, so layering RPM packages directly can cause update conflicts. Flatpak keeps Vivaldi isolated from the base system, which avoids that entire class of problems.
How to Configure Vivaldi After Install
Once Vivaldi Browser on Fedora 44 is running, a few quick settings improve daily use right away.
- Open Settings from the menu icon in the top left corner.
- Under Privacy, enable the built in tracker and ad blocker.
- Under Tabs, turn on tab stacking if you often juggle many open tabs.
- Under Appearance, adjust the theme to match your desktop’s dark or light mode.
These small adjustments take less than five minutes and make the browser feel tailored to your workflow instead of using default settings built for a general audience.
Keeping Vivaldi Updated
If you installed through the DNF repository method, updates happen automatically with your regular system updates.
sudo dnf upgrade -yWhat this does: it checks all repositories, including Vivaldi’s, for newer package versions and installs them.
Why it matters: browsers are a common attack surface for security exploits. Staying current with Chromium based security patches is not optional for anyone managing a machine seriously, whether it is a personal laptop or a shared workstation.
Troubleshooting Common Errors
Even with a clean process, a few issues show up often enough to cover directly.
Error: “config-manager: command not found”
This happens when dnf-utils is missing.
Fix: run sudo dnf install dnf-utils -y then retry the repo add command from Step 3.
Error: “Signature verification failed”
This appears during manual RPM installs before Vivaldi’s repo is configured.
Fix: use sudo dnf --nogpgcheck -y install ./vivaldi-stable.x86_64.rpm for the first install only.
Error: “No package vivaldi-stable available”
This usually means the repo was not added correctly or the cache is stale.
Fix: re-run the repo add command from Step 3, then run sudo dnf clean all followed by sudo dnf update.
Duplicate Repository Files After Install
Some users notice two Vivaldi repo files appear in /etc/yum.repos.d/ after installing, one added manually and one generated by Vivaldi itself after first launch.
Fix: this is normal behavior and does not cause conflicts. If you want a cleaner setup, check both files and remove the older duplicate manually.
Vivaldi Will Not Launch After Install
If the app installs but nothing happens when you click it, check for missing GPU drivers or a corrupted profile folder.
Fix: try launching from the terminal with vivaldi --no-sandbox to see the actual error message, then search that specific error for a targeted fix.