
Performance issues in production can silently kill user retention before you ever notice a problem in your logs. If you want to catch those issues before your users do, Apache JMeter is the tool you need, and this guide will show you exactly how to install Apache JMeter on Debian 13 from scratch. By the end of this tutorial, you will have a fully functional JMeter setup running on Debian 13 “Trixie,” ready for both GUI-based test plan creation and high-efficiency CLI load testing. This guide targets beginner to intermediate Linux users, developers, and sysadmins who want clear, actionable steps without the fluff.
What is Apache JMeter?
Apache JMeter is a 100% pure Java, open-source application designed to load test functional behavior and measure application performance. The Apache Software Foundation maintains it as a top-level project, and it has become one of the most widely adopted performance testing tools in the DevOps and QA world.
JMeter supports a broad range of protocols out of the box:
- HTTP and HTTPS
- FTP
- JDBC (database connections)
- LDAP
- SOAP and REST APIs
- JMS messaging
The current stable release is Apache JMeter 5.6.3, which requires Java 8 or later at a minimum, though Java 17 or later is strongly recommended, and the next major release will require Java 17 as its hard minimum.
Why Debian 13 (Trixie) is a Strong Platform for JMeter
Debian 13 “Trixie” was officially released on August 9, 2025. It ships with Linux Kernel 6.12 LTS, the EEVDF CPU scheduler for better multi-threaded process fairness, and uses tmpfs by default on /tmp, which benefits JMeter’s temporary file operations.
More importantly for Java workloads, Debian 13’s default repositories natively ship OpenJDK 21 as the default-jdk package. This means you get a modern, long-term support Java runtime with a single apt command, no third-party PPAs required.
Prerequisites
Before you run a single command, confirm the following:
- Operating System: Debian 13 “Trixie” (64-bit, amd64 recommended)
- User Privileges: Root access or a user account with
sudoprivileges - Internet Connection: Required to download packages and the JMeter binary
- Terminal Access: Local terminal or SSH session to your server
- Disk Space: Minimum 500 MB free (1 GB recommended)
- RAM: Minimum 2 GB (4 GB or more recommended for meaningful load tests)
Verify your Debian version before proceeding:
lsb_release -aExpected output:
No LSB modules are available.
Distributor ID: Debian
Description:    Debian GNU/Linux 13 (trixie)
Release:        13
Codename:       trixie
If you see trixie in the output, you are good to proceed.
Step 1: Update Your Debian 13 System
The first step in any Apache JMeter on Debian 13 setup is to refresh your package index and apply all pending upgrades. Skipping this step is one of the most common reasons for broken dependency chains during Java installation.
Run the following:
sudo apt update && sudo apt upgrade -yHere is what each part does:
apt update— fetches the latest package metadata from all configured repositoriesapt upgrade -y— installs newer versions of all currently installed packages, automatically confirming prompts
After the upgrade completes, clean up orphaned packages:
sudo apt autoremove -yWhy This Step Matters
On a freshly provisioned Debian 13 server or a system that has not been updated in weeks, stale package lists can cause apt to install outdated versions of OpenJDK or fail to resolve dependencies entirely. One apt update before you start prevents that scenario completely.
Step 2: Install OpenJDK 21 on Debian 13
Apache JMeter is a pure Java application, so Java must be installed before JMeter can run. On Debian 13, OpenJDK 21 is the native default Java package available directly from the Debian repositories.
Install it with:
sudo apt install openjdk-21-jdk -yNote: On Debian 13 (Trixie),
openjdk-17-jdkis no longer available in the default repositories. OpenJDK 21 and OpenJDK 25 are the available versions. OpenJDK 21 is the recommended choice because it is the current LTS release and satisfies JMeter 5.6.3’s requirements.
The apt package manager will automatically resolve and install all required dependencies, including the Java Runtime Environment (JRE) and the Java Development Kit (JDK).
Why Install the Full JDK and Not Just the JRE?
The JDK includes the keytool utility. You need keytool if you ever plan to use JMeter’s HTTPS Test Script Recorder to capture browser traffic. Installing the JRE alone will leave you with a broken recorder later. Install the JDK from the start and save yourself the troubleshooting.
Step 3: Verify the Java Installation
Always verify before moving forward. Run:
java -versionExpected output:
openjdk version "21.0.x" 2024-xx-xx
OpenJDK Runtime Environment (build 21.0.x+xx-Debian...)
OpenJDK 64-Bit Server VM (build 21.0.x+xx-Debian...)
Also verify the compiler to confirm the full JDK installed correctly:
javac -versionExpected output:
javac 21.0.xIf javac returns “command not found,” the JRE was installed instead of the JDK. Fix it by running sudo apt install openjdk-21-jdk -y again explicitly.
Set the JAVA_HOME Environment Variable
JAVA_HOME tells JMeter’s startup scripts exactly where to find the Java executable. Without it, JMeter may fail to start even with Java correctly installed.
Find the exact Java installation path:
readlink -f $(which java)This will return something like /usr/lib/jvm/java-21-openjdk-amd64/bin/java. You need the parent of the bin directory, which is /usr/lib/jvm/java-21-openjdk-amd64.
A cleaner method on Debian 13 is to use a one-liner that handles the path automatically:
sudo cat >> /etc/profile.d/java.sh <<'EOF'
export JAVA_HOME=$(dirname $(dirname $(readlink $(readlink $(which java)))))
export PATH=$PATH:$JAVA_HOME/bin
EOF
Apply it to your current session:
source /etc/profile.d/java.shVerify it is set correctly:
echo $JAVA_HOMEYou should see the JDK root path printed in the terminal.
Step 4: Download Apache JMeter on Debian 13
Always download JMeter from the official Apache JMeter website. Never use third-party mirrors or package repositories for the JMeter binary itself since the Apache project does not publish JMeter to the apt repository.
Navigate to your /tmp directory:
cd /tmpDownload the latest binary archive using wget:
wget https://dlcdn.apache.org/jmeter/binaries/apache-jmeter-5.6.3.tgzImportant: Always check the official download page at
https://jmeter.apache.org/download_jmeter.cgifor the current version number before running this command. Replace5.6.3with the latest version listed there.
Verify the Download Integrity
Apache provides SHA512 checksums for every release. Skipping this verification step is a security risk on production systems. Download the checksum file:
wget https://downloads.apache.org/jmeter/binaries/apache-jmeter-5.6.3.tgz.sha512Run the verification:
sha512sum -c apache-jmeter-5.6.3.tgz.sha512Expected output:
apache-jmeter-5.6.3.tgz: OKIf you see FAILED instead of OK, delete the file and re-download it. A failed checksum means the file is either corrupted or tampered.
Step 5: Extract, Move, and Configure Apache JMeter
Extract the Archive
tar -xzf apache-jmeter-5.6.3.tgzFlag breakdown:
-x— extract files from the archive-z— decompress using gzip-f— specify the archive filename
After extraction, confirm the directory structure:
ls apache-jmeter-5.6.3/You will see:
bin/ docs/ extras/ lib/ licenses/ printable_docs/The key directories to know:
bin/— startup scripts (jmeter,jmeter.sh) and core configuration fileslib/— core Java libraries JMeter depends onlib/ext/— the plugin directory where you drop JMeter plugin JARsextras/— sample files and Ant integration examples
Move JMeter to /opt
The /opt directory is the Linux Filesystem Hierarchy Standard location for self-contained third-party applications not managed by apt. Moving JMeter there keeps your system organized.
sudo mv apache-jmeter-5.6.3 /opt/apache-jmeterUsing the generic name apache-jmeter instead of keeping the version number in the path means you will not have to update your PATH or any scripts when you upgrade JMeter later.
Set ownership so your user can run JMeter without sudo:
sudo chown -R $USER:$USER /opt/apache-jmeterConfigure JMeter Environment Variables
Add JMETER_HOME and update PATH so you can run jmeter from any directory:
sudo cat >> /etc/profile.d/jmeter.sh <<'EOF'
export JMETER_HOME=/opt/apache-jmeter
export PATH=$PATH:$JMETER_HOME/bin
EOF
Apply the changes:
source /etc/profile.d/jmeter.shVerify JMeter is accessible globally:
which jmeterExpected output:
/opt/apache-jmeter/bin/jmeterCheck the installed version:
jmeter --versionIf JMeter is correctly installed, the terminal will display the JMeter ASCII logo followed by the version number, such as Version 5.6.3.
Step 6: Launch JMeter and Run Your First Test
Launch JMeter in GUI Mode
Start the graphical interface with:
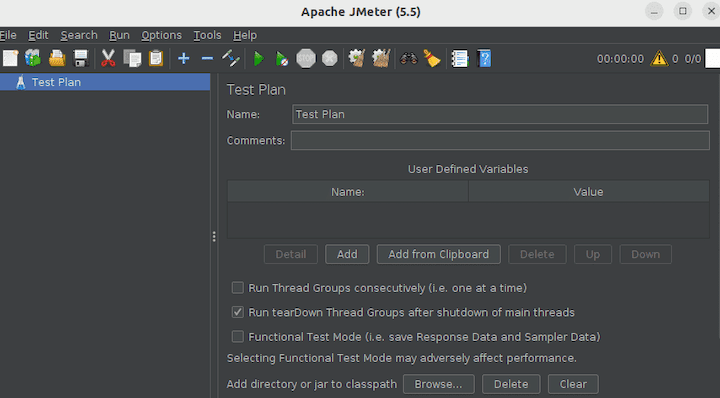
jmeterThe JMeter GUI window will open with an empty Test Plan in the left panel. The GUI is useful for building and debugging test plans. However, you should never run actual load tests in GUI mode. The GUI consumes significant resources and will produce inaccurate results because system overhead from the interface directly competes with the test threads.
Use GUI mode for these tasks only:
- Building and editing test plans (
.jmxfiles) - Recording HTTP sessions via the proxy recorder
- Debugging samplers and viewing results interactively
Run Tests in CLI (Non-GUI) Mode
For all real load testing, use CLI mode (also called Non-GUI mode). This is the correct way to configure Apache JMeter on Debian 13 for production-grade performance testing.
The basic command structure is:
jmeter -n -t /path/to/testplan.jmx -l /path/to/results.jtlFlag reference:
| Flag | Purpose |
|---|---|
-n |
Run in Non-GUI (CLI) mode |
-t |
Path to your JMX test plan file |
-l |
Path to the JTL log file for storing results |
-e |
Generate an HTML dashboard report after the test |
-o |
Output directory for the HTML report (must be empty) |
To run a test and automatically generate an HTML report:
jmeter -n -t /home/user/testplan.jmx -l /home/user/results.jtl -e -o /home/user/report/Open /home/user/report/index.html in a browser to view the full test dashboard with response time graphs, throughput data, and error rate summaries.
Optimize JMeter Heap Memory for Large Tests
The default JMeter heap size is 1 GB. On a Debian 13 server with 8 GB or 16 GB of RAM running high thread counts, that limit will cause OutOfMemoryError crashes mid-test.
Increase the heap before launching a test:
export JVM_ARGS="-Xms2g -Xmx4g -XX:MaxMetaspaceSize=256m"
jmeter -n -t testplan.jmx -l results.jtl-Xms2g— sets the initial heap to 2 GB-Xmx4g— sets the maximum heap to 4 GB-XX:MaxMetaspaceSize=256m— caps the metaspace to prevent unbounded class metadata growth
As a general rule, set -Xmx to no more than 75% of your total available system RAM.
Troubleshooting Common Issues on Debian 13
Even with a clean installation, a few issues come up repeatedly. Here are the five most common problems and their verified fixes.
1. “java: command not found” when launching JMeter
Java is not installed or PATH is not updated. Run sudo apt install openjdk-21-jdk -y and then source /etc/profile.d/java.sh.
2. “Permission denied” when running jmeter.sh
The script lost its execute permission. Fix it with:
chmod +x /opt/apache-jmeter/bin/jmeter3. GUI fails to open on a headless Debian 13 server
Headless servers have no display environment. This is expected behavior and not a bug. Always use CLI mode on servers:
jmeter -n -t testplan.jmx -l results.jtl4. OutOfMemoryError during test execution
The default 1 GB heap is too small. Set JVM_ARGS before running the test as shown in the optimization section above.
5. “JAVA_HOME is not defined correctly” warning at startup
JMeter found a symlink rather than the real JDK path. Use this command to get the correct path and update your /etc/profile.d/java.sh:
readlink -f $(which java)Strip /bin/java from the end of the output and use the remaining path as your JAVA_HOME value.
Congratulations! You have successfully installed Apache JMeter. Thanks for using this tutorial for installing Apache JMeter on Debian 13 “Trixie” system. For additional help or useful information, we recommend you check the official Apache website.
[su_box title=”VPS Manage Service Offer” style=”bubbles” box_color=”#000000″ radius=”10″]If you don’t have time to do all of this stuff, or if this is not your area of expertise, we offer a service to do “VPS Manage Service Offer”, starting from $10 (Paypal payment). Please contact us to get the best deal![/su_box]