
Install Stacer on Ubuntu 26.04 when you want a simple GUI tool to monitor system load, clean junk files, manage startup apps, and inspect services without jumping between many terminal commands. In this guide, I will walk you through a clean Stacer on Ubuntu 26.04 setup the same way a senior sysadmin would approach it, with clear commands, practical checks, and reasons for every step. You will also learn how to configure Stacer on Ubuntu 26.04 after installation, plus what to do when the package does not install cleanly.
Stacer is useful, but it is not magic. The upstream project notes that development has been abandoned, so the safest approach is to install it carefully, verify the package source, and keep expectations realistic on a modern Ubuntu desktop or workstation. That matters even more on Ubuntu 26.04 LTS, where package behavior, dependencies, and desktop integration should be handled with care.
Prerequisites
Before you start, make sure you have the right setup.
- OS version: Ubuntu 26.04 LTS, or a compatible Ubuntu-based desktop system.
- Permissions: A user account with
sudoaccess. - Tools needed: Terminal access, internet connection, and either the Ubuntu package manager or the official Stacer
.debrelease. - Recommended check: A desktop environment, because Stacer is a GUI tool.
- Optional:
wgetorcurlif you plan to download the release package manually.
Step 1: Update your system
Why this comes first
A package install works best when your package list is fresh. Updating first helps Ubuntu see the latest repository metadata, so dependency checks happen correctly and you avoid common install failures.
Run the update command
sudo apt updateExpected output
Hit:1 http://archive.ubuntu.com/ubuntu ...
Reading package lists... Done
What this does
This command refreshes Ubuntu’s package index. It does not upgrade your apps yet, but it prepares the system so the next install command can resolve packages cleanly.
Optional upgrade step
sudo apt upgrade -yThis updates installed packages to current versions. I recommend it because a clean base system lowers the chance of dependency conflicts during a Linux server tutorial style setup, even on a desktop machine.
Step 2: Check whether Stacer is available
Why you should check first
On Ubuntu, the cleanest install path is usually the native package manager. If Stacer is already in the Ubuntu archive for your release, that method is simpler than manually downloading a package.
Search the package
apt search stacerOr inspect package policy
apt policy stacerExpected output example
stacer:
  Installed: (none)
  Candidate: 1.x.x
  Version table:
     1.x.x 500
What this tells you
If Ubuntu shows a candidate version, you can install directly with APT. If it does not, move to the .deb method below.
Step 3: Install Stacer from the Ubuntu repository
Why this is the preferred method
APT manages dependencies for you, keeps the package registered with the system, and makes future removal easier. That is usually safer than manual package handling, especially for users who want a low-friction How To Install Stacer on Ubuntu 26.04 workflow.
Install the package
sudo apt install stacer -yExpected output
Reading package lists... Done
Building dependency tree... Done
The following NEW packages will be installed:
  stacer
What this command does
It installs Stacer from the configured Ubuntu repositories and resolves any needed dependencies automatically. That is important because a GUI utility can fail to launch if a library is missing.
Why this matters
This method gives you the cleanest package lifecycle. It is the best first choice for most desktop users and developers who want a reliable Stacer on Ubuntu 26.04 setup without extra manual steps.
Step 4: Install Stacer from the official .deb package
Why you need a fallback
Sometimes the Ubuntu repository version is missing, outdated, or not present in your exact release path. The official .deb release gives you a direct install option from the project’s release assets.
Download the package
Go to the official Stacer releases page and pick the correct .deb file for your architecture. The release history shows amd64 packages, which is the normal choice for most modern Ubuntu desktops.
If you prefer the terminal, use a direct download URL only when you have verified the current release name on the official page.
wget <official-stacer-deb-url>Install the package
sudo apt install ./stacer*.debExpected output
Preparing to unpack ...
Unpacking stacer ...
Setting up stacer ...
Why use apt install ./file.deb
This method is better than plain dpkg -i because APT can fetch missing dependencies if needed. That reduces broken installs and saves troubleshooting time.
Alternative command
sudo dpkg -i stacer*.deb
sudo apt -f install
Use this only if you already downloaded the package and want to repair dependencies afterward. It works, but it is less convenient than the APT route.
Step 5: Launch Stacer for the first time
Why this step matters
An install is not complete until the app opens correctly. Launching it confirms that the binary, desktop entry, and required libraries all work together.
Start from the terminal
stacerExpected output
Stacer window opensOr launch from the desktop menu
- Open the application launcher.
- Search for Stacer.
- Click the icon to open it.
What to look for
You should see a dashboard with system stats such as CPU, memory, and disk usage. That tells you the GUI is connected to your system correctly and can read live data.
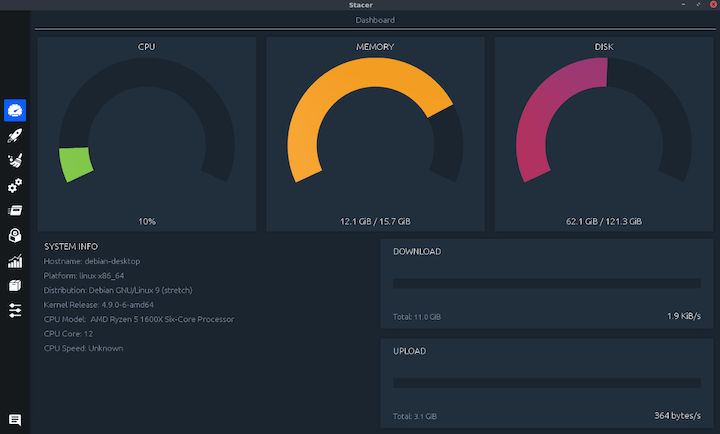
Step 6: Configure Stacer on Ubuntu 26.04
Why configuration matters
Default settings are fine for many users, but a sysadmin should tune the tool to match the machine’s role. That helps you avoid unnecessary startup load and prevents you from cleaning data you still need.
Review startup apps
- Open the startup section.
- Disable items you do not need at login.
This reduces boot overhead and helps desktops feel faster.
Review services
- Open the services panel.
- Check only services you understand.
This matters because disabling the wrong service can break networking, printing, or desktop support tools.
Review cleaner options
- Inspect cache, temporary files, and logs before cleaning.
- Remove only what you understand.
This protects you from deleting useful state or troubleshooting data.
Why this is the right approach
Stacer is a convenience tool, not a replacement for deep system admin work. Use it to save time, but keep a cautious mindset, especially on production or shared systems.
Step 7: Verify the installation
Why verification is important
Verification confirms the package was installed correctly and is visible to the system package database. It also helps you separate package issues from desktop launcher issues.
Check the package
dpkg -l | grep stacerOr check the binary path
which stacerExpected output
ii stacer 1.x.x amd64 System optimizer and monitoring toolWhat this means
If the package appears in dpkg, the install succeeded. If the binary is missing, the package may not have installed correctly or the release may not match your architecture.
Step 8: Understand Stacer’s main features
Why this section helps
A lot of users install a tool and never use half of it. Knowing the main panels helps you get value from the app immediately.
Core areas to explore
- Dashboard: Gives you a quick view of CPU, RAM, and disk activity.
- System cleaner: Helps remove temporary files and caches.
- Startup apps: Lets you control what runs at login.
- Services: Lets you inspect background services.
- Processes: Lets you see running tasks and resource usage.
- Uninstaller: Lets you remove packages more easily.
Why these features matter
The dashboard helps with quick checks. Cleaner and startup control help with routine maintenance. Processes and services help you find resource problems faster than digging through multiple terminal commands.
Step 9: Common mistakes to avoid
Why caution matters
System utility tools feel simple, but they can still cause trouble when used blindly. A cleanup action that looks harmless can remove files you still need.
Avoid these mistakes
- Do not disable services unless you know what they do.
- Do not delete logs if you still need troubleshooting history.
- Do not assume every cache file is safe to remove.
- Do not install random third-party builds.
Why this matters
The fact that Stacer is abandoned upstream makes caution even more important. You want predictable behavior, not surprise changes from an unmaintained tool.
Troubleshooting
1. Package not found
If Ubuntu says it cannot locate stacer, refresh package metadata first.
sudo apt updateIf the package still does not appear, use the official .deb release instead. This usually means the package is not present in your current repository set.
2. Dependency errors after .deb install
If the install stops with missing packages, repair them with:
sudo apt -f installThis command asks APT to resolve broken dependencies. That is why it is often the next step after dpkg -i.
3. Stacer will not open
If the app refuses to launch, check whether your desktop session has the needed GUI support. Also confirm the package matches your system architecture.
4. Desktop icon does not show up
Log out and log back in, or search for the app name manually. Some desktop environments cache launcher entries, so the icon may appear late even after a successful install.
5. Services or cleaner panels show limited data
This can happen on minimal systems or systems with restricted permissions. Run the app with the same user you used during install and make sure sudo access is available for admin tasks.

